Creating Launch Pages With the Publish Utility
You can use the Publish utility to create a launch page
for any report listed in the Standard Reports folder. By right-clicking
a Standard Report and selecting the Publish option,
or by clicking the Publish button on the
toolbar when working in the applet, you can open the Publish Standard
Report dialog box to access the Publish utility.
The Publish utility contains the following tabs:
- Publish
- Template
- Background
Note: When using the Publish Utility to make launch pages
available outside of Managed Reporting, there are security settings
you should be aware of, including the MR_ANONYMOUS_RUN_ACCESS and
the MR_AUTOSIGNON settings. For more information, see Managed
Reporting Settings in the WebFOCUS Administration Console in the WebFOCUS
Security and Administration manual.
x
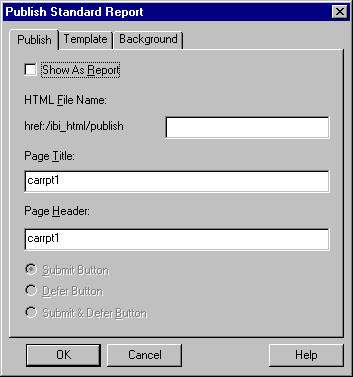
You
can use the Publish tab to create a basic HTML launch page for your
Standard Report. The Publish tab displays the Show as Report check
box, which is unselected by default, followed by three text boxes,
HTML File Name, Page Title, and Page Header. There are also three
options that are disabled, Submit Button (selected by default),
Defer Button, and Submit & Defer Button. WebFOCUS uses the Standard
Report's name as the default text in the Page Title and Page Header
fields. However, you must supply a name for the launch page in the
HTML File Name field. To make the launch page available outside
of Managed Reporting, leave the Show as Report check box unchecked.
The following image shows an example of the Publish tab for a Standard
Report named carrpt1.
If a Standard Report has the Only run as a Deferred
Report property selected, the report cannot be published
outside of Managed Reporting, and the Defer Button is selected by
default.
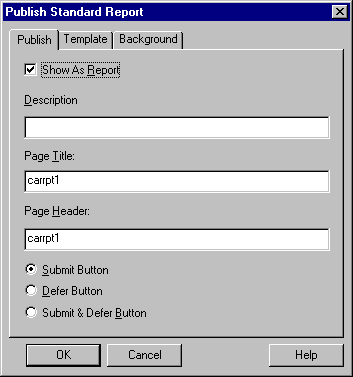
If you select the Show as Report check box, the launch page will
be created within Managed Reporting as a Standard Report, and three
options are enabled to add a Submit button, a Defer button, or both
Submit and Defer buttons to the launch page. The Standard Report
name is used as the default text in the Page Title and Page Header
fields, and you must supply a name for the launch page in the Description
field.
Note: For more information about Standard Report properties,
see the WebFOCUS Managed Reporting Administrator's Manual.
x
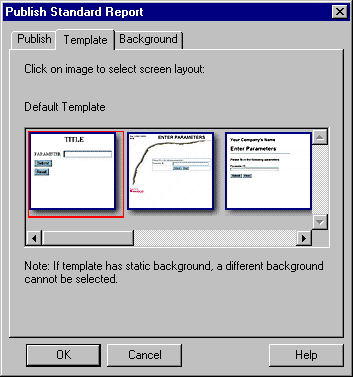
The Template tab, shown in the following image, contains
predefined HTML screen layouts. Use the horizontal scroll bar to
view a thumbnail image of each template. When you decide on a template,
click its image.
x
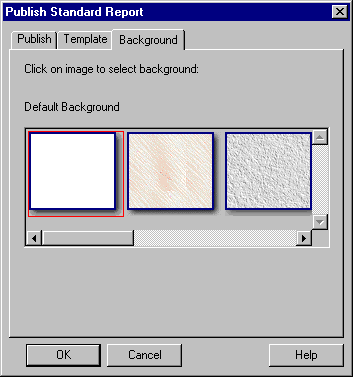
The Background tab contains predefined images that appear
in the background of the launch page. Use the horizontal scroll
bar to view a thumbnail image of each background. When you decide
on a background, click its image.
Note: WebFOCUS will not apply a background to a template
that includes a static background. (There are several types of static
backgrounds from which you can choose in the Template tab.) When
a template with a static background is selected, the Background
tab is disabled.
x
Procedure: How to Publish a Standard Report
-
Expand
the Standard Reports group folder that contains the report you want
to publish.
-
Right-click
the Standard Report and select Publish. In
the applet, click the Publish button on the
Toolbar, or right-click the report and select Publish from
the shortcut menu. The Publish dialog box opens.
Note: The Show as Report check box is not selected
by default.
-
To save the launch page to the /ibi_html/publish
directory, which makes it available outside of Managed Reporting:
-
Type a name for the page. WebFOCUS
adds the .htm extension to the file name.
Note: The
following characters are replaced with an underscore within the
file name specified for the page: - (hyphen), $ (dollar sign), % (percentage),
\ (backslash), + (plus sign), ! (exclamation point), and ^ (up arrow).
Caution: Make sure you supply
a unique name for the published report. If your report has the same
name as an existing published report, WebFOCUS overwrites the existing
published report.
-
In the Page Title input box, type a
title for the page. If you do not specify a title, WebFOCUS uses
the original report name as the title.
-
In the Page Header input box, type
a header for the page. If you do not specify a header, WebFOCUS
uses the original Standard Report name as the header.
-
To save
the launch page as a Standard Report and allow users to access the
page from within the (Managed Reporting) Domains reporting environment:
-
Select the Show as Report check box.
This enables the launch page options that appear in the lower-left
corner. The Submit button is enabled by default.
To create a Defer button on your launch page, click Defer Button.
To
create a Submit button and a Defer button on your launch page, click Submit
& Defer Button.
Note: If you select
the Defer or Submit & Defer button
and uncheck Show as Report, the option buttons
will be reset to their default setting (Submit button).
-
Type a name for the page. WebFOCUS uses only the first eight characters
and adds the .htm extension to the file name.
-
In the Page Title input box, type a title for the page. If
you do not specify a title, WebFOCUS uses the original Standard
Report name as the title.
-
In the Page Header input box, type a header for the page. If
you do not specify a header, WebFOCUS uses the original Standard
Report name as the header.
-
Click
the Template tab and select a template. (This
step is optional.)
To select a template, position the red selection box around
the template image by clicking the image.
-
Click
the Background tab and select a background.
(This step is optional.)
To select a background, position the red selection box
around the background image by clicking the image.
-
Click the Publish tab
and click OK.
If you
did not select the Show as Report box, WebFOCUS
saves the page to the /ibi_html/publish directory. Users can run
this report by typing the URL for the page in a browser.
If you selected the Show
as Report box, WebFOCUS saves the page to the Domain's
app directory. Users can run this report from the Standard Reports
tab in the Domains View.
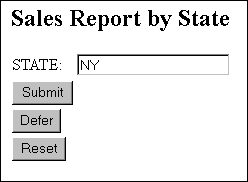
Example: Running a Published Standard Report
The
following image displays a published launch page of a Standard Report.
You are prompted to enter a value for the product category. Since
the Show as Report check box and the Submit & Defer Button were
selected, you can submit the report to run immediately or as a deferred
report.