Virtual Fields (DEFINE Statements)
A virtual field is a field whose value is not stored
in the data source but can be calculated from the data that is
there. A virtual field takes up no storage space. It is created
only when a user accesses the Reporting Object that includes
the virtual field.
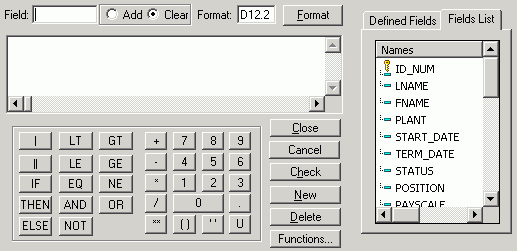
You use the Define Tool to create a virtual field. Using this
tool, you specify the virtual field name, format, and the expression
that defines the field. An expression enables you to combine
fields, constants, predefined functions, and operators into an operation
that produces a single value. For more information about defining
fields, see the Creating Reporting Applications With
Developer Studio manual.
When you define a virtual field, you must specify a field
format type, length, and appropriate display options.
x
Procedure: How to Create a Virtual Field
-
Expand
the Reporting Object in which you want to add a virtual field.
-
In the
browser, select the Define folder and
click the Open button in the Reporting
Object window. The Define Tool dialog box opens and displays
any existing defines.
-
In the
browser, click New Define.
In Developer Studio, right-click the Define folder
and select Open in the Reporting Object
window.
The following dialog box opens (this dialog
looks slightly different in the browser).
-
In the
Field box, type the name of the virtual field.
-
In the
Format box, type a field format.
For detailed information about field formats, see
Field Formats.
-
In the
input box below the field name, type the expression that defines
the virtual field.
-
Click
OK to save the virtual field, close the
Field Creator, and return to the Define Tool.
-
In the
Define Tool window, click OK to close
the tool.
You return to the Reporting Object window. The virtual
field now appears in the field list when a user accesses this Reporting
Object.
If you
have finished working with the components of the Reporting Object, remember
to click Done in the Reporting Object window to save the changes.
Note:
- In the browser, syntax and error
checking are not performed on the commands you enter until the Reporting
Object is executed. In Developer Studio, you can click the Check
button to check your syntax. If a DEFINE field is created with invalid
syntax, it will not display for the user in the Report Assistant
or Graph Assistant.
- In the browser, the field list shown
in the Reporting Objects DEFINE tool is not updated to display new
virtual fields until you exit from the DEFINE tool and reopen it.
If you are creating a virtual field (DEFINE statement) that
uses a previously created virtual field in the expression, you
must save the first virtual field before creating the second
one. To save the first virtual field, exit from the DEFINE tool
by clicking the OK button. Reopen the
DEFINE tool to create the second field. Alternatively, you can
type in the name of the first virtual field in the expression instead
of selecting it from the field list. In this case, you do not
need to exit and reopen the DEFINE tool.
- Since every procedure creates a
new session on the Reporting Server when it is run, the duration
of your connection is always limited to a single procedure.
Therefore, any Define issued at the beginning of a procedure
will be in effect only for those report requests that are called
in the same procedure.
x
Procedure: How to Edit a Virtual Field
-
Expand
the Reporting Object in which you want to edit a virtual field.
-
Right-click
the Define folder and select Open in
the Reporting Object window.
- In the browser,
the Define Tool dialog box opens and displays any existing virtual
fields. Select the virtual field you want to edit and click
Edit Define.
- In Developer
Studio, from the Defined Fields tab, select the virtual field
you want to edit.
The Field Creator dialog box
opens, displaying the expression for the selected field.
-
Make
changes to the field expression or format and click OK.
The Field Creator dialog box closes and you return
to the Define Tool.
-
Click
OK to exit the Define Tool.
WebFOCUS saves the change and returns you to the Reporting
Object window.
If you
have finished working with the components of the Reporting Object, remember
to click Done in the Reporting Object
window to save the changes.
Note: Syntax and error
checking are not performed on the commands you enter until the
Reporting Object is executed.
x
Procedure: How to Delete a Virtual Field
-
Expand
the Reporting Object in which you want to delete a virtual field.
-
In the
browser, select the Define folder and
in the Reporting Object window, click the Open button.
In Developer Studio, right-click the Define folder
and in the Reporting Object window, select Open.
In the browser, the Define Tool dialog box opens
and displays any existing virtual fields.
-
Delete your virtual field:
-
In the browser, select the virtual
field that you want to delete and click the Delete
Define button.
In Developer
Studio, click the Defined Fields tab and select
the virtual field you want to delete. Click the Delete button.
-
Click OK to
verify the deletion.
WebFOCUS deletes the virtual
field and returns you to the Reporting Object window.
If you have finished working with
the components of the Reporting Object, remember to click Done in
the Reporting Object window to save the changes.
x
You must specify a field format for every virtual field
you create. You assign a format based on the values that the virtual
field will hold. The field format specifies the following information:
- The field type,
which indicates whether the field value will contain an alphanumeric,
numeric, or date value.
- The field length,
which determines the maximum number of positions an alphanumeric
or numeric field value can contain.
- Options that
affect how a numeric or date field value will appear in reports.
You can specify the format type, length, and appropriate display
options in the Format input box in the Define Tool dialog box, or
you can use the Change format dialog box to assist you in defining
the field format as shown in the following image. The following procedure
describes how to use this dialog box.
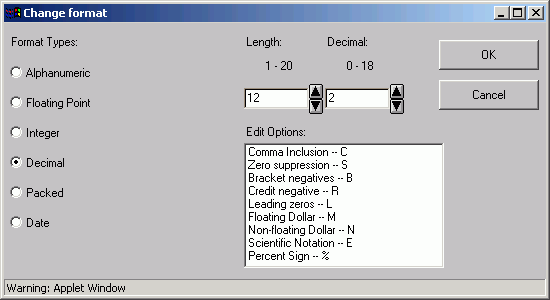
In this dialog box, you can select format attributes from list
boxes instead of typing the required syntax.
x
Procedure: How to Specify a Field Format
-
In the
Field Creator window, click Format to
open the Change format dialog box.
-
In the
Format Types list, select the radio button to the left of the format type
you want to assign to the virtual field.
The default length for the format type appears in the
Length box.
-
If you
want to change the format length, type a new value in the Length box
and the Decimal box.
Note: The Decimal box appears only for the Floating
Point, Decimal, and Packed format types.
-
If the
Format Type is numeric or date, specify any report display options.
- For numeric
format types, select one or more options in the Edit Options list
box.
- For the Date
format type, type the display option code in the Date Format box.
-
Click OK.
The Change
format dialog box closes and you return to the Field Creator.
The virtual field will have the field format you just specified.
Note: Syntax and error checking
are not performed on the commands you enter until the Reporting
Object is executed.
x
There are three types of field formats: alphanumeric,
numeric, and date.
-
Alphanumeric.
Assigns the Alphanumeric format to values composed of any combination
of alphabetic, numeric, or special characters, up to 256 characters
in length. You can concatenate alphanumeric values, but you cannot perform
mathematical operations on an alphanumeric field, even if the
field value is composed of numeric characters.
Note: If
you define an alphanumeric DEFINE field to a constant value without
enclosing the value within single quotation marks, WebFOCUS
does not list the field in the Field List window for Report Assistant,
Graph Assistant, and Advanced Graph Assistant.
-
Numeric. Assigns
a numeric format to values composed of the digits 0 through 9
and a minus sign or a decimal point. You can perform mathematical operations
on numeric values. There are four specific numeric formats:
|
Format
|
Description
|
|---|
|
Integer (I)
|
Integer format can consist of a maximum
of 11 positions, counting the digits and an optional minus sign. Use
this format for whole number values; the value cannot contain a
decimal point.
|
|
Floating Point (F)
|
Floating Point format can consist of
a maximum of 9 positions, counting the digits, a minus sign, and
a decimal point. Use this format for whole numbers or fractional
values. For larger numbers, use the Decimal or Packed formats.
|
|
Decimal (D) and Packed (P)
|
Decimal and Packed formats can consist
of a maximum of 20 positions, counting the digits, minus sign,
and a decimal point. Use this format for whole numbers or fractional
values that are larger than the maximum value for a Floating
Point value.
|
For numeric formats, you can also
specify how the field will appear in reports. Note that the characters
added by these display options count toward the maximum number
of positions a field can hold. For more information on numeric
format options, see the Describing Data With WebFOCUS Language manual.
-
Date. Assigns
the Date format to values that represent a date or date component.
You can add or subtract values in the date format.
For Date
formats, you can specify how the values that represent a date
or date component are stored and displayed. For more information
on date format options, see the Describing Data With WebFOCUS Language manual.