Reporting Objects are stored in the Reporting Objects
folder. The Reporting Objects folder contains simple views of
your data that users access to create their own reports. You begin
creating a Reporting Object by first defining a Reporting Object group
folder. You organize the Reporting Objects under group folders.
After you define a group folder, you define one or more Reporting
Objects in that folder. The Reporting Objects that you create
can include selection criteria (WHEREs), JOINs, virtual fields
(DEFINEs), Filters, and other FOCUS statements, as well as Reports and
Graphs, which you supply as templates. You use these Reporting
Object components to define the Reporting Objects that are available
to the Managed Reporting user environment.
x
Procedure: How to Create a Reporting Object Group Folder and Subgroup Folder
-
In either
Developer Studio or the Managed Reporting Applet Domain Builder,
expand the domain in which you want to add a Reporting Object by clicking
the plus sign (+) next to the domain name.
-
Right-click
the Reporting Objects folder and:
- In Developer Studio,
select New Group. A new folder named New
Folder appears in the right pane.
- In Domain Builder,
select New Reporting Object Group. The New
Reporting Object Group dialog box opens.
-
Name
the new group folder, as follows:
-
To create
a new Reporting Object subgroup folder, right-click the Reporting
Object group folder and:
-
To name
and save the folder, see Step 3.
The new Reporting Object subgroup folder appears under the
Reporting Object group folder.
x
Procedure: How to Define a Reporting Object
After you have defined the Reporting
Object group folder, you can create the actual Reporting Object.
-
In the
browser, right-click a Reporting Object group folder, select
New Reporting Object, then New
Reporting Object.
In Developer Studio, right-click a Reporting Object
group folder, select New Reporting Object,
and then Reporting Object.
The
New Reporting Object dialog box opens, as shown in the following
image.

-
In the
Name field, type a descriptive name for the Reporting Object.
-
Optionally,
check Server and choose a server from
the drop-down list.
-
Optionally,
check Application Path to choose your
application and override the server default search path.
See Working With the Server and Application
Path Properties in the Creating Domains section of the WebFOCUS
Managed Reporting Administrator's Manual.
Note: You
must have the Data Server privilege to change the Server and Application
Path.
-
In the
Data File field, type the name of a data description to be associated
with the Reporting Object.
You can also click File to
browse the available files. Select the data description and click
OK to return to the New Reporting Object
dialog box.
-
WebFOCUS
offers the following optional features when creating your Reporting
Object:
- If you check
the Prompt for Parameters check box,
WebFOCUS prompts the user to supply a value (parameter) when
the Reporting Object is used to create a My Report.
- If you check
Show as Standard Report, WebFOCUS lists
the Reporting Object under the Standard Reports tab in addition
to the Reporting Objects tab in the Domains reporting environment.
A user can then run the Reporting Object as if it was a Standard
Report.
- If you check
Show Only as Standard Report, WebFOCUS
will only display the Reporting Object under the Standard Reports
tab in the Domains environment.
Caution: When you create
a Reporting Object, do not click the Report Painter button
on the Report Assistant window unless you also check Show
Only as Standard Report on the New Reporting Object
window. You cannot open Reporting Objects created with Report Painter
with the Report Assistant in Managed Reporting. However, you can
run a Reporting Object when it is shown as a Standard Report.
- If you check
Run with OLAP and you have OLAP-enabled
the Reporting Object, users can run the Reporting Object using
OLAP capabilities.
- If you check
Only run as a Deferred Report, WebFOCUS
always submits this report in deferred mode.
See the WebFOCUS Managed Reporting End User's Manual for
more information.
- If you check
Use InfoAssist to create components, then
InfoAssist will be the only Reporting tool available from the
drop-down list to open this Object in Business Intelligence Dashboard.
-
Click
OK.
The Managed Reporting Domain Builder in the browser
displays the new group folder and Reporting Object.
Note: You
may be prompted for WebFOCUS Server credentials when you click
the File button or OK button, depending
on your environment.
x
Procedure: How to Review Reporting Object Properties
-
Expand
the domain that contains the Reporting Object you want to review.
-
Expand
the Reporting Objects folder and then
expand the Reporting Objects group folder that contains the
Reporting Object.
-
Right-click
the Reporting Object you want to review, and select Properties.
The Reporting Object Properties dialog box opens, as shown in
the following image.
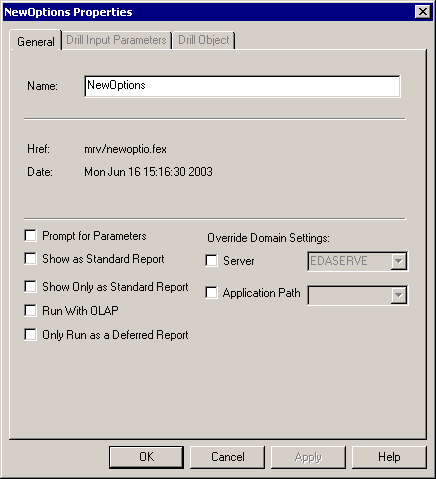
This dialog box lists the name of the Reporting Object,
the date the Reporting Object was created, the file name for the
Reporting Object, and the HTML launch page that can be used to run
the Reporting Object.
-
To:
- Change the Reporting
Object name, type a new name in the Name input box.
- Select amper
auto prompting, check the Prompt for Parameters check
box.
- Display as a
Standard Report, check Show as Standard Report.
- Display only
as a Standard Report, check Show Only as Standard Report.
- OLAP-enable
the report, check the Run with OLAP check
box.
- Only run the
report in deferred mode, check the Only run as Deferred
Report check box.
- Select a server,
check the Server check box, and select
a server from the drop-down list.
- Select an application,
check the Application Path check box.
Select an application from the drop-down list. In the browser,
click the ellipsis button to open a separate window that lists
the applications from which you can select. See Working
With the Server and Application Path Properties in the Creating Domains section
of the WebFOCUS Managed Reporting Administrator's Manual.
-
Click
OK to save your changes or click
Cancel to discard your changes.
xCutting or Copying and Pasting a Reporting Object
When
you copy or cut and paste a Reporting Object, Managed Reporting
evaluates the request based on the destination location and whether
or not the internal name and/or the display name of the source file
exists in the destination location. When you paste a Reporting Object,
one of the following scenarios occur:
- If you are
pasting within the same domain and the same folder, then the new file
is created with a new internal name and a copy number is appended
to the new file tree name, for example, Sales Summary (Copy1).
- If you are
pasting within the same domain, but to a different folder, then
the Confirm Create New File dialog box opens notifying you that
the internal name of the file you are copying already exists in
the destination location.
- If you are
pasting to a different domain and the internal name exists in
the destination location, then the Confirm File Replace dialog
box opens with the option to either copy the source file and create
a new internal name, or overwrite the existing file with the content,
properties, and name of the source file.