In this section:
How to: |
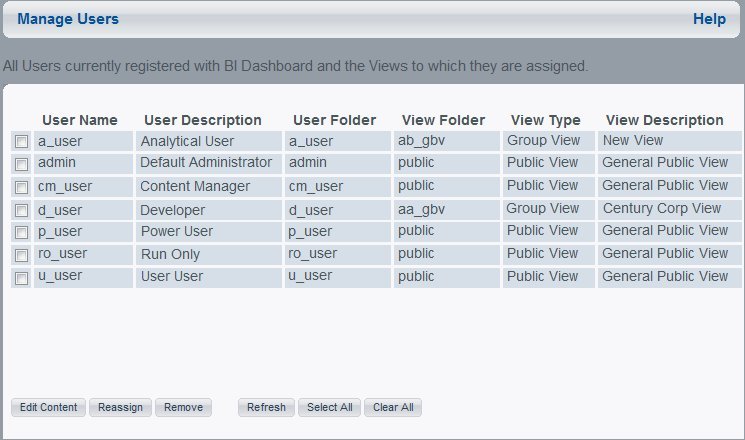
You can manage user views (public, group, and personal) from the View Builder. The Manage Users option allows you to view, update the content of a personal page, and change the appearance of their Dashboard views.
The following image shows the Manage Users Window.
The Manage Users window provides the following information:
The Content Window opens.
Note: You can only edit content for one user at a time.
When you replace content, the users still have access to all of the domains (and the items in those domains) they are assigned to. Only Dashboard specific items, such as content pages and content blocks, are replaced. The Favorites and Recent lists of users are cleared when you select the Replace User Content with View Content check box.
This procedure only removes the user from Dashboard, not Managed Reporting. If a user is logged on to Dashboard when you remove the user from Dashboard using the View Builder Manage Users page, a HTTP 500 error is displayed in the browser window. If the user logs on to Dashboard again, the user will appear in Manage Users list again.
How to: |
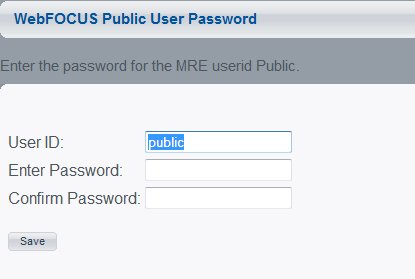
You can choose to restrict access to a public user for WebFOCUS Managed Reporting by setting a password when the public user is created. The password must also be stored in Dashboard to allow the user to view the public pages without entering a password. Setting a password is optional, but if a password is set in WebFOCUS Managed Reporting, it must also be set in Dashboard to the same value.
Dashboard administrators can select a specific Managed Reporting user ID and password other than the public user ID and password used to access Dashboard Public views.
When a Public view opens in a browser, Dashboard logs into Managed Reporting with a default user ID and password that you can set in the View Builder. The public user ID and password are stored in the file:
ibi\WebFOCUS77\worp\conf\worp_mre.mpd
If a user attempts to login from the Dashboard login page with the Managed Reporting user ID that has been designated as the public user in Dashboard, a message (19102) appears.
When public user credentials are changed outside of Dashboard, the changes must be propagated to Dashboard using the View Builder. Public user credentials include the user ID and password that connect the public user to Managed Reporting or the WebFOCUS Reporting Server. If the changes are not reflected in the View Builder, the public user cannot use the updated credentials when connecting to Dashboard.
Dashboard issues public sign-on requests when a public page is opened and any or all of the following conditions are met:
Note:
Note: The user ID and password are stored in encrypted format in the worp_mre.mpd file in the WebFOCUS77/worp/conf directory.
How to: |
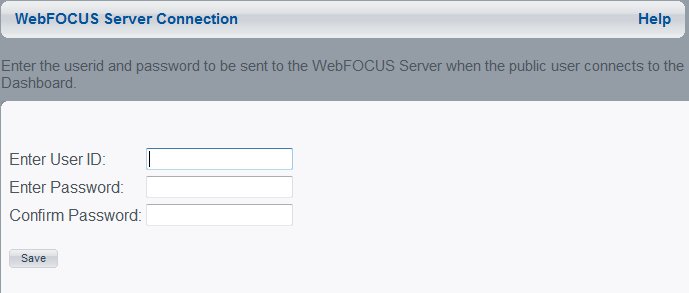
In the View Builder, you can set a user ID and password so the public user can connect to the default WebFOCUS Reporting Server without having to enter login information. Although a user ID and password is optional, it is required to allow public access to the default WebFOCUS Reporting Server through Dashboard without requiring a login window. For details on setting the WebFOCUS server user ID and password in the server profile files, see the WebFOCUS Security and Administration manual.
The user ID and password entered here will be used for connecting to the default WebFOCUS Reporting Server. To set a different user ID and password to connect to alternate servers, the user ID and password must be set in the server profile. For more information, see the WebFOCUS Security and Administration manual.
Note:
The following image shows the WebFOCUS Server Connection window containing text boxes for User ID, Password, and Confirm Password.
The user ID and password are stored in encrypted format in the worp_eda.epd file in the directory WebFOCUS77/worp/conf.
| WebFOCUS |