Change Management Extract Utility

In this section:

How to:

Reference:

Many organizations do not grant developers write access to the user acceptance test and production environments. Access to these environments is controlled and granted only to administrators or automated change management processes (or both). Only developers know which changes are ready to be moved into test. The Change Management Extract Utility presents developers with a graphical view of the Managed Reporting domains they manage and allows them to build a change package. This package is then loaded into another environment by a Managed Reporting Administrator using the Change Management Load Utility or the (Java) Load Program named IBILoadRepos.

Note: The Change Management Extract Utility only extracts Domain content, not My Reports or Custom Reports.


Top of page

x
Procedure: How to Access and Use the Change Management Extract Utility
  1. Launch the WebFOCUS Welcome Page in the environment where you want to create a change package with the Change Management Extract Utility
    http://hostname[:port]/ibi_apps/

    where:

    hostname[:port]

    Is the name of the Web server and optional port number (specified only if you are not using the default port number) where the WebFOCUS Web application in the desired environment is deployed.

  2. Click the Managed Reporting Change Management Extract link.
  3. Type your Managed Reporting Administrator or Developer user ID and password and click Logon.

    The Change Management Extract Utility loads and displays the Domains to which the developer or administrator has access.

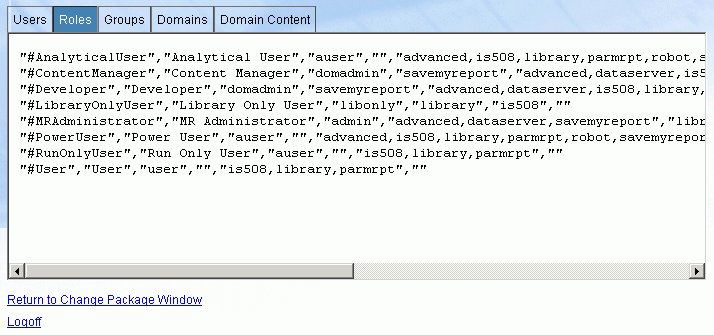
    The following image shows the Change Management Extract Utility available to administrators, which displays the Domains Tree pane on the left and the Selected Files and Domains pane on the right. The available options include Download File (default) and Save on Server.

    Change Management Extract Utility Window

    Note: The Display Repository Metadata button only displays for administrators. For more information, see Extracting Repository Metadata.

  4. Expand the folders in the Domains Tree pane. You can select individual items from a domain or the contents of an entire domain for your change package.

    You can single-click (or drag and drop) one or more items from a domain. You can also select the domain help and profile files.

    You can also double-click (or drag and drop) a domain to conveniently select all of the content from this domain. Properties of the domain, for example, its Server and/or Application Path, are not propagated by the change management process. Note that a selected domain is a collection of the domain content, not a complete clone of the original domain.

    When you select an item or domain, it appears in the Selected Files and Domains list. If you select duplicate items or domains, they are only added to the change package once. You should not select individual items from a domain that is already selected.

  5. If you need to remove an item or domain from the Selected Files and Domains list, select the item and press the Delete key.

    To remove all items and domains from the Selected Files and Domains list, click the Clear File List button.

  6. By default, the Download File option is selected. Click Create Change Package to download the change package to your browser. You will then have the option to open it or save it locally, as shown in the following image.

    File Download options Window

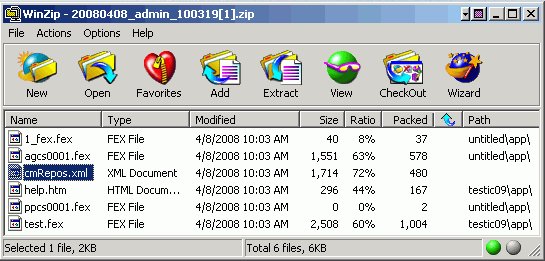
    The naming format for the change package is: YYYYMMDD_admin_HHMMSS.zip. The format is Java Zip (which is WinZip compatible). If you have WinZip installed locally, open the change package. To ensure that the Change Management utility recognizes the file and processes it correctly, do not change the file name or the .zip file extension.

    The contents of the change package includes the extracted files and a cmRepos.xml document that contains metadata about the files, such as their internal references and properties, as shown in the following image.

    WinZip Interface Window

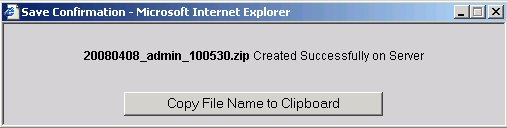
    If you select the Save on Server option, the following window opens to provide you with the name of the change package created on the server.

    Save Confirmation Window

    Consider whether you want developers to download and e-mail change packages to a coordinator, or create the packages on the Web server platform. Packages created on the server are written to the install_dir/WebFOCUS77/utilities/cm/extract folder. You can change this location, as follows:

    1. In the WebFOCUS Administration Console, in the left pane, select Configuration, Application Settings, then Application Paths.
    2. In the right pane, change the mrcmextractdir Parameter Value to the directory where you want change packages to be written.

      The directory specified by the mrcmextractdir setting must exist and be writable by the servlet container.

    3. Click Save.

    You may want to have developers create the package on the server, and also download and e-mail it to a coordinator. This may help audit the change process because you have a record of the intent of the Developer, and can load the packages from a controlled location.

    Note: To ensure that the contents of a change package are not altered in any way, we recommend that you always load change packages that were created on the server.


Top of page

x
Alternate Change Management Extract Program

How to:

Reference:

The following topics explain how to prepare for, and how to run, the alternate Change Management Extract program.


x
Reference: Preparing to Run the Alternate Change Management Extract Program

In some instances, you must edit utility variables, as follows:

  1. A valid Managed Reporting (MR) user ID is required. Edit the utiluservars.bat file on Windows (or the script file on UNIX systems) and set the MRADMINID to a valid MR user ID. The specified ID does not require the MR Administrator privilege. The Utility runs correctly even when the MRREPOS variable is not set.

    Note: The MRADMINID variable is also used by other MR Utilities that do require the MR Administrator privilege.

  2. Set JDBC_DRIVER_JARS, if necessary. This variable is in the utiluservars.bat file located in the WebFOCUS Client /utilities/setenv directory. When using the Realm Driver to authenticate or authorize to a relational DBMS system, you must set JDBC_DRIVER_JARS to the full path of your driver Jar files. If your driver consists of multiple files, use the semi-colon ';' as a separator on Windows and a colon ':' as a separator on UNIX.
  3. If you are using a custom Realm Driver extension, you may need to include additional Jar files in the class path of this utility. Simply append the Jar files to the JDBC_DRIVER_JARS variable, which is found in the utiluservars.bat file located in the WebFOCUS Client /utilities/setenv directory.


x
Procedure: How to Run the Alternate Change Management Extract Program
  1. Create a text file that will identify the domains or items to be extracted for the change management package. To extract an entire domain, give the domain href in the form of domain00/domain00.htm. To extract individual items, on a separate line list each item in the form of domain:item.

    For example, the contents of a file instructing the Alternate Change Management Extract Utility to extract an entire domain might look like this:

     untitled/untitled.htm

    Whereas the contents of a file instructing the utility to extract individual items might look like this:

     domain00/domain00.htm:app/item.fex
     domain00/domain00.htm:app/item.htm
     domain00/domain00.htm:app/item.css
     domain00/domain00.htm:app/item.sty
     domain00/domain00.htm:app/mrv/item.fex

    You can also extract a combination of domains and individual items:

     domain00/domain00.htm:app/item.fex
     domain00/domain00.htm:app/item.htm
     domain00/domain00.htm:app/item.css
     domain00/domain00.htm:app/item.sty 
     domain00/domain00.htm:app/mrv/item.fex
     domain01/domain01.htm
  2. Navigate to the WebFOCUS77/utilities/cm directory.
  3. Execute the cmextract.bat file (Windows systems) or cmextract file (UNIX systems). A series of messages appear:
    -------------------------------------------------
     Managed Reporting Change Management Extract Utility
     WebFOCUS Release 7
    -------------------------------------------------
    Finished.
    Press any key to continue . . .

    The change management package is extracted to the location indicated by the mcrmextractdir parameter in the WebFOCUS Administration Console. For more information, see Changing Application Settings in the WebFOCUS Administration Console in the WebFOCUS Security Administration manual. In addition, a log file, WebFOCUS77/utilities/cm/cmevent.log, is created with helpful information about the extract. Each time a package is extracted, information is appended to cmevent.log file.


x
Reference: IBIExtractRepos Usage

The underlying program that extracts change packages from a Managed Reporting Repository is written in Java and is contained in the WebFOCUS77/utilities/cm/IBIExtractRepos.jar archive file. You call the program directly (or modify the cmextract batch file) by using the following usage reference.

java [options] -cp archivepath ibi.srv.cm.IBIExtractRepos arguments

where options include:

-DinfoLogType={FILE|CON|OFF}

Optional. If you want informational messages associated with the extraction to be logged, select FILE to write them to cmevent.log in the current directory. Each time the extract program is run, messages are appended to this file. If you want these messages echoed to the command console, select CON, otherwise select OFF. Not specifying this option is equivalent to selecting CON.

-DerrorLogType={FILE|CON|OFF}

Optional. If you want error messages associated with the extraction to be logged, select FILE to write them to cmevent.log in the current directory. Each time the extract program is run, messages are appended to this file. If you want these messages echoed to the command console, select CON, otherwise select OFF. Not specifying this option is equivalent to selecting CON.

where:

archivepath

Is the full or relative path to the IBIExtractRepos.jar file and supporting files. The IBIutilcp variable, defined in utilprodvars.bat (or script file on UNIX) located in the WF Client /utilities/setenv directory, is set to the required supporting files for the IBIExtractRepos and other MR Utilities.

where arguments include:

-user userid

Required. The ID userid specified is required to initialize the IBIExtractRepos program. This ID userid does not need to have MR administration privileges. It just needs to be a valid MR ID.

-confDir wfroot

Required. Specifies the full path to the root directory of the WebFOCUS Client installation. IBIExtractRepos uses this path information to locate the WebFOCUS deployment configuration file (webconfig.xml) and the WebFOCUS deployment descriptor file (web.xml), from which several settings necessary to initialize the program are used.

Note: This program will always use the web.xml file on the filesystem, and not within the .war file.

-f wfroot/filelist.txt

Required. Specifies the absolute or relative path to the -f filelist.txt identifying the domains or items to be extracted.


Top of page

x
Reference: Extracting Repository Metadata

The Extract Repository Metadata link takes you to a pane where you can extract metadata from the Repository for analysis. Administrators can query the Repository for metadata from this page. This may be helpful in planning or debugging. For more information about the output generated from these options (Users, Roles, Groups, Domains, Domains Contents), see Managed Reporting Extract Utility. To return to the Change Management Extract Utility, click Return to Change Package Window.

The following image shows the Extract Repository Metadata pane containing metadata information for Extract Roles.

Extract Repository Metadata Pane Window

Note: For additional convenience, the MR Change Management Extract Utility is also available from the Administration Console in the Utilities section of the main menu. The interface is slightly different, but the functionality is the same. For more information, see the WebFOCUS Security and Administration manual.


WebFOCUS