Using Web Links as Event Handlers
One of the components of your project is a Web link.
A Web link is an object that contains a valid URL, such as a Web
page, e-mail address, or FTP server (basically anything that can
be typed into a browser's Location box). A Web link can also be an
HTML file.
You create and use a Web link as an event handler in your application.
For example, in the event handler editor, you might create a Web
link that maps to a Web page, assigning it to an event that occurs
when a user clicks a button. During run time, clicking this button opens
the Web page you defined in your Web link.
You can also use a Web link HTML file as a help file using the
Help property. For more information, see Assigning Help to Your Forms and
Controls.
You can also launch a Web link into a frame using the frame control.
For more information, see Using Frames.
Here are some ways you might use Web links:
- Create a button
on every form that jumps to your company's home page.
- Create a Suggestions
button. Clicking this button would enable end users to compose and
send e-mail to the staff responsible for administrating the application.
(E-mail links require that the end user's browser supports Internet
mail services.)
- Create a button
that downloads instructions for using your application.
- Create a button
that runs a WebFOCUS report based on values supplied at run time.
When you define a link, you give it a name. Because you refer
to a link by its name, not its URL, it is easy to maintain. For
example, if you refer to the same Web link from several places in
your project and you need to update the URL, you do so only once
in the Link Editor, and the change will be reflected wherever you
use that Web link in the project.
x
Procedure: How to Create a Web Link
-
In the
Event Handler editor, click the Web link button.
-
In the
Web Link dialog box, click New.
-
In the
Link Editor dialog box, type a name for the Web link in the Name box.
-
Depending
on the type of Web link you are creating, you can type a URL for
the Web link in the Universal Resource Locator (URL) box or click
the
 button
to open the URL Wizard.
or
Select an HTML file in
the list of HTML file resources in your project. (If the one you want
to select is not there, click New to open
the Resource Wizard.)
For more information on defining Web
links, see How to Use the URL Wizard to Define an HTTP Web Link, How to Use the URL Wizard to Define an FTP Web Link, How to Use the URL Wizard to Define a WebFOCUS Report as a Web Link,
and How to Use the URL Wizard to Define an E-mail Web Link.
-
Optionally,
type a description for the Web link by clicking the Description tab
and entering a description.
-
Click OK when
you are done.
Example: Creating and Using a Link
Suppose
you decide to include a button in a user application that links
to the Information Builders home page: www.informationbuilders.com.
- Open the Form
Editor and create a button with the name IBIWeb and the title Information
Builders on the Web.

- Double-click
the IBIWeb button to open the Event Handler editor.
- In the Event
Handler editor, select the Click event, and then select the Web
Link
 icon.
icon.WebFOCUS
Maintain opens the Web Link dialog box.
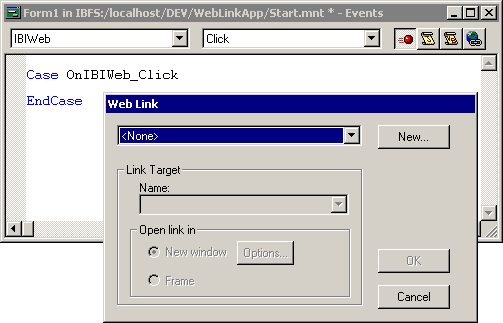
- Create a web
link by clicking New.
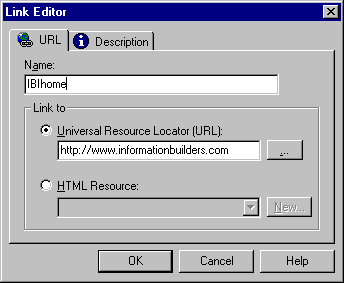
- In the Link
Editor dialog box, name your Web link IBIhome and enter the URL http://www.informationbuilders.com.
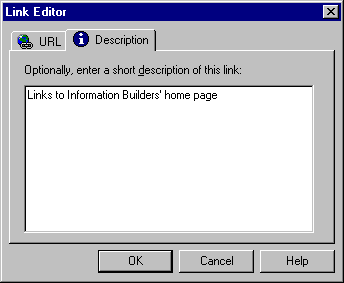
- Enter a description
of the Web link in the Description tab.
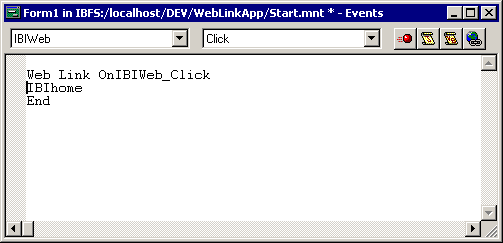
- Click OK in
the Link Editor and the Web Link dialog box.
- Close the Event
Handler editor and save your project.
- When you deploy
and run the application, clicking Information Builders on
the Web will open Information Builders' home page.
x
Procedure: How to Use the URL Wizard to Define an HTTP Web Link
-
In the
Link Editor, click the
 button.
-
In the
URL Wizard, select http or https: - Hypertext Transfer Protocol and
click Next.
-
Enter
the domain name of your target server.
-
If you
are connecting to a secure server, select Make this a secure
hyperlink (https:).
-
Click Next.
-
Optionally,
if you want to link to file, directory, or alias on the server, enter
its name in the Object path name box.
-
If the
object is a CGI or ISAPI program, select This object
is a Common Gateway Interface (CGI) or Internet Server Application
Programming Interface (ISAPI) program. Otherwise, click Finish.
-
Click Next.
-
If your
CGI or ISAPI program has any parameters whose value you must supply
at run time, define them and supply values.
-
Click Finish.
x
Procedure: How to Use the URL Wizard to Define an FTP Web Link
-
In the
Link Editor, click the
 button.
-
In the
URL Wizard, select ftp: - File Transfer Protocol and
click Next.
-
Enter
the domain name of your FTP Server and click Next.
-
Optionally,
if you want to link to a file, directory, or alias on the FTP server,
enter its name in the Object path name box.
-
Click Finish.
x
Procedure: How to Use the URL Wizard to Define a WebFOCUS Report as a Web Link
-
In the
Link Editor, click the
 button.
-
Select
the WebFOCUS report radio button in the URL
Wizard dialog box and click Next.
-
Select
from the drop down list or type in the domain name of your WebFOCUS
Server. (Notice that the URL Wizard appends the text /cgi-bin/ibi_cgi/ibiweb.exe
after the domain name. This points to the WebFOCUS executable.)
Click Next.
-
Select
the name of a WebFOCUS report from the list and click Next.
-
Bind
a value to each parameter. To bind an existing parameter, double-click
on that parameter in the Parameter column. To add a new parameter,
click the Add to list button. The Enter a
Parameter dialog box will display.
-
In the
Enter a Parameter dialog box, specify a value for your parameter. To
bind a parameter manually, select the As Entered Below radio button.
Type the value you wish to specify in the Value text
box.
-
To bind
a parameter from a control, select the From a control radio
button. Specify the Form name and Control name in the drop-down
text boxes provided.
-
Click OK.
-
When
you have specified values for all parameters in the report, review the
display in the URL Wizard and click Finish.
WebFOCUS Maintain generates the complete URL and puts it in the
URL box.
Note: The
URL Wizard does not parse the initial amper variable in a -SET statement.
Only if the -SET statement contains amper variables to the right
of the equal sign will that parameter appear in the URL Wizard dialog box.
x
Procedure: How to Use the URL Wizard to Define an E-mail Web Link
-
In the
Link Editor, click the
 button.
-
In the
URL Wizard, select mailto: - MailTo Protocol and click Next.
-
Define
the recipients who will receive your e-mail message and click Next.
-
If you
wish, define the CC recipients who will receive your e-mail message
and click Next.
-
Enter
a subject and body for your e-mail message and click Finish.
x
Procedure: How to Add an HTML File to Your Project as a Resource
-
In the
Link editor, select the HTML Resource radio
button and click New.
WebFOCUS Maintain opens the Resource Wizard, a series of
windows that guide you through adding an HTML file to your project.
-
Enter
the path to the HTML file. If you prefer to browse for the HTML
file, click the
 button.
The Resource Wizard will automatically display the HTML
file. Click Refresh to update the display.
Then
click Next.
-
Specify
a unique name for your HTML file.
Then click Finish.
-
You
may see a dialog box informing you that WebFOCUS Maintain needs to
make a copy of the HTML file in the project directory. Click OK.
x
Procedure: How to Use a Web Link as an Event Handler
-
Open
the Event Handler editor.
-
Select
a control and an event from the lists.
-
Click
the Web link button.
-
Select
the Web link from the list of Web links.
-
Enter
a target name to define the name of a frame, or select one of the pre-defined
frames (_self, _parent, or _top).
-
Determine
whether you want to open the Web link in a new window or a frame
in the existing window. If you select new window, you can specify
options for this new window by clicking Options.
When
the event occurs (for example, a button being clicked), the browser
will open the Web link.
x
Procedure: How to Edit a Web Link
-
Open
the Event Handler editor for the control and event assigned to the
Web Link.
-
Click
the Web link icon to open the Web Link dialog box.
-
Click
the Edit button.
-
Make
any changes in the Link Editor dialog box.
-
Click OK when
you are done.
x
Procedure: How to Delete a Web Link
-
Select
the Web link in the Project Explorer.
-
Right-click
the Web link, and in the shortcut menu, click Delete.
or
Press
the Delete key.
or
Click the Delete
 button
on the General toolbar.
x
Reference: Web Link Dialog Box
When you indicate
that you want to use a Web link as an event handler in the Event Handler
editor, WebFOCUS Maintain displays the Web Link dialog box.
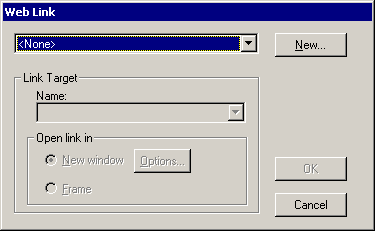
This
dialog box has the following fields:
-
[list of available Web links]
-
Select the name of an existing Web link in the list.
-
New...
-
Opens the Link Editor, where you can define a new Web link.
-
Link Target Name
-
Specifies
the name of a target you can launch your Web link in. You can type a
name here, or select one of the following:
_self launches
the Web link in the current frame.
_parent launches
the Web link in the frame containing the current frame.
_top launches the Web link in
the highest frame.
-
Open link in
-
Select New window to open your Web
link in a new window; select Frame to open
your Web link in a frame on the current form.
-
Options...
-
If you open your Web link in a new window, click this button
to open the Window Options dialog box, where you can customize the
appearance of this window.
x
Reference: New Window Options Dialog Box
The New Window
Options dialog box determines the appearance of the new browser window
that your Web link appears in. You will only see this dialog box
if you select a Web link as an event handler, you select the Opens
new window option, and you click the Options button.
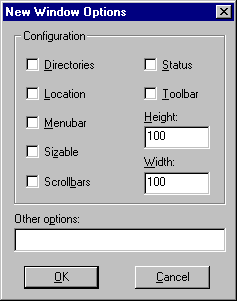
This dialog box has the following fields:
-
Directories
-
Determines
if you can see the Links toolbar on the browser window.
-
Location
-
Determines
if the browser window displays a Location box where the end user
can type new URLs.
-
Menubar
-
Determines if the browser window displays a menu bar.
-
Sizable
-
Determines if the end user can resize the browser window.
-
Scrollbars
-
Determines if the browser window has scroll bars.
-
Status
-
Determines if the browser window displays a status bar.
-
Toolbar
-
Determines if the browser window displays a toolbar.
-
Height
-
Determines the height of the browser window.
-
Width
-
Determines the width of the browser window.
-
Other options
-
Specifies other HTML options for the appearance of your new
browser window. WebFOCUS Maintain will append this code to the end
of its generated code.
x
Reference: Link Editor URL Tab: Specifying a Name and URL for a Web Link
When you create
or edit a Web link, WebFOCUS Maintain opens the Link Editor.
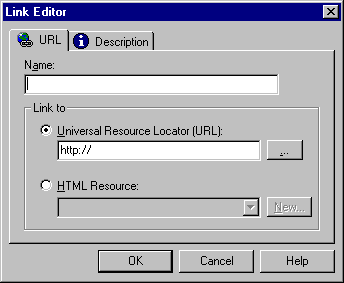
This
dialog box has the following fields:
-
Name
-
Type the name that you want to refer to this link by.
-
Universal Resource Locator (URL)
-
Type the Web address for the Web link.
-

-
Opens the URL Wizard, which guides you through the process
of defining a Web link.
-
HTML Resource
-
Select the name of an HTML file from the list.
-
New...
-
Opens the Resource Wizard, where you can define a new HTML
file to your project.
x
Reference: Link Editor Description Tab: Adding a Description to a Web Link
When you click
the Description tab in the Link Editor, WebFOCUS
Maintain opens a dialog box where you can enter a description for
your Web link.
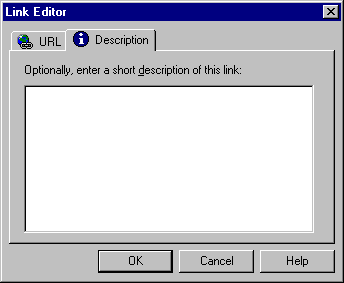
x
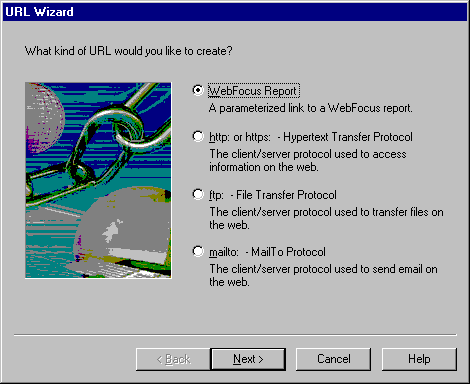
Reference: URL Wizard: Specifying What Kind of Web Link to Create
When you open
the URL Wizard from the Link Editor, you first see a window where
you specify what kind of Web link you want to create. WebFOCUS Maintain
enables you to create four types of Web links easily from here.
x
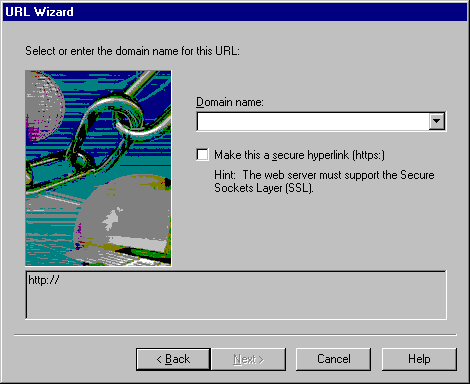
Reference: URL Wizard: Specify a Domain Name
You use this
window to specify the domain name of the WebFOCUS Server, Web server, or
FTP server to which you are connecting.
-
Domain name
-
Enter the domain name of your WebFOCUS Server, Web server,
or FTP server here.
-
Make this a secure hyperlink (https:)
-
(For WebFOCUS reports and Hypertext Transfer Protocol only)
Select this option if your Web server is secure.
x
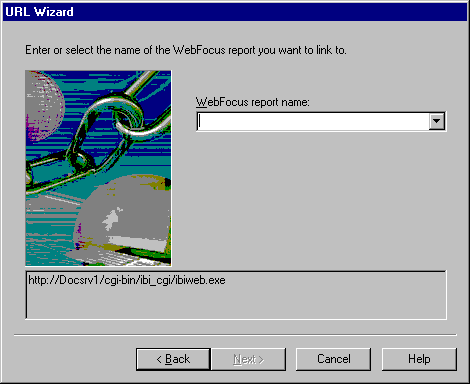
Reference: URL Wizard: Specifying Name of WebFOCUS Report
You use this
window to specify the name of the WebFOCUS report that you want
to execute from your application.
-
WebFOCUS report name
-
Enter the name of a WebFOCUS report here. This report must
be on the execution path of the WebFOCUS Server to which you are connecting.
x
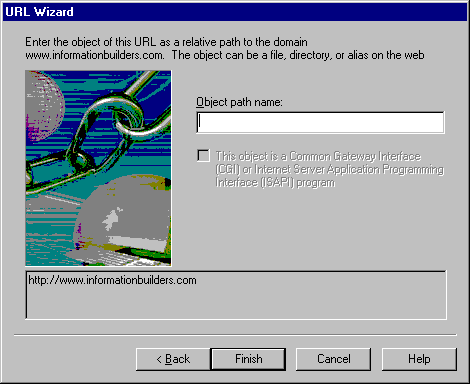
Reference: URL Wizard: Specifying an Object
When you are
defining a link to a Web server or FTP server, you have the option
of specifying an object.
-
Object path name
-
Enter the name of a file, directory, or alias on the Web
server or FTP server you are defining a link to. This step is optional.
-
This object is a Common Gateway Interface (CGI) or Internet Server Application Programming Interface (ISAPI) program
-
Select this option if the object is one of these types of
programs. This changes the Finish button to the Next button so that
you can specify values for parameters for these programs, if necessary.
x
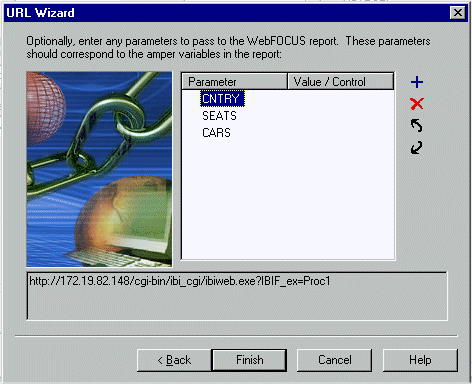
Reference: URL Wizard: Specifying Parameters for a WebFOCUS Report
If you are defining
a Web link to a WebFOCUS report, you may need to specify values for
parameters at run time. (In WebFOCUS reports these parameters are
called amper variables). If you are defining a report that
contains parameters, the URL Wizard will parse the report, and parameter
names will appear in the Parameters column of this dialog box in
the URL Wizard.
-
Parameter
-
Lists the parameters in the report. To edit the name or value
for a parameter, double-click it here.
-
Value
-
Lists the values that you have supplied for the parameters.
-

-
Opens the Enter a Parameter dialog box, where you can create
a new parameter and supply a value.
-

-
Deletes the selected parameter.
-

-
Moves the selected parameter up in the list.
-

-
Moves the selected parameter down in the list.
x
Reference: URL Wizard: Enter a Parameter Dialog Box
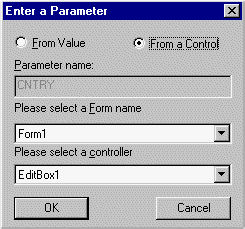
The Enter a
Parameter dialog box provides the following options when the From
a control radio button is selected:
-
From a control
-
When selected, enables you to supply a parameter value from
a control.
-
Parameter name
-
Displays the name of the parameter. If you are adding a parameter,
you can name the new parameter here.
-
Please select a Form name
-
Enables you to specify the name of the form you wish to use
to bind your parameter.
-
Please select a controller
-
Enables you to specify the control you wish to use as the
value for your parameter.
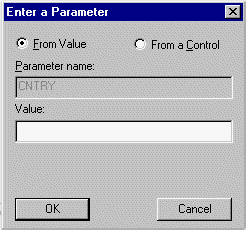
The Enter a
Parameter dialog box provides the following options when the From
Value radio box is selected:
-
From Value
-
When selected, enables you to manually specify a value for
a parameter.
-
Parameter name
-
Displays the name of the parameter. If you are adding a parameter,
you can name the new parameter here.
-
Value
-
Enables you to specify the value you wish to bind to the parameter.
x
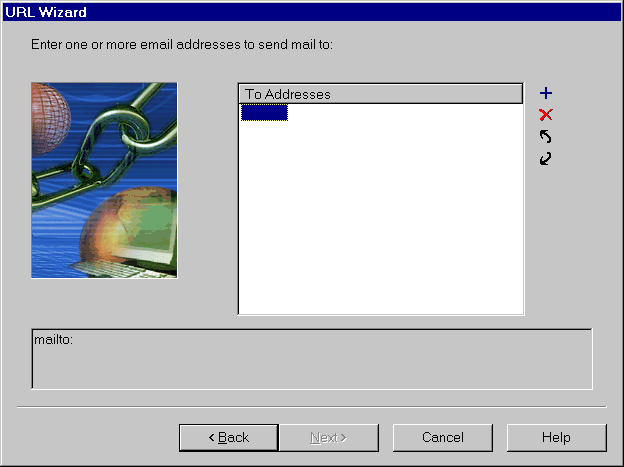
Reference: URL Wizard: Specifying E-mail Addresses
If you are defining
an e-mail Web link, you use this window to define the recipients
and CC recipients of your e-mail message.
-
To Addresses
-
Lists the e-mail addresses to which this message will be
sent. To edit an address, double-click it here.
-

-
Opens the Email Address dialog box, where you can enter a
new address.
-

-
Deletes the selected address.
-

-
Moves the selected address up in the list.
-

-
Moves the selected address down in the list.
x
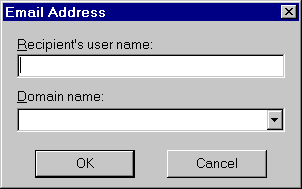
Reference: E-mail Address Dialog Box
You use the
Email Address dialog box to enter a new address.
-
Recipient's user name
-
Enter the user name of your e-mail recipient here.
-
Domain name
-
Enter the domain of your e-mail recipient here, or select
a domain you have already used in this project from the list.
WebFOCUS
Maintain creates the e-mail address by concatenating the recipient's
user name to the domain name, separated by the @ symbol.
x
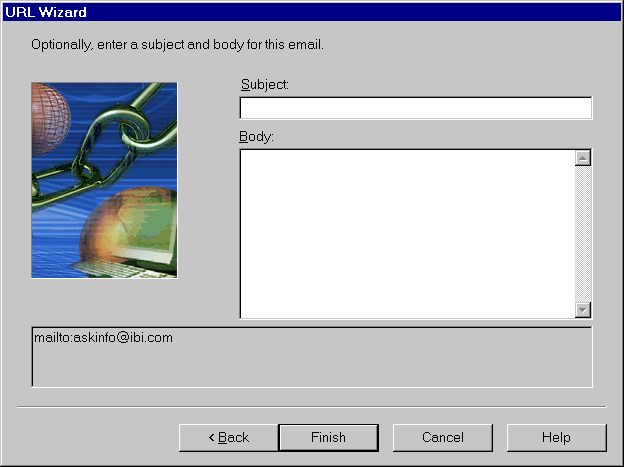
Reference: URL Wizard: Entering an E-mail Message Subject and Body
You use this
window to enter an optional subject and body for your e-mail message. The
end user has the option of changing these fields at run time.
 button
to open the URL Wizard.

 icon.
icon.


 button
on the General toolbar.


