To set the search engine parameters in WebFOCUS:
-
In the left pane of the WebFOCUS Administration Console, select
Magnify, then General
Settings.
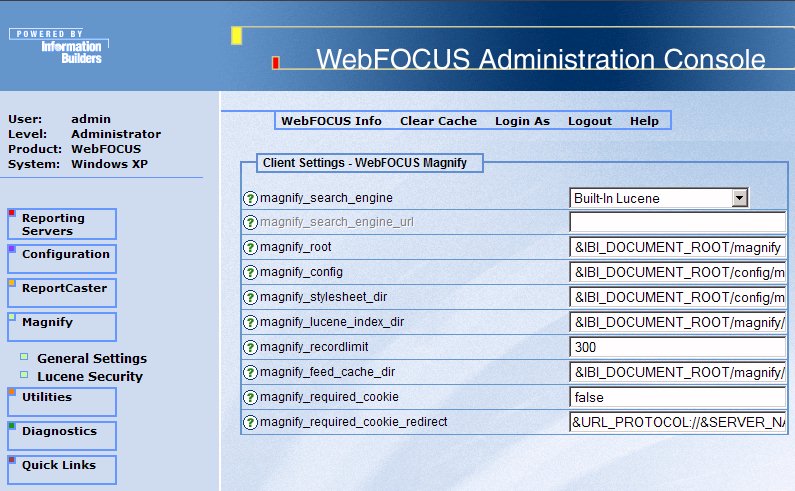
The following image shows the WebFOCUS Administration Console with the default Client Settings for Magnify in the right pane.
-
From the magnify_search_engine drop-down list, select
the search engine you want to configure with Magnify. The selections
are:
- Built-In Lucene. (The Lucene search engine is included with Magnify.)
- Google Search
Appliance. (You must purchase this product separately.)
For more information on configuring Magnify to use the Google Search Appliance, see Technical Memo 4699:Using Magnify With The Google Search Engine.
-
Type values (or accept the default values) for the remaining parameters:
-
magnify_search_engine_url. URL to the Google Search Appliance. This is only active for the Google Search Appliance (GSA).
-
magnify_root. Full path to the directory where all Magnify configuration files are located, including the lucene index, cached index files, log files, and the Magnify style sheet.
The default path is
&IBI_DOCUMENT_ROOT/magnify
-
magnify_config. Full path to the directory where the configuration files are located.
If your installation needs to make changes to the configuration directory, you should move this directory outside of the ibi directory. This ensures that future WebFOCUS upgrades do not overwrite your configuration information.
The default path is
&IBI_DOCUMENT_ROOT/config/magnify
-
magnify_stylesheet_dir. Full path to the directory where the Magnify style sheets reside. This setting enables you to set the path to a directory outside of your WebFOCUS installation to prevent it from being overwritten when you perform an upgrade or a reinstallation.
The default is
&IBI_DOCUMENT_ROOT/config/magnify
Important: Be sure to include a slash at the end of the path to the style sheet directory.
-
magnify_lucene_index_dir. Full path to the directory where the default Lucene index resides. This is only active for the Lucene search engine.
The default directory is
&IBI_DOCUMENT_ROOT/magnify/lucene_index
Additional search directories are configured in the following file:
config/magnify/collections.xml
-
magnify_recordlimit. Maximum number of URL items to be returned by a search request. (These items will appear in the Dynamic Categorization tree.) Any results beyond this number are not displayed to the user. The default value is 300.
-
magnify_feed_cache_dir. Directory where Magnify stores records which are not yet loaded into the index. The files stored in this directory are files which are generated from the iWay Service Manager feed process. After all content is added to the Lucene index, the cached version is moved or deleted depending on the magnify_generate_deltas variable value of true or false. An index during a quiecse is loaded into the index after the backup of the Lucene index is complete.
The default value is
&IBI_DOCUMENT_ROOT/magnify/feedcache
-
magnify_required_cookie. If a HTTP cookie name is specified, Magnify verifies that the cookie is set. If the required cookie does not exist, Magnify displays the Web page specified by the magnify_required_cookie_redirect parameter. If the parameter is set to false (the default value), Magnify does not verify any cookies.
-
magnify_required_cookie_redirect. Web page that Magnify displays if the HTTP cookie specified by the magnify_required_cookie parameter does not exist. By default, the WebFOCUS Welcome page displays.
-
- Click Save.
Configuration of the search engine for Magnify is complete.