You can insert active form controls into a compound
document to act as filters on the reports of the document. You can
also cascade (chain) controls to populate based on the selections
of the previous controls. The output format of the compound document
must be active report, active Flash, or active PDF in order to insert
active form controls.
xAssociating a Field With a Control
You can bind a field to an inserted active form control
from the Query pane, by dragging the desired column directly from
the report on the canvas, or through the Active Dashboard Properties
dialog box. Setting the target reports, cascading controls, and changing
the filter conditions can only be done through the Active Dashboard
Properties dialog box. For more information, see Using the Active Dashboard Properties Dialog Box.
x
Procedure: How to Associate a Field With a Control From the Query Pane
-
With InfoAssist
open in the Document view and at least one report on the canvas,
add an active form control, as described in How to Add an Active Technologies Form Control to a Compound Document.
-
Click the
report.
The fields of the report will be populated in the Query
pane.
Note: If the report is included as an existing
report, you are not able to bind its fields to a control.
-
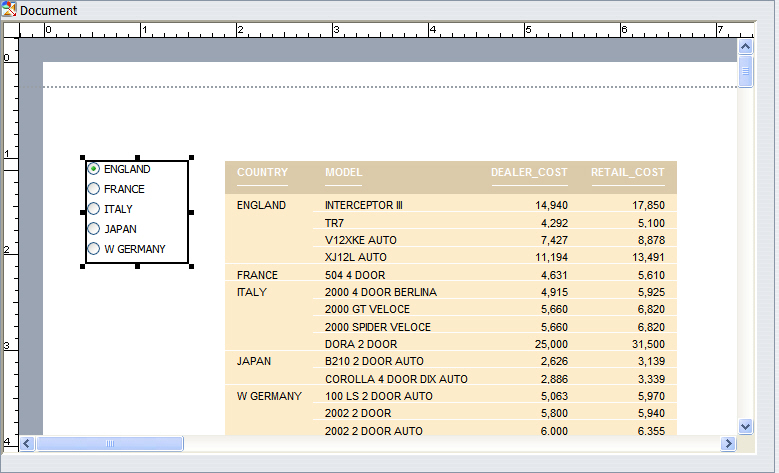
Select a
data source field from the Query pane and drag it onto the Layout
Canvas. Make sure that you drop the data source field onto the active
form control that you want the field to be binded to.
The control updates with the options from the field, as
shown in the following image.
x
Procedure: How to Associate a Field With a Control From a Report on the Canvas
-
With InfoAssist
open in the Document view and at least one report on the canvas,
add an active form control, as described in How to Add an Active Technologies Form Control to a Compound Document.
-
Right-click
the report you wish to add a filter column from and select Edit
Report.
Note: If the report is included as an existing report,
you are not able to bind its fields to a control.
-
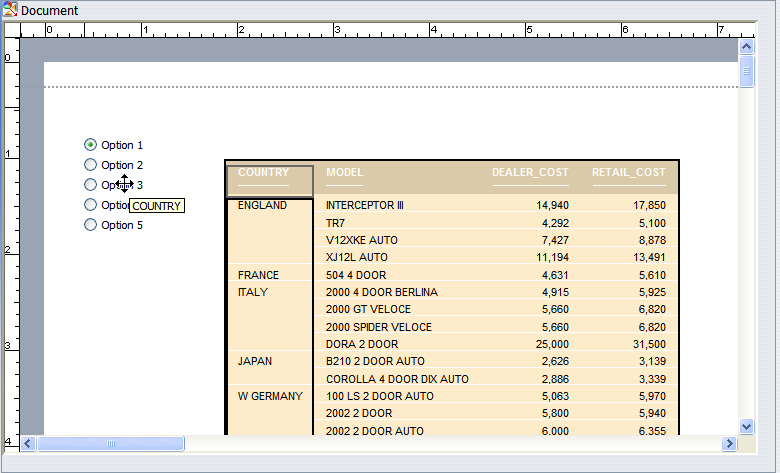
You can
now select fields within the report. Click and drag the desired field
from the report and drop it onto the active form control you want
the field to be binded to, as shown in the following image.
x
Procedure: How to Associate a Field With a Control From the Active Dashboard Properties Dialog Box
-
With InfoAssist
open in the Document view and at least one report on the canvas,
add an active form control, as described in How to Add an Active Technologies Form Control to a Compound Document.
-
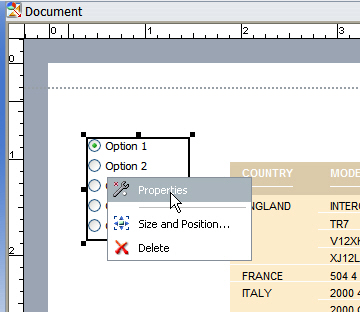
Right-click
the active control you wish to add a filter column to and select Properties,
as shown in the following image.
-
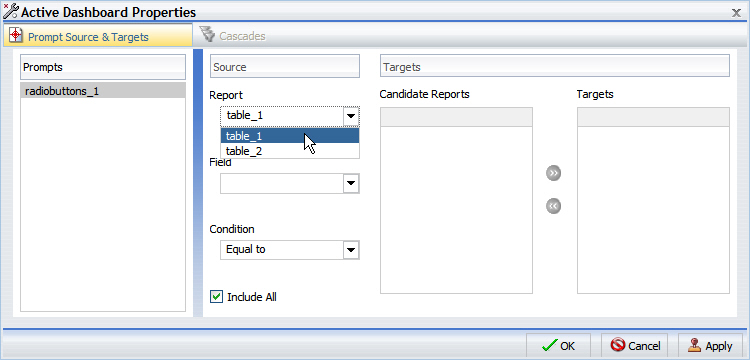
The Active
Dashboard Properties dialog box appears. Select the report that
contains the field you wish to filter on from the Report drop-down
menu, as shown in the following image.
-
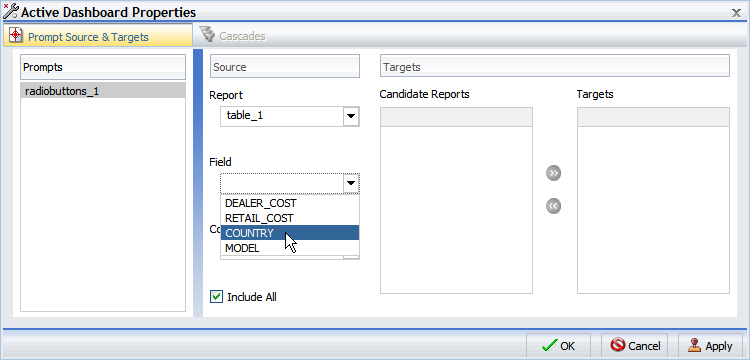
Select the
field you wish to filter on from the Field drop-down menu, as shown
in the following image.
-
Select OK.
The active form control is updated with the selected options.
xUsing the Active Dashboard Properties Dialog Box
You can use the Active Dashboard Properties dialog box
to bind a field to an active form control, change the filter condition
of an active form control, set the target for the form control filters,
and set up cascading form controls.
x
Procedure: How to Set Target Reports
You
can add or remove target reports from an active form control through
the Active Dashboard Properties dialog box. When you bind a field
to an active form control, the default target report is the report
you dragged the field from. More target reports can be added from
the Active Dashboard Properties dialog box.
Reports that can
be target reports must meet one of the following requirements:
- The report contains
a field with the same name as the source field (actual field name
or AS name).
- The Master File of
the report has a field with the same name as the source field.
If
a report is eligible to be a target report because of an AS name
and that AS name is changed, the report is automatically removed.
-
With InfoAssist
open in the Document view, bind an active form control to a field,
as described in Associating a Field With a Control.
-
Right-click
the active form control you wish to add a filter column to and select Properties,
as shown in the following image.
-
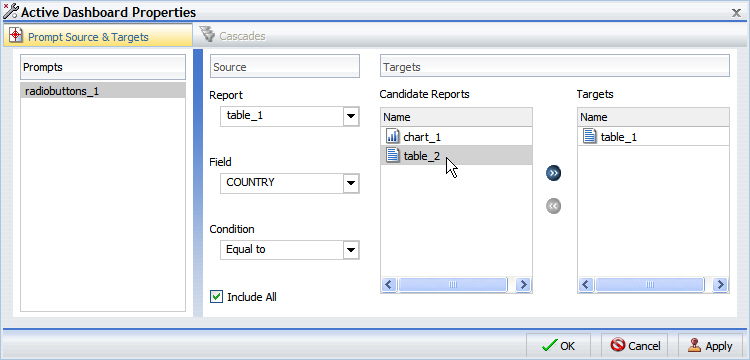
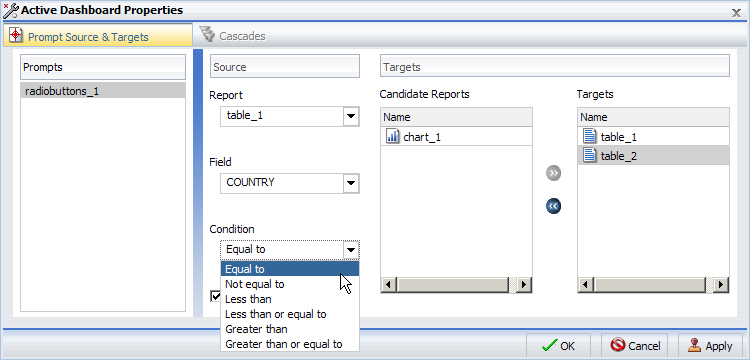
From the
Active Dashboard Properties dialog box, select the reports from
the Candidate Reports list box that you wish to add as target reports,
as shown in the following image.
Note: You can multi-select candidate reports by
pressing the Ctrl key and selecting multiple reports.
-
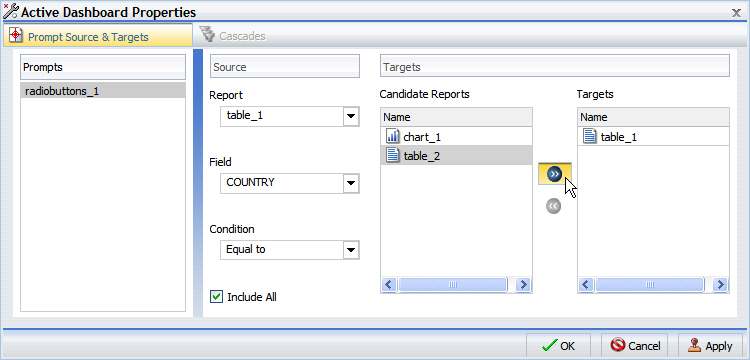
Click the Add
to List arrow to move the selected reports to the Targets
list box, as shown in the following image.
Note: You can remove reports from the Targets list
box by selecting reports there and clicking the Remove
from List arrow.
-
Select OK.
x
Procedure: How to Change the Filter Condition
-
With InfoAssist
open in the Document view, bind an active form control to a field,
as described in Associating a Field With a Control.
-
Right-click
the active form control you wish to change the filter condition for and
select Properties, as shown in the following
image.
-
From the
Active Dashboard Properties dialog box, select the desired filter
condition, as shown in the following image.
x
Procedure: How to Cascade Controls
When
you have more than one control on the canvas you can cascade controls
to populate based on the selections of the previous controls. Cascading controls
have a parent-child relationship, in which the parent filters the
available options of the child. An active form control can be the
parent of more than one other control but cannot be a child of more
than one control.
-
With InfoAssist
open in the Document view, bind at least two active form controls
to fields, as described in Associating a Field With a Control.
-
Right-click
an active form control and select Properties,
as shown in the following image.
-
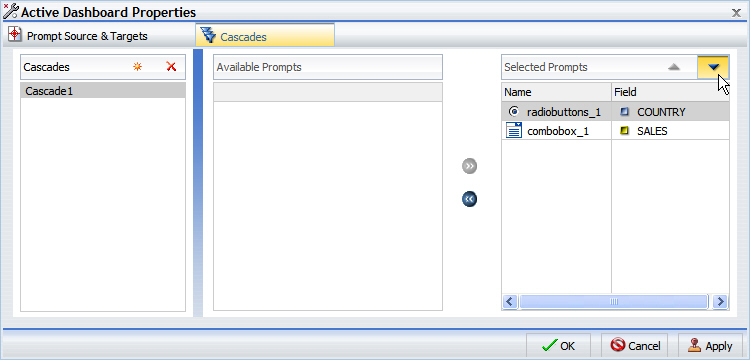
Select Cascades from
the Active Dashboard Properties dialog box, as shown in following
image.
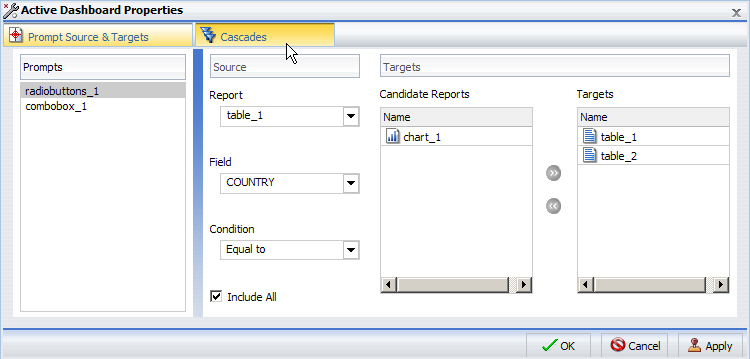
By
default, a cascade named Cascade1 will appear in the Cascades section
of the Active Dashboard Properties dialog box.
You can click
the Create a new cascade
 button
to create a new cascade.
button
to create a new cascade.
You can click on the Delete
selected cascade
 button
to delete the selected cascade.
button
to delete the selected cascade.
-
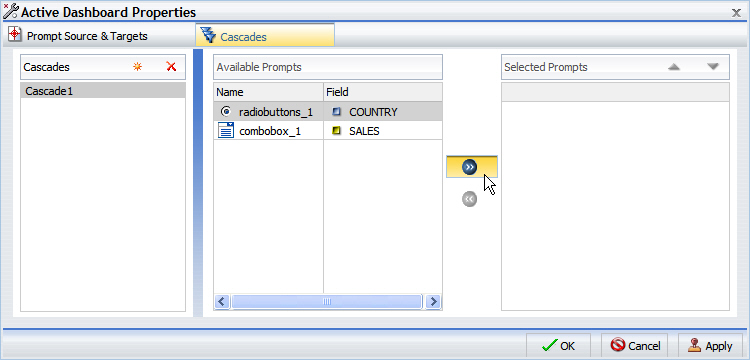
Select the
cascade you wish to add controls to.
-
Select the
control you wish to add from the Available Prompts list box.
-
Click the Add
to List arrow to move the selected control to the Selected
Prompts list box, as shown in the following image.
Note: You can remove controls from the Selected
Prompts list box by selecting controls there and clicking the Remove
from List arrow.
-
Add any
additional controls you wish to be part of the cascade by repeating
steps 5 and 6.
By default, the hierarchy of the controls is determined
by the order they are added to the Selected Prompts list. The cascade
of the controls is from the top, down. The controls that come first
in the Selected Prompts list are the parents of the lower controls.
-
You can
change the hierarchy of the controls by selecting a control in the
Selected Prompt list box and clicking the Move Up and Move Down
arrows, as shown in the following image.