In this section: How to: Reference: |
A virtual field can be used in a request as though it
is a real data source field. The calculation that determines the
value of a virtual field is performed on each retrieved record that
passes any screening conditions on real fields. The result of the expression
is treated as though it were a real field stored in the data source.
You can define a virtual field in the
following ways:
Tip: If your environment supports the KEEPDEFINES parameter,
you can set KEEPDEFINES to ON to protect virtual fields from being
cleared by a subsequent JOIN command.
x
Reference: Usage Notes for Creating Virtual Fields
- When
a JOIN is issued, all pre-existing virtual fields for that data
source are cleared except those defined in the Master File.
- To
join structures using a virtual field with the source, make sure
the Define follows the Join. Otherwise, the Join clears the temporary
field. For an explanation of reporting on joined data sources, see Joining and Merging Data Sources.
- If no field in the
expression is in the Master File or has been defined, use the WITH command
to identify the logical home of the defined calculation.
- WITH can be used
to move the logical home for the virtual field to a segment lower than
that to which it would otherwise be assigned (for example, to count
instances in a lower segment).
- You may define fields
simultaneously (in addition to fields defined in the Master File)
for as many data sources as desired. The total length of all virtual
fields and real fields cannot exceed 32,000 characters.
- When you specify
virtual fields in a request, they count toward the display field
limit.
- Virtual fields are
only available when the data source is used for reporting. Virtual fields
cannot be used with MODIFY.
- A DEFINE command
may not contain qualified field names on the left-hand side of the
expression. If the same field name exists in more than one segment,
and that field must be redefined or recomputed, use the REDEFINES
command.
- Using a self-referencing
DEFINE such as x=x+1 disables AUTOPATH (see the Developing Reporting Applications manual).
x
Procedure: How to Create a Virtual Field
To
define a virtual field (Define object) in a procedure:
-
Right-click
the procedure in the Procedures folder and choose Edit
in Developer Studio tool from the context menu. The Procedure
(FOCEXEC) window opens.
-
Click and
hold a component connector (yellow diamond) at the point where you
want to include the virtual field in the procedure, then click the Define button
on the component connector toolbar.
-
The Open
dialog box opens. Select the Master File from which you want to
create the virtual field and click Open.
The Define dialog box opens. For details see Define Tool.
-
Type the
name of the virtual field in the Field input box.
-
Enter an
expression in the expressions box. See specific procedures for details
on assigning alphanumeric, numeric, date, and CLOB formats.
For information on expressions, see the Creating
Reports With WebFOCUS Language manual.
You can also
use a function in an expression by clicking the Functions button
on the Define dialog box. For details on functions, see the Using Functions manual.
Note: If
you want to make a virtual field available for use with all procedures
during your session, issue the DEFINE command from the Command Console. The
virtual field is retained for the duration of the session.
x
Procedure: How to Assign an Alphanumeric Format With the Define Tool
In
the Define tool window:
-
Click the Format button.
The Format dialog box opens.
-
Select Alphanumeric as
the Format Type.
The default length is 20. It appears in the Length input area.
-
To assign
a different length, specify a number between 1 and 4096 in the Length
input area.
-
Click OK.
The
Format dialog box closes.
For more information on field formats,
see Assigning Field Formats in
the Creating Reports With Report Painter manual.
x
Procedure: How to Assign a Numeric Format With the Define Tool
-
Click the Format button.
The Format dialog box opens.
-
Select one
of the format option buttons in the Format Types section:
The default length appears in the Length input area. The
Decimal input area shows the number of decimal places for Floating
Point, Decimal, and Packed.
-
To assign
a different length, specify a number between 1 and 9 for Floating
Point, between 1 and 11 for an Integer, between 1 and 20 for Decimal,
or between 1 and 33 for Packed in the Length input area.
-
To assign
a different number of decimal places for Floating Point, Decimal,
or Packed, specify the desired number in the Decimal input area.
-
If you wish
to include numeric display options, select these options in the
Edit Options section.
-
Click OK.
The
Format dialog box closes.
For more information on field formats,
see Assigning Field Formats in
the Creating Reports With Report Painter manual.
x
Procedure: How to Assign a Date/Time Format With the Define Tool
In
the Define tool window:
-
Click the Format button.
The Format dialog box opens.
-
Select the Date/Time button
from the Format Type section.
The Date and Time Formats dialog box opens.
-
Select Date as
the Field Format.
The Date section options are enabled.
Note: The
Date and Time Formats dialog box enforces valid Date-only and DateTime
format combinations, based on the input entered and the field selected. Some
options may not be available for your selections.
-
Select a
date format from the Format drop-down list.
When a date format is selected, the Format String
and Sample Date are displayed for the format selected.
-
Optionally,
you may select the Month Name, Day Name, Prefix, and Separator options.
-
Click OK.
The Date and Time Formats dialog box closes. The selected
format appears in the Date/Time Format section of the Format dialog
box.
-
Click OK to
close the Format dialog box.
Note: Administrators
and developers should note that date options set in a virtual field
will override date options set in the Master File or with a SET command.
x
The following
image shows the Define tool.
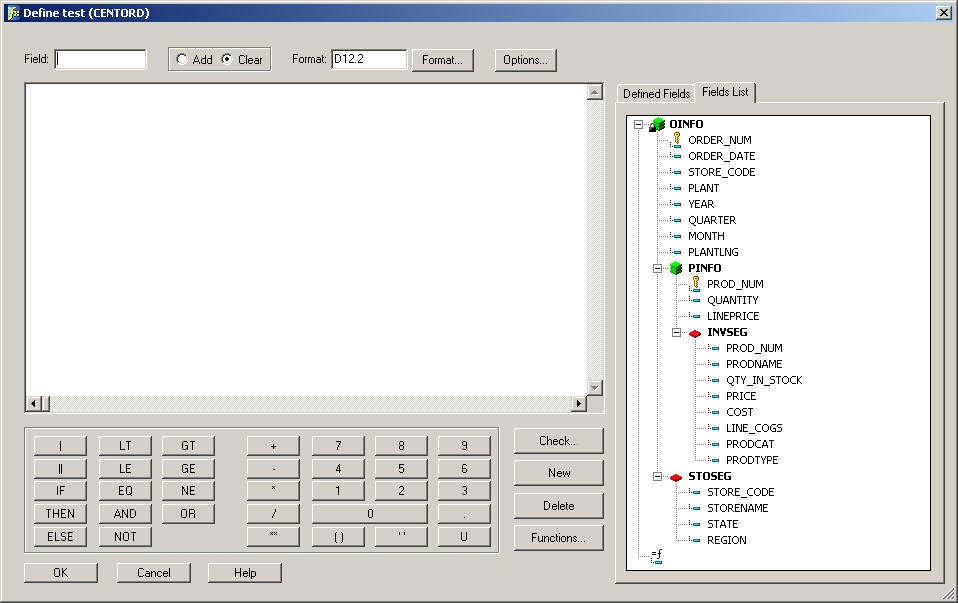
The Define
tool has the following fields/options:
-
Field
- Displays the name of the temporary field.
When creating
a field, type the name you wish to assign.
When editing a
field, click the down arrow on the Field combo box, and select the field
you wish to edit. The drop-down list shows all virtual fields for
the current data source. When you select a field, the corresponding
information appears in the Format box, and the expression box. You
can edit the information, eliminate the field, or run it.
-
Add
- When selected, it indicates that the current temporary field
definitions should be added to the list of temporary fields previously
defined for the same data source.
If this button is not selected,
the current set of temporary fields replaces those previously defined
for the same data source.
In Application View, this action
marks all definitions created during the current use of the Define
tool to be added to other virtual fields defined for the same data
source during earlier use of the tool.
Note: You can
define and execute several virtual fields during a single use of
the Define tool. However, unless you select Add, running the current
list will erase other virtual fields created outside of the Master
File for the same data source. Virtual fields created in the Master
File remain in effect.
-
Clear
- When selected, it clears any current temporary field definitions
you previously added to the list of temporary fields.
-
Format button
- Opens the Format dialog box, where you assign a format to
the temporary field.
-
Format box
- Displays the field type, field length, and display options.
The field type can be alphanumeric, numeric, or date/time.
-
Options button
- Opens the Options window, which enables you to establish
a segment location for a temporary field in the associated Master
File, and/or assign attributes to set how missing values in the
virtual field are handled.
-
Expressions box
- Displays the expression used to evaluate the field.
Type
the expression or use the Fields list, calculator, and functions
list to help you create the expression.
-
Calculator buttons
- Provide numbers and operators that you can use to create
numeric, alphanumeric, Boolean, and conditional expressions.
Click
the desired number or operator to add it to the expression box.
- To enclose a value
in parentheses, click the ( ) key in the
calculator. Parentheses affect the order in which the specified
operations are performed.
- To enclose a value
in single quotation marks, click the ' ' key
in the calculator. Use single quotation marks to enclose alphanumeric
and date literals.
- To convert entries
in the expression box to uppercase, click the U key
in the calculator. Note that field names are case-sensitive.
-
Check
- Displays the Define phrase in code, and specifies any errors.
-
New
- Clears the entry fields of the tools, including the Field
combo box and the corresponding expression. It also returns the
format to the default value D12.2, and places the cursor in the
Field combo box so you can begin to create a new field.
-
Delete
- Deletes the temporary field identified in the Field box.
The field is no longer available.
-
Functions
- Opens the Function Arguments dialog box, which lists all
available built-in functions. (A function is a program that returns
a value.)
Double-click the desired function to add it to the
expression box. Then, in the expression box, highlight each argument
and substitute the value or field name you wish to use. For details,
see the Using Functions manual.
-
Defined Fields
- Lists the names of the temporary fields already associated
in the Master File.
-
Fields List
- Lists the fields defined in the Master File.
Example: Creating a Virtual Field
Using
information in the sample data source EMPLOYEE, the following example
shows how to create a virtual field, INCREASE, to calculate the
annual salary increase each employee will receive. This example
assumes that you have already created a procedure with which you
want to use this virtual field.
- Open a procedure
in which you want to create a virtual field.
- Select the EMPLOYEE Master
File and click Open.
- Open the Define tool
from the component connector toolbar.
- Type INCREASE in
the Field input box.
- Click the Format button.
The
Format dialog box opens.
- Confirm that the Decimal option
button is selected under Format Types.
- Click the down arrow
in the Length input area to specify the field length 8. Leave the
number 2 in the Decimal field.
- Select the Floating
dollar--M option in the Edit Options list box.
- Click OK to
make the changes and return to the previous dialog box.
- Click the Fields
List tab, then double-click CURR_SAL.
- Enter the following
by typing or using the number/operator buttons in the Expressions
window:
* .05
The expression for
the Define field now appears as: CURR_SAL * .05.
- Click OK.
You
can then select the new field, INCREASE, in the Fields window of
the reporting tools.
x
Procedure: How to Specify Missing Value Attributes Using the Define Tool
-
Open the
Define tool by:
The
Define tool opens.
-
Create a
Define expression.
-
Click the Options button
and select the Override missing values handling check
box to specify how the missing value attributes are handled.
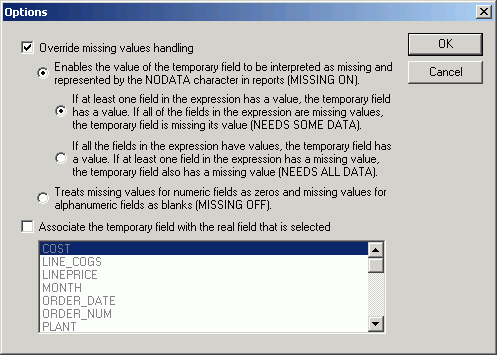
-
Click OK to
close the Options dialog box.
For
more information about Missing Field Values, see MISSING Attribute
in a DEFINE or COMPUTE Command in the Handling Records With Missing Field Values chapter
of the Creating Reports With WebFOCUS Language manual.
x
Procedure: How to Establish a Missing Segment Location Using the Define Tool
-
Open the Define tool by:
The Define
tool opens.
-
Create a
Define expression.
-
Click the Options button.
-
Select the Associate
the temporary field with the real field that is selected check
box and select a field.
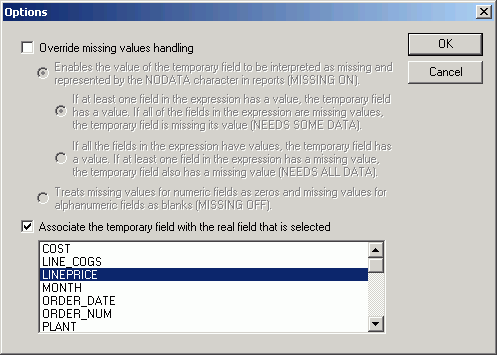
-
Click OK to
close the Options dialog box.
For
more information about Missing Field Values, see Establishing
a Segment Location for a Virtual Field in the Handling Records With Missing Field Values chapter
of the Creating Reports With WebFOCUS Language manual.
xDefining Multiple Virtual Fields
You may wish to have more than one set of virtual fields
for the same data source, and to use some or all of the virtual
fields in the request. The Add option enables you to specify
additional virtual fields without clearing existing ones. If you
omit the Add option, previously defined virtual
fields in that data source are cleared.
If you want to clear a virtual field for a particular data source,
use the Clear option.
x
Procedure: How to Add a Virtual Field to a Set of Virtual Fields
-
In the Define
dialog box, type the field name in the Field input box.
-
Enter the
desired expression in the expression box.
For information on expressions, see the Creating
Reports With WebFOCUS Language manual.
-
Select the Add option
button.
-
Click OK.
xDisplaying Virtual Fields
You can display all virtual fields with the ? DEFINE
command. You can also access this information
in the Define tool.
x
Procedure: How to Display Virtual Fields
Click
the Defined Fields tab in the Define tool.
x
The following can clear a virtual
field created in a procedure:
- A new list of virtual fields for the same
data source without the Add option selected.
- A join. When a join
is created for a data source, all pre-existing virtual fields for
that data source are cleared except those defined in the Master
File. This may affect virtual fields used in an expression.
- A change in the value
of the FIELDNAME SET parameter.
Unlike fields created in a procedure, virtual fields in the Master
File are not cleared in the above ways.
x
Procedure: How to Delete a Virtual Field
In
the Define tool window, with the field in the Field combo box, click Delete.
The
field is no longer available.
xIncreasing the Speed of Calculations in Virtual Fields
Virtual fields can be
compiled into machine code in order to increase the speed of calculations.
xApplying Dynamically Formatted Virtual Fields to Report Columns
Dynamic formatting enables you to apply different formats
to specific data in a column by using a temporary field that contains
dynamic data settings. You can create
a dynamic format by writing an expression using the Define tool
inside or outside of Report Painter.
Before you can format a report column using the dynamic format,
you must create the report, then apply the temporary field to a
column in the report. For example, you can create a temporary field
that contains different decimal currency formats for countries like
Japan (which uses no decimal places) and England (which uses 2 decimal
places). These currency formats are considered dynamic formats.
You can then apply the temporary field containing the dynamic formatting
to a Sales column. In a report, the Sales column reflects the different
currency formats for each country.
x
Procedure: How to Create a Virtual Field Containing Dynamic Formatting
In
the Define tool:
-
Type
the name of the virtual field in the Field input box.
-
Click Format and
type A8 (Alphanumeric, 8 characters). Click OK.
-
Type
the expression in the Expressions window or use the Fields list, calculator,
or functions list to help you create the expression. The expression
should contain the parameter values necessary for defining the dynamic
formatting. All expressions must be written in uppercase.
-
Click OK.
You
can apply dynamic formatting to a report column.
x
Procedure: How to Format a Report Column Using Dynamic Formats
-
Right-click
a report column in Report Painter and select Format.
-
Click
the Dynamic option button in the Format Types
area.
-
Select
the field with the desired dynamic format from the Format Field drop-down
list.
-
Click OK to
format the report column.
For
more information about Report Painter, see the Creating Reports With Report Painter manual.
Example: Setting Appropriate Formats for Different Currencies
The
following example demonstrates how the dynamic field format can
be used to set different currency formats for specific countries
in a report.
- Open the procedure
for which you want to create the virtual field, then open the Define
tool from the component connector toolbar.
The Open dialog box
opens.
- Select the CAR Master
File and click Open.
The Define tool opens.
- Type MYFORMAT in
the Field box.
- Click the Format button.
Select the Alphanumeric option button, and
specify 8 as the length. Click OK.
- Click the Functions button
to open the Functions Arguments dialog box:
- Select DECODE from
the Select a function drop-down list. The DECODE function appears
with placeholders for its arguments.
- Select COUNTRY as
the DECODE field name.
- Enter the actual
and display values by typing the following placeholder fields with
specific values that define the decimal precision for each currency: 'ENGLAND'
'P15.2C' 'JAPAN' 'P15.0' ELSE 'P15.2M'.
- Enter the default
value 'P15.2M' to be assigned if the code
is not found among the list of codes.
- Click OK to
return to the Define tool. The DECODE function appears as the Define
expression.
- Click OK to
close the Define tool.
- Select Report from
the Connector toolbox, and at the Open dialog box, select CAR from
the list of Master Files. Click Open.
- In Report Painter,
double-click the COUNTRY and SALES fields
in the Fields list.
- Select the SALES column
and click the Sum button on the Columns toolbar.
- Right-click
the SALES column and select Format.
- Click the Dynamic option
button and select the MYFORMAT field from
the Format Field drop-down list.
- Click OK to
apply the formats associated with the MYFORMAT field to the SALES
column.
- Select the COUNTRY column
and click the By button on the Columns toolbar.
- Run the report.

Notice
that the SALES column displays the format variations you defined
for each country in the DECODE function.