Editing Your Update Assist Application
When you click Finish in the Update Assist (Step 6 of
6) - Summary dialog box, the files that comprise your Update Assist
project are generated (for a list of files, see Files Generated By Update Assist).
If you wish, you can perform further editing on these files.
xChanging the Search Field for Tree and Combo Box Navigation
If you select either Tree or Combo Box navigation for
your Update Assist project, by default the navigation displays the
keys for each selected segment. This is a safe choice because keys
are always unique. Tree and Combo Box navigation code automatically ensures
that duplicates will be removed.
Not all users find keys friendly. In many cases, the record key
is an integer or a unique alphanumeric code. When users are trying
to locate a particular record, they seldom do so by scanning a list
of key code values.
You can easily change the search field from the key field to
a more friendly field by editing the segname_navbar.htm file. However,
if the new friendly field is not unique, you will only be able to
select the first instance of each value. For example, suppose your database
contains a list of movies, and there are two movies named Airplane.
There are two methods to solve this problem:
- Specify a folder
for each friendly field that will contain duplicate titles, and show
each unique key for the duplicate inside that folder.
- Create a DEFINE
field that concatenates the friendlier field with the key field
(which as you know is always unique). Use that as the display field
for the tree or combo box.
x
Procedure: How to Change the Search Field for Tree and Combo Box Navigation
-
Open
the file segname_navbar.htm in a text editor.
-
Find
the constructFields() function at the bottom.
-
For
the call to fieldInfo.AddField(), change the sixth parameter (the displayfield)
to the field name you want to use on display. Make sure to leave
the quotes around the field name.
x
Procedure: How to Generate Folders for Non-Unique Search Fields
-
Open
the file segname_navbar.htm in a text editor.
-
Find
the constructFields() function at the bottom.
-
Above
the existing call to fieldinfo.addfield(), add a call as follows:
fieldInfo.addField("friendlyfield",
"friendlyfield",
"segname",
null,
false,
"friendlyfield",
false,
true,
true,
"friendlyfield",
"segname",
null);
where:
- friendlyfield
Is the name of your friendly field.
- segname
Is the name of the segment in which the friendly field resides.
x
Procedure: How to Define a New Unique Field in a Master File
To
use a DEFINE field as the displayed value:
-
Edit
the Master File for the data source as text.
-
Create
a DEFINE field by adding the following line to the end of the fields in
the segment:
DEFINE newfield/An=keyfield | friendlyfield
where:
- newfield
Is the name of your new field.
- An
Is the format for your new field. n is
the sum of the format for your key field and the format for your
friendly field.
- keyfield
Is the name of your unique key field.
- friendlyfield
Is the name of the friendly field.
Tip: You
may wish to add some punctuation between the two fields, for example,
a comma or dash. Do not forget to increase the size of your new
field by the appropriate number of characters.
Example: Creating a Unique Field for the MOVIES Data Source
Adding
the following code to the end of the MOVIES Master File defines
a field that concatenates the TITLE field with the MOVIECODE field,
which will appear in parentheses:
DEFINE TITLEKEY/A50 = TITLE | ' (' || MOVIECODE || ')';$
xCustomizing the Tree Control
The Tree control option for Update Assist applications
enables users to find the record they are looking for by navigating
through a tree hierarchy. You can add the following JavaScript variables
in the MasterFileName_navbar.htm file to control this hierarchy:
-
maxNodesPerFolder. An
integer value that controls the maximum number of nodes that can
be displayed in each folder. If the number of nodes exceeds this
number, the Tree control automatically splits the nodes up using
subfolders labeled with a range of the node values contained within.
-
maxFolders. An
integer value that determines the maximum number of folders that
can be rendered. The total number of nodes that will be rendered
will be divided up amongst these folders.
These variables and the values you wish to set for them can be
added to the area of code inside the MasterFileName_navbar.htm
file that generates the tree, using the syntax
maintainTree.maxNodesPerFolder =
and
maintainTree.maxFolders =
prior to the maintainTree.init() code.
For example:
var maintainTree = new maintainTreeInfo(constructFields(),mCallBack);
linestyle = "white";
maintainTree.maxNodesPerFolder= 8;
maintainTree.maxFolders = 20;
maintainTree.init();
Note: If the maxNodesPerFolder and maxFolders values are
set in a way that would cause a conflict, the setting for maxFolders
takes precedence over maxNodesPerFolder.
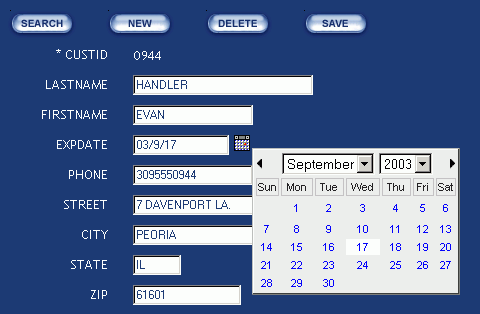
xCalendar Control for Date-Formatted Fields
A calendar icon appears next to changeable date-formatted
fields. When a user clicks the calendar icon, a calendar appears.
Any date selected on this calendar is entered into the date field.
Users can also enter dates into the date field manually.
x
Many DBMSs allow you to create a "time stamp" field.
This automatically fills the field with the current date and/or
time and saves the user having to do it. There are many reasons
at an application level for doing this. The most common is to give
reporting applications some way to track when a record was first
created or when each change was entered.
Note: If you are using an external DBMS that directly
supports Date and Time Stamp field types, you will not need to use
this technique. Instead, make sure the field that contains the time
stamp is set to Changeable = No to prevent Update Assist from even touching
that field.
x
Procedure: How to Date-Stamp a Field in an Update Assist Application
To
date-stamp a field in an Update Assist application, so that when
a user clicks New, your application can set the initial value of
the field to today's date in the stack before it is displayed in
the form:
-
Open
the SegmentName.mnt file in the Maintain
Development Environment.
-
Add
this line of code to the top of the maintain, just above Case Top:
MODULE IMPORT(MNTUWS);
This
imports the library of functions shipped with WebFOCUS Maintain.
-
Scroll
down to the newrecord case and add this code right below the first
Stack Clear statement:
COMPUTE TheDate/MDY = Today();
COMPUTE stack.datefield = TheDate;
Where stack and datefield are the
stack name and field name to which you want to assign the current
date.
Note: If
you have multiple fields that need to be set to today's date, you
only need to set the variable TheDate once and can re-use it as
many times as you need.
Example: Date-Stamping a Field in the MOVIES Data Source
If
you wanted the Release Date field from the MOVIES data source to
contain the current date, your code would look like this:
COMPUTE TheDate/MDY = Today();
COMPUTE Movinfo_stack.RELDATE = TheDate;
xAuto-numbering Fields in Update Assist Applications
Some DBMSs allow you to create an "auto-number" field.
This automatically fills the field with a sequence number that is
the last record's index plus one. This saves the user having to
make up an arbitrary key for the record, so it is a popular feature.
x
Procedure: How to Auto-Number a Field in an Update Assist Application
To
auto-number a field in an Update Assist application, so that when
a user clicks New, your application can set
the initial value of the field to the next sequence number in the
stack before it is displayed in the form:
-
Open
the SegmentName.mnt file in the Maintain
Development Environment.
-
Scroll
down to the newrecord case and add this code right below the first
Stack Clear statement:
Stack clear SegmentNameStk;
For all next MasterFileName.SegmentName.autonum into SegmentNameStk;
NextVal/I5 = SegmentNameStk(SegmentNameStk.FOCCOUNT).val + 1;
Stack clear SegmentNameStk;
Note: If
you are using an external DBMS that directly supports Date Stamp
field types, you will not need to use this technique.
xContinuing Displaying Currently Displayed Values After a New Action
By default, Update Assist clears all text boxes and
controls in the form on a New action. You can have the values stay
in the text boxes by editing the SegmentName.MNT
file.
For example, users of some types of applications may be entering
many similar records, one after another, and would like to display
a record, then essentially have the New action display a copy of
the record which they can edit before clicking Save.
x
Procedure: How to Continue Displaying Currently Displayed Values After a New Action
-
Open
the SegmentName.MNT file and go to the newrecord
case.
-
Comment
out the line that clears the stack, using a double dollar sign.