-
Right-click
the Master Files and select Upload Data File
from the New menu, as shown in the
following image.
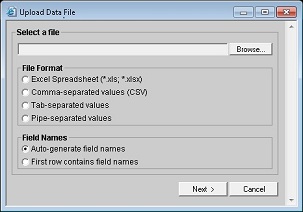
The first page of the Upload Data File dialog box opens displaying three sections that require you to make a selection:
- Select a file
- File Format
- Field Names
-
Click the Browse button
to the right of the Select a file section.
A Choose file dialog box opens.
-
Navigate to the file location and select Open.
The following image shows the first page of the Upload Data File dialog box.
-
In the File Format section, select one of the following supported
formats for the file you want to import:
- Excel® Spreadsheet (.xls, .xlsx)
- Comma-separated values (CSV)
- Tab-separated values
- Pipe-separated values
-
In the Field Names section, select
one of the following options based on how the data file is created:
- Auto-generate field names (the default)
Use this option if your data file does not contain field names in the first row. Each data column will be assigned a field name which can then be customized, as described below.
- First row contains field names
Use this option if your data file contains field names in the first row. Please note in this case the first row will not be included in the uploaded data file. Instead, the Upload File Utility will extract the first row to assign as field names in the Master File created during the upload process. Field names can be customized, as described below.
- Auto-generate field names (the default)
-
Click Next at the bottom of the Upload
Data File dialog box.
The second page of the Upload Data File dialog box, as shown in the following image, appears for you to review and customize the file conversion options.
-
For each field in the file you imported, you can select the
field column heading and then edit the following attributes for
that field:
- Field Name
- Alias
- (Data) Type
- Format
The default format for numeric fields is Double D12.2. For all other fields, the default format is Alphanumeric A50. During reporting, to ensure that you see all records and in the correct format, adjust the field type and format based on your input data file. Base the maximum value for Format on the maximum length of the fields in your input file.
If you change any of the attributes for a field, click the Apply button to apply the changes and refresh the data.
As of 7703, a new data type supports Alpha Variable (AnV) data types. The maximum length is 4093 characters and the default display value is 256.
Note: When you are selecting a format for Alphanumeric data types, it may take a few seconds for the Format drop-down list to appear.
- Once you have reviewed all fields, enter a valid name in the File Name input box (spaces are not allowed) and use the Application Directory menu to select the location where the file should be created. You must have write access to this location.
-
Click Next to upload the file.
Three files are created in the selected Reporting Server Application:
- Master File
- Access File
- Tab-delimited
data file (.TXT)
This file contains the data from the input file in a tab-delimited format.
Note: If a file with the same file name already exists, a dialog box is displayed prompting you to allow file replacement.