How to: |
Administrators can use the WebFOCUS Administration Console to add WebFOCUS Reporting Servers and HTTP Listeners to the WebFOCUS environment. Additionally, the console can be used to add WebFOCUS Client node profiles for each WebFOCUS Reporting Server. We recommend setting WebFOCUS Reporting Server security using the node profiles. The nodes are added to the ibi/WebFOCUS77/client/wfc/etc/odin.cfg file.
A node can enable access to one server or multiple servers. If it specifies multiple servers, it is called a cluster node. The WebFOCUS Administration Console lets you define a basic cluster node and specify the servers it can access.
Tip: You can configure more advanced cluster functionality using the Web Console of the server. For details, see Technical Memo 4641: Distributing Workload Across Clustered WebFOCUS Reporting Servers.
- Click Reporting Servers and then Remote Services.
- Click New.
- In the NODE field, specify the name by which you will refer to the server. The name is your choice, but cannot be the same as any other node name. In addition, the name must begin with a letter and cannot be more than eight characters. When the WebFOCUS Client accesses this server, it will use this name.
-
Specify the
Node class (Client, Cluster, or CLM Processing).
If you specify:
- Client, this node will function as a stand-alone server. It can also be used as an alternate server within a cluster configuration.
- Cluster, this is the primary node that will be used to distribute workload to alternate servers.
- CLM Processing, the Cluster Manager node monitors server performance statistics and sends the request to the best available server for processing.
-
Click Next.
- If you selected Client in step 4, proceed to step 6.
- If you selected Cluster in step 4, proceed to step 7.
- If you selected CLM Processing in step 4, proceed to step 8.
-
The
New Client Node window opens. Enter the following required parameters:
- CLASS. If this is a z/OS server, you must include a qualifier.
- HOST. Host name or IP address of the server.
- PORT. Port number for the TCP listener. The default port is 8120.
-
SECURITY. Determines how WebFOCUS connects to the WebFOCUS Reporting
Server. The following are possible SECURITY values:
Default. Is the initial value for new nodes and represents the traditional behavior, where the odin.cfg file does not contain a SECURITY keyword. In this case, WebFOCUS makes an explicit connection to the Reporting Server with whatever user ID and password it has available for the request. A user ID may come from IBI_REPORT_USER on the console Client Settings, Reporting Server pane, from a WebFOCUS Client Node Profile, or from the user WF_COOKIE if a Reporting Server sign-on has taken place. How the server processes explicit connections depends on its security setting (OFF, PTH, OPSYS, LDAP, DBMS).
HTTP Basic. Configures WebFOCUS to extract the user ID and password from the Authorization header. These credentials are then used to make an explicit connection to the WebFOCUS Reporting Server. You should only select this option when your Web tier is performing Basic Authentication so that the user Base64 encoded ID and password will be available in the request header. For example:
Authorization Basic amx0XHdmdXNlcjp3ZnVzZXIx
To verify that the Authorization header is available to WebFOCUS, click the Diagnostics menu on the WebFOCUS Administrative Console and select HTTP Request Info.
Kerberos. Configures WebFOCUS to pass the Kerberos ticket for the user to the WebFOCUS Reporting Server. This option enables an end-to-end single sign-on solution from the desktop to WebFOCUS, from WebFOCUS to the Reporting Server, and from the Reporting Server to supported relational DBMS systems. When using this option, the WebFOCUS Reporting Server must run in security OPSYS mode. There are additional setup requirements for WebFOCUS and Microsoft Active Directory that are described in Technical Memo 4647: Configuring Single Sign-on to the WebFOCUS Reporting Server Using Kerberos.
SAP Ticket. Enables customers using WebFOCUS Open Portal Services in SAP Enterprise Portal to achieve single sign-on through WebFOCUS to a Reporting Server configured with the Data Adapter for SAP. WebFOCUS passes along the MYSAPSSO cookie of the user, created on SAP Enterprise Portal, to the Reporting Server which validates it using the SAP security API.
Service Account. Enables you to specify a user ID and password to be used for all connections to the Reporting Server, as shown in the following image.
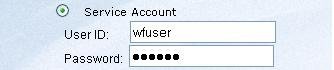
The service account credentials are encrypted and stored in the SECURITY keyword of the odin.cfg file. When defined, the service account overrides any other credentials that may be presented to WebFOCUS for this Reporting Server node.
Trusted. Enables you to connect to the Reporting Server with only a user ID. This option is useful when no password is available for the user, and controls can be placed on the server to ensure that connections from unauthorized clients are rejected (for example, employing the server RESTRICT_TO_IP setting so that only a particular WebFOCUS client can connect to the server).
If the server runs in security OPSYS mode, the connecting user ID must be valid on the server operating system and the Reporting Server cannot run on Windows. In this scenario, the connecting user appears in the server edaprint.log file and is returned by the server GETUSER and CNCTUSR subroutines. The report agent runs in the security context of the connecting user, which makes it possible to use operating system permissions and the trusted option for DBMS adapters in order to restrict file and data access.
Trusted connections are also supported by servers running in security OFF, PTH, and LDAP modes provided that the server trust_ext setting is enabled.
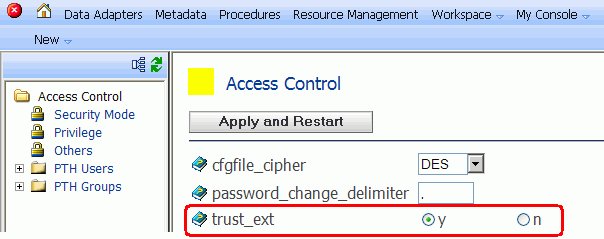
In this configuration the connecting user appears in the server edaprint.log file and is returned by the server CNCTUSR subroutine. The server GETUSER subroutine will always return the user ID that started the server. When the server runs in LDAP mode the connecting user must be found in the LDAP directory before the connection is accepted.
If the server runs in the PTH or OFF security modes, then trusted connections will be accepted without authentication by Reporting Servers on any platform, including Windows. The server edaprint.log file and CNCTUSR subroutine will reflect the connecting user ID, and the server GETUSER subroutine shows the user ID that started the server.
The following lines in a report request are useful to determine connection behavior.
-SET &CONNECT_USER = CNCTUSR('A30');
-SET &AGENT_USER = GETUSER('A30');
-TYPE Connect User is: &CONNECT_USER
-TYPE Report Agent runs as: &AGENT_USER
When you select Trusted, the WebFOCUS script variable and Web server HTTP variable settings are displayed, as shown in the following image.

Select the option that will be used to retrieve the connected user.
Note: Trusted connections are not supported by servers running in security DBMS mode.
You can also specify the following optional parameters:
- Security Object. For any security
option, an administrator can specify one or more HTTP Header names
and/or Cookie names as follows:
- COOKIE - Specify each HTTP Cookie name separated by a comma. For example, cookie_name1, cookie_name2.
- HEADER - Specify each HTTP Header name separated by a comma. For example, header_name1, header_name2.
Note: HTTP Cookie and Header names must not contain commas or colons, since these are reserved delimiters.
REMOTE_USER is not a valid value in the HEADER input box, since it is a special type of HTTP header variable and its contents will not be sent to theWebFOCUS Reporting Server. Instead, specify the WF_REMOTE_USER variable.
- HTTP_SSL. Enables
encrypted communication between the WebFOCUS Client and the WebFOCUS Reporting Server HTTP listener.
This option must be selected, if the HTTP listener of the server
is configured to use SSL.
If you are using a self-signed certificate to enable HTTPS communication with a WebFOCUS Reporting Server, the certificate must be configured in the Java environment in which the WebFOCUS Client is installed. This enables HTTPS communication between the Reporting Server and the following WebFOCUS Client tools:
- WebFOCUS Administration Console.
- Developer Studio Metadata tools, such as the Synonym Editor and Create Synonym tool.
For more information on configuring WebFOCUS to trust a self-signed certificate, see Registering a Self-Signed Certificate With the JVM. If the certificate was created by a trusted certificate authority, no further steps are required.
- COMPRESSION. Turns on data compression. Codes are: 0 (off) and 1 (on).
- ENCRYPTION. Sets
data encryption ability and the cryptography symmetric method used.
Select one of the following options from the drop-down list:
- 0 = off
- AES = Advanced Encryption
Standard. The AES selections are in the format, CIPHER(x)(-MODE).
where:
CIPHER is AES128, AES192, AES256.
x is optional and defines an RSA key length of 1024 bits.
MODE is optional and is either Electronic Code Book (ECB) or Cipher Block Chaining (CBC).
For example, AES256x-CBC is the AES cipher, with 1024-bit RSA keys, and CBC mode. If the RSA or mode is not specified, then the default values are used. The RSA default value is 512 bits. The mode default value is ECB.
- DES = 168-bit
- 3DES = 512-bit
- 3DESx = 1024-bit
- IBCRYPT = user defined IBCRYPT DLL is loaded.
Note:
- The DES, 3DES, and 3DESx are deprecated.
- Triple DES and IBCRYPT are not supported under the HTTP protocol or for communication to and from the MVS server. In addition, if encryption is set manually outside of the console using the odin.cfg file, the console displays it as a static value and it cannot be modified using the console.
For more information about configuring encryption, see How to Configure Encrypted Communication to a WebFOCUS Reporting Server.
- CONNECT_LIMIT. Number of seconds the client holds the pending connection. This is useful in a cluster deployment to avoid a lengthy delay of failover response. Other possible values are 0 (no wait) and -1 (infinite wait). -1 is the default value.
- MAXWAIT. <query wait>[,<row wait>]. Time the client waits before timeout. The first number is the return time for any row. The second number (optional) is the return time for rows beyond the first row. Time is in seconds.
- HTTP_PORT. Port number for the HTTP listener. This is normally the second consecutive port that the server uses. Type the same port number that was specified during installation. The default HTTP port is 8121.
- DESCRIPTION. Description for the WebFOCUS Reporting Server node. This description displays in the WebFOCUS front-end tools.
Because you specified Client in Step 4, proceed to Step 8 (and skip Step 7, which is used when Cluster is specified).
- Security Object. For any security
option, an administrator can specify one or more HTTP Header names
and/or Cookie names as follows:
-
The
New Cluster Node window opens. Enter the following required parameters:
- ALTERNATE. Select the servers to be included in the cluster.
- DESCRIPTION. Description for the cluster.
-
The New CLM Processing Node window opens. Enter the following required
parameters:
- HOST. The IP address of the Reporting Server where the Cluster Manager is configured.
- PORT. UDP Port number.
-
DESCRIPTION. Optional description for the CLM Processing
node.
You can add multiple CLM hosts and ports by clicking Add. A check box is added next to each new host and port combination. To remove a host and port, select the associated check box and click Remove.
Note: The node name provided in the WebFOCUS Administration Console for CLM configurations must match the Cluster name of the Cluster Manager Server.
- Click Save.
Tip: More advanced cluster functionality can be configured using the Reporting Server Web Console. For details, see Technical Memo 4665: Distributing Workload Across Clustered WebFOCUS Reporting Servers.
- Click Reporting Servers and then Remote Services.
- Select the node you want to change.
-
Click
one of the following buttons:
-
Modify. Displays
the settings for the selected node, enabling you to make changes.
You can select the Set as Default Server Node check box to specify that the node is the default WebFOCUS Reporting Server. The node will be written as the IBI_REPORT_SERVER parameter value in the cgivars.wfs file. Note that even if you check Set as Default Server Node, this can be overridden if an IBIC_server is set in site.wfs or a node profile.
If the site.wfs file or request URL contains an IBIC_server setting, it will override the IBI_REPORT_SERVER parameter. In this case, the WebFOCUS Administration Console indicates that the IBI_REPORT_SERVER is the default node, even though it is no longer the default.
You can also click Save As to save these settings for another specified node that will be added to the ibi\WebFOCUS\client\wfc\etc\odin.cfg file.
- Remove. Deletes the selected node. You will receive a message asking for you to confirm the deletion. This button only appears if you have more than one node defined.
- Profile. Enables you to override WebFOCUS default settings for a specific WebFOCUS Reporting Server node. These settings are written to ibi\WebFOCUS\client\wfc\etc\node.prf, where node is the node you selected in Step 2.
- Server Console. Displays the WebFOCUS Reporting Server Console, which enables you to remotely manage your server environment. For more information, see the Server Administration for UNIX, Windows, OpenVMS, IBM i, and z/OS manual.
Note: You can select the Sort alphabetically check box to sort a list of multiple servers.
-
Modify. Displays
the settings for the selected node, enabling you to make changes.
This procedure assumes that you have already successfully installed and configured the WFServlet implementation of WebFOCUS.
-
If you are
using Sun JVM with an encryption cipher key that is over 128 bits,
be sure to install the Java Cryptography Extension (JCE). You can
obtain the JCE from the Oracle download Web site.
Note: The JCE must be installed in the JVM directory that your application is using. For more information, see the JCE documentation.
- Redeploy the webfocus.war file if it is necessary to point to the .war file. Otherwise, point to the Web application directory.
- In the WebFOCUS Administration Console, click Reporting Servers and then Remote Services.
-
Select
the WebFOCUS Reporting Server node
(for example, EDASERVE) you want to configure for encryption,
then click Modify.
The Remote Services - Modify Settings window appears.
-
Click Add
Setting.
The Remote Services - Modify Settings - EDASERVE window appears.
-
Select
the encryption cipher you want to use from the ENCRYPTION parameter
drop-down list. (This parameter is available when modifying a server
in the Reporting Servers, Remote
Services pane.)
Note: When using any of the AES encryption ciphers, the client randomly generates a new RSA key pair (public and private keys of the specified length) and sends the public key to the server. Upon receipt of the public key, the server generates a random secret key. The length of the secret key depends on the chosen cipher strength. The secret key is encrypted with the public RSA key and sent back to the client, which decrypts it with its private RSA key. After the exchange, the client and the server both share the same secret key, and use it to encrypt and decrypt all communications between them.
- Click Set and then click Save.
Note: For additional encryption, you can add 3DES WebFOCUS cookie encryption, as outlined in WebFOCUS Encryption.