To add record selection criteria:
-
Depending on the type of field you
want to select records from (Detail, Sum), do one of the following:
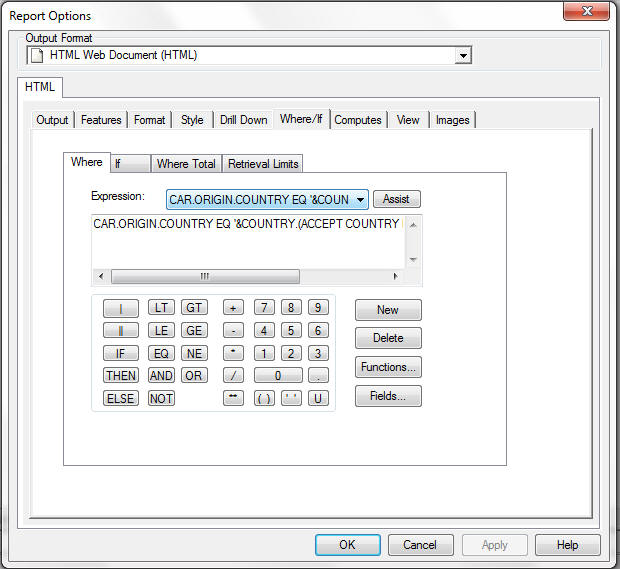
- If you want data evaluated before it is retrieved, click the Where/If button on the Columns toolbar to open the Report Options dialog box at the Where tab.
- If you want data evaluated based on a Boolean expression, click the Where/If button on the Columns toolbar. Then, select the If tab.
- If you want data selected after all the data has been retrieved and processed, click the Where/If button on the Columns toolbar. Then, select the Where Total tab.
Choose one of the following:
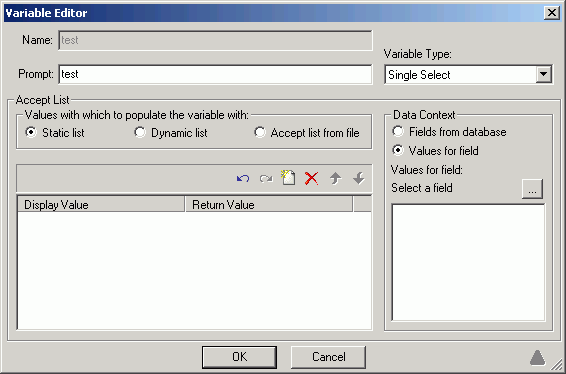
- Click the Assist button to display the Expression Builder dialog box. The Expression Builder dialog box assists you in constructing selection criteria. This dialog box is also available from the Graph Assistant, and the When dialog box. For details about the Expression Builder, see Using the Expression Builder.
- Type your expression directly in the Expression box.
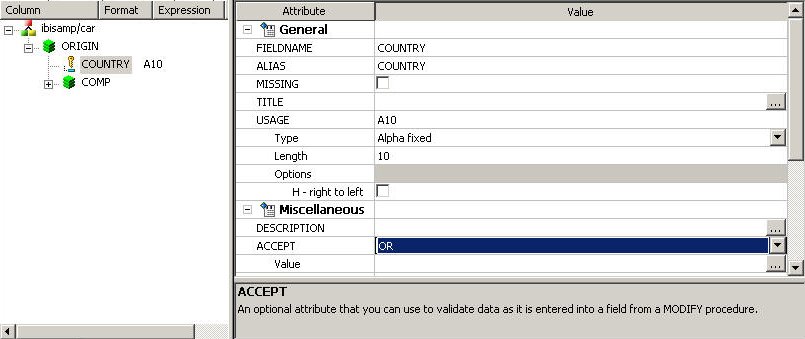
Note: If you are typing an expression with multiple criteria directly into the Where or Where Total dialog box, you must explicitly include parentheses to control the order of evaluation.
- Click OK to confirm your expression. Report Painter checks your syntax before exiting. If you have made any errors, you will be unable to exit until you fix them.
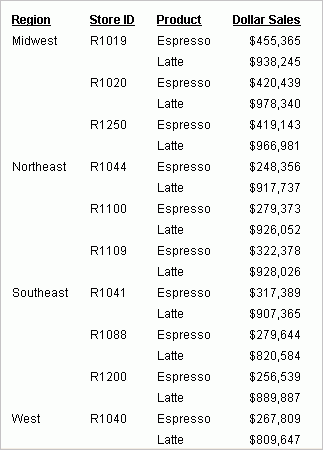
Suppose that you want to see total sales for specific products. The following example shows how to create a report of the Gotham Grinds Latte and Espresso sales for each store within each region.
- Open the GGSALES data source in Report Painter.
- Identify and format your report columns.
- Identify your sort columns. Click By on the Report Painter toolbar and double-click or drag REGION, STCD, and PRODUCT from the Fields tab of the Object Inspector.
- Identify your summary column. Click Sum on the Report Painter toolbar and double-click or drag DOLLARS from the Fields tab of the Object Inspector.
- Format the Dollar Sales column. Right-click Dollar Sales in the Report Painter window and select Format. Click Decimal in the Format Types box. Select Floating dollar -- M from the Edit Options list. Click OK.
- Apply selection
criteria:
- Click the Where/If button on the Columns toolbar to open the Report Options dialog box at the Where tab.
- Click Assist to open the Expression Builder.
- Select PRODUCT from the Fields list.
- Select equals from the Relations list.
- Click Value to retrieve a list of data available for the PRODUCT field.
- Select Latte from the drop-down list and click Add.
- Click the drop-down list again and select Espresso, then click Add.
- Click OK. Your new expression is added to the Expression Builders list of expressions.
- Click OK to return to the Where/If dialog box.
- Click OK to return to the Report Painter window.
- Run the report
by clicking the Run button on the toolbar.
The report appears in the browser.


 (or
click Ctrl + Enter) to add a new Display and Return value.
(or
click Ctrl + Enter) to add a new Display and Return value.