Configuring the Adapter for IWAF

How to:

Reference:

Configuring the adapter consist of specifying connection and authentication information for each of the connections you want to establish.


Top of page

x
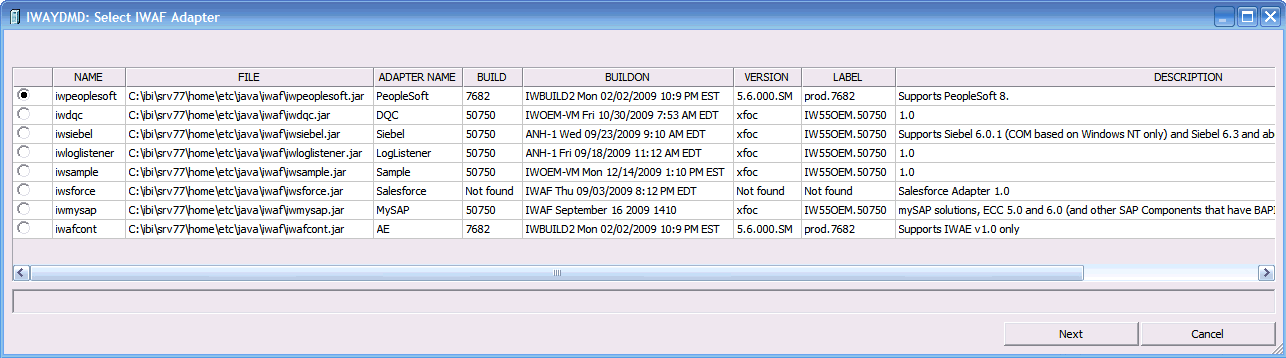
Procedure: How to Configure the IWAF Adapter

You can configure the adapter from either the Web Console or the Data Management Console.

  1. From the Web Console menu bar, click Adapters

    or

    from the Data Management Console, expand the Adapters folder.

    The Adapters folder opens.

  2. Expand the Available folder, if it is not already expanded.
  3. Expand the Procedures folder, and then expand the IWAF folder.
  4. Right-click IWAF and select Configure.
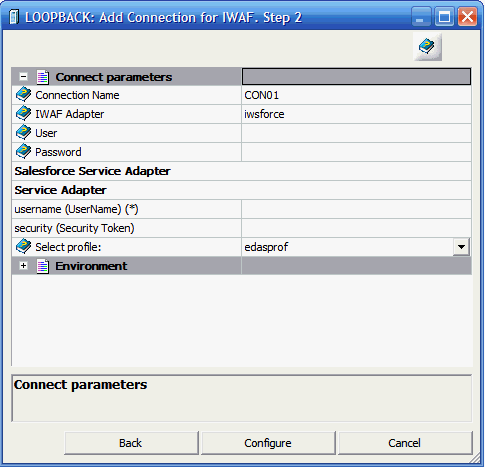
  5. Click OK to allow changes to the server configuration.

    The IWAF Successfully added to configuration window appears.
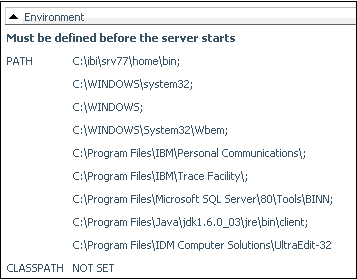
  6. Optionally, you can click the Environment arrow to see the path requirements.

    The path requirements are displayed:

  7. Click Restart Java Services and then click OK.

Top of page

x
Procedure: How to Declare Connection Attributes for an IWAF Adapter

You can declare connection attributes for an IWAF adapter from either the Web Console or the Data Management Console.

  1. From the Web Console menu bar, click Adapters

    or

    from the Data Management Console, expand the Adapters folder.

    The Adapters folder opens.

  2. Expand the Available folder, if it is not already expanded.
  3. Expand the Configured folder, right-click IWAF, and select Add Adapter.
  4. From the list of IWAF adapters, check the radio button for the one you want and click Next.

    This list of IWAF adapters will vary from the illustration below depending on what has been installed on your server.

    For an explanation of the information in the adapters list, see IWAF Adapter Information.

  5. Select the connection type and click Next.

    The following image shows the dialogue for Salesforce.com.

    For an explanation of the information in the adapters list, see IWAF Connection.

  6. Enter values for the parameters required by the adapter and click Configure.

    For a description of these parameters, see IWAF Connection Parameters.

    For example, the following illustration shows the connection parameters dialogue for a Salesforce.com service adapter.


Top of page

x
Reference: IWAF Adapter Information

The following table describes the information in Select IWAF Adapter dialog box.

Attribute

Description

Name

Internal name of the Adapter.

File

Full path and location of the jar file for this adapter.

Adapter Name

Name of the adapter as it will appear in the Metadata tree.

Build

iWay build number.

Build on

Date and time the adapter was built.

Version

iWay internal build number.

Label

iWay Subversion number.

Description

Adapter description.


x
Reference: IWAF Connection

The following table describes the information in Select IWAF Adapter dialog box.

Attribute

Description

Name

Name of the IWAF adapter.

Class

Name of the class file.

Type

Name of the Java class.

Option

Description of the adapter type.


x
Reference: IWAF Connection Parameters

The following table describes the information in the Add Connection to IWAF dialog box.

Attribute

Description

Connection Name

User entered connection name.

iWAF Adapter

Name of the IWAF adapter.

Type

Type is service or event.

User

Authorization ID to connect to the source.

Password

Password associated with the authorization ID.

Adapter Specific

Additional options depending on the adapter selected.

Select Profile

Select a profile from the drop-down list to indicate the profile in which to store the connection attributes. The global profile edasprof.prf is the default. Select New Profile to create a new profile.


iWay Software