In this section: |
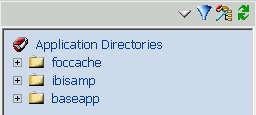
You begin all path management tasks by selecting either Metadata or Procedures on the Web Console menu bar. Both choices display the Application Directories folder on the navigation pane. Above this pane is a set of icons that provide the quickest way to initiate path management tasks.
A single click on one of the icons, shown in the following table, is enough to get you started.
|
Icon |
Tool Tip |
Function |
|---|---|---|
|
|
Hide and Show tree |
Toggles the navigation pane on and off, allowing one or both panes to occupy the screen, as needed. Note that these icons are displayed in any context in which you might wish to toggle the navigation pane on and off. |
|
|
Filter |
Depending upon the selected context in the navigation pane, this icon opens the Filter Metadata Tree pane (where you can filter synonyms), or the Filter Procedures Tree pane (where you can filter procedures and HTML files). |
|
|
Configure Path |
This icon opens the Application Configuration pane from which you can create applications, add applications to the search path, map and reorder applications, delete applications or mappings from the path. The Application Configuration pane provides additional icons designed to facilitate each of these tasks. |
|
|
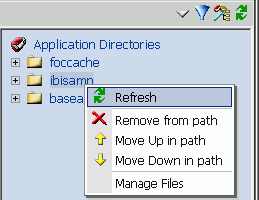
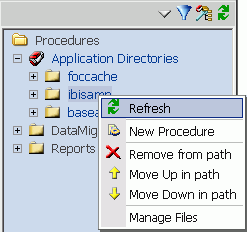
Refresh |
Depending upon the selected context in the navigation pane, this icon refreshes the synonyms or procedures, and html files listed in the application tree. Note that this icon is displayed in any context in which you might wish to refresh the display of objects on the navigation pane. |
Using Context Menus to Initiate Path Configuration and Filter Options
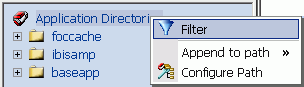
As an alternative to using path management and filtering icons, you can initiate these tasks from right-click menus that appear at three levels of the Application Directories tree.
Note: If you prefer to use left-click behavior to access these menus, choose My Console, then select Preferences from the Web Console menu bar. On the Preferences pane, select the Left-click to show pop up menu check box, then click Update. The behavior change takes effect after you refresh your browser. (This is particularly useful for browsers that do not support right-click behavior.)
|
|
|
How to: |
The applications available for inclusion in the search path are identified by name, type, and physical location. With the exception of the baseapp application, which is always part of the search path, (and the foccache directory, which is automatically added to the search path when you connect to the server), you must explicitly add applications to your search path.
On the Web Console menu bar, select Procedures or Metadata.
Click the Configure Path
 icon
above the navigation pane. The Application Configuration pane opens.
icon
above the navigation pane. The Application Configuration pane opens.
All path configuration tasks are managed from a single pane that provides its own set of icons to facilitate your work.

On a Unified Server using PDS deployment, the physical location designations on the Application Management pane look a little different, but the icons are the same.

Click one of the following icons to initiate these tasks.
|
Icon |
Tool Tip |
|---|---|
|
|
Create Directory under APPROOT |
|
|
Create New mapping |
|
|
Above the Application directories list, the tip reads: Delete application directory or remove mapping Above the APP PATH box, the tips reads: Delete from APP PATH |
|
|
Up in APP PATH Down in APP PATH |
|
|
Copy APP PATH from server and group profiles (Appears when configuring a new or existing user or group profile, but not the server profile.) |
The procedures that follow will explain how to:
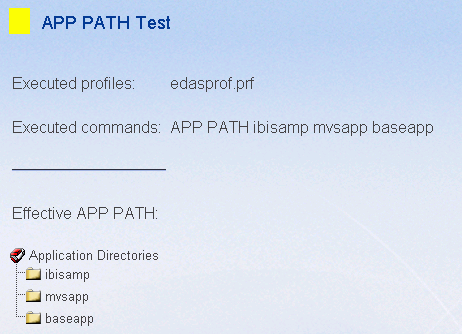
The profile is the location in which the search path is saved. Three levels of profiles are available for processing from this pane: edasprof (the global profile of the server), group (if applicable to the platform), and user.
The applications available for inclusion in the search path are identified by name, type, and physical location. With the exception of the baseapp application, which is always part of the search path, you must explicitly add applications to your search path.
To create a profile:
To edit an existing profile:
Tip: You can also edit the search path of the profile by selecting and saving configuration options, as described in How to Configure the Application Path in the Web Console.
The Procedures pane opens.
 icon above
the navigation pane.
icon above
the navigation pane.
The Application Configuration pane opens.
 icon.
icon.
The new application is added to the Application directories list.
Note: The application must still be added to the Application Path.
You can assign an application name to a non-approot application anywhere in the file system. This application name becomes a virtual application under approot, which can be referenced in an APP PATH command and any other APP command that the takes an application name as a parameter. (Note that mapping does not automatically add an application to the path. It simply makes it available for addition to the search path.)
Application mappings can be added and deleted on a per profile basis.
The Procedures pane opens.
 icon above
the navigation pane.
icon above
the navigation pane.
The Application Configuration pane opens.
Choose a profile from the drop-down list. The selected profile will have the application mapping added to it.
 icon.
icon.
An input screen is displayed.
|
HFS |
PDS |
|---|---|
ext=//DD:ddname or /dir/subdir |
ext=//DD:ddname |
If applicable, click the check box next to Create directory if none exists.
The application is marked Yes in the Mapped column of the Application directories list.
Note: The mapping must still be added to the Application Path.
If you are not already at the Application Configuration pane, do one of the following:
The Procedures pane opens.
 icon above
the navigation pane.
icon above
the navigation pane.
The Application Configuration pane opens.
 between
the boxes. The application is added to the APP PATH box.
between
the boxes. The application is added to the APP PATH box.
 icons above
the APP PATH box.
icons above
the APP PATH box.
 icon.
icon.
 icon
above the APP PATH box enables you to quickly copy the effective
APP path from the server profile (and/or from a group profile if available)
into the APP PATH box, after which you can make additional adjustments to
the path, as required.
icon
above the APP PATH box enables you to quickly copy the effective
APP path from the server profile (and/or from a group profile if available)
into the APP PATH box, after which you can make additional adjustments to
the path, as required.Do one of the following:
The Procedures pane opens.
 icon above
the navigation pane.
icon above
the navigation pane.
The Application Configuration pane opens.
 icon.
icon.
A confirmation dialog box opens.
If not already open, open the Application Configuration pane, do one of the following:
The Procedures pane opens.
 icon above
the navigation pane.
icon above
the navigation pane.
The Application Configuration pane opens.
 icon.
icon.
The mapping is removed from the Application directories list.
Note: Any APP PATH commands that reference the deleted APP MAP will not be changed by this action. To remove the previously mapped application from the path, select it in the APP PATH box and click the Delete icon above the box.
How to: |
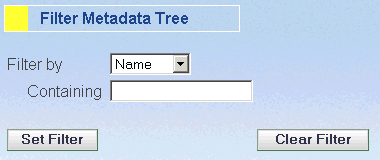
You can limit the synonyms, procedures, and html files that appear in the application tree.
You can limit the synonyms that appear in the application tree on the Web Console Metadata Page by applying a filter. Your filtering selections apply to all applications displayed in the navigation pane.
To filter synonyms in the metadata tree, do one of the following:
The Metadata pane opens.
 icon
above the navigation pane.
icon
above the navigation pane.
The Filter Metadata pane opens.
FILE=   , SUFFIX=     ,
.
.
.
REMARKS='Inventory'  ,$
Note that these entries are case sensitive.
The Filter icon is superimposed on the folder icon in the navigation pane.
Note: You can remove the filter by clicking the Clear Filter button.
By default, only procedures are listed in the application tree on the Procedures pane, but, by applying a filter, you can show the procedures and/or html files in the application tree. Your filtering selections apply to all application displayed in the navigation pane.
To filters procedures and html files in the procedures tree, do one of the following:
The Procedures pane opens.
 icon
above the navigation pane.
icon
above the navigation pane.
The Filter Procedures Tree pane opens.

Note that these entries are case sensitive.
The Filter icon is superimposed on the folder icon in the navigation pane.
Note: You can remove the filter by clicking the Clear Filter button.
How to: |
You can copy and move one or more synonyms or procedures between applications, delete one or more synonyms or procedures from applications, and refresh one or more synonyms in applications.

To see additional information for each listed synonym, select the Extended check box and click Refresh Page. The pane now includes columns for Size, Date Modified, Real Table Name, and Connections.

To see additional information for each listed procedure, select the Extended check box and click Refresh Page. The pane now includes columns for Size and Date Modified.
To refresh all listed synonyms in the selected application, click the check box at the top of the column.
To copy all listed files from one application to another, click the check box at the top of the column.
Tip: Alternatively, expand the Application Directories folder, expand a specific application folder, click a synonym or procedure, and choose Copy synonym or Copy (procedure) from the menu. Then select the application to which you want to copy the designated component. To copy a group, left-click the icons of the components (check marks identify the group), then right-click any marked component and select Copy marked to>. Then select the application to which you want to copy the group.
From the Web Console you can only copy two file types: synonyms and procedures. If you need to copy other file types, see Designating File Types for APP Commands.
To move all listed files from one application to another, click the check box at the top of the column.
Tip: Alternatively, expand the Application Directories folder, expand a specific application folder, click a synonym or procedure, and choose Move synonym or Move (procedure) from the menu. From a secondary menu, select the application to which you want to copy the designated component. To copy a group, left-click the icons of the components (check marks designate those that form the group), then right-click any marked component and select Copy marked to>. From a secondary menu select the application to which you want to copy the group.
From the Web Console you can only move two file types: synonyms and procedures. If you need to move other file types, see Designating File Types for APP Commands.
For procedures, click the Delete button.
Tip: Alternatively, expand the Application Directories folder, expand a specific application folder, click a synonym or procedure, and choose Drop synonym or Delete (procedure) from the menu. To delete a group, left-click the icons of the components (check marks designate those that form the group), then right-click any marked component and select Drop marked or Delete marked.
From the Web Console you can only copy two file types: synonyms and procedures. If you need to copy other file types, see Designating File Types for APP Commands.
| WebFOCUS |
 and
and