
In this section: How to: Reference: |
Schedule blackout dates are those dates on which schedules will not run and cannot be set to run. As a ReportCaster user, you can view schedule blackout dates that have been set for all users (global dates) and those set for the groups to which you belong. Only ReportCasteradministrators and Managed Reporting Group Administrators can define, update, and delete schedule blackout dates.
To view schedule blackout dates, in theReportCaster Development Interface, select the Blackout Dates tab. The Schedule Blackout Dates interface, shown in the following image, provides a calendar and a list of groups to which you belong in the left pane. The right pane displays a list of schedule blackout dates for the selected group. The Blackout Dates tab initially opens to the Global group.
The following image shows the Schedule Blackout Dates tab for the administrator, which includes the administrative options in the toolbar, Save, Import, and Extract.
Administration of schedule blackout dates is performed by:
When managing schedule blackout dates, you can add new blackout dates, delete and replace the description of existing blackout dates, and extract existing blackout dates to a file for future use. In the ReportCaster Blackout Dates tab, you can perform these tasks through:
To view the schedule blackout dates for a particular group, select that group in the left pane. The list of blackout dates in the calendar and right pane refresh to display the selected group blackout dates, which are shaded in yellow, along with the global blackout dates, shaded in gray.
You can change the month or year using the arrows at the top of the calendar. Click Refresh to load the latest blackout dates. Dates only appear as available or unavailable. You can toggle between exposing and hiding the left pane by clicking the arrow in the top-right corner of the pane. The following image shows the display with the left pane hidden.

Blackout dates are enforced during schedule creation and at run time:
Note: Schedule blackout dates for a specific user include the global blackout dates and the blackout dates assigned to the group(s) to which the user belongs.
To define Blackout Dates:
Note: Only a ReportCaster administrator can set Global schedule blackout dates.
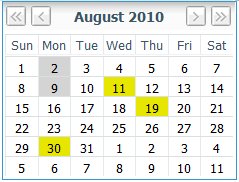
If you are choosing global dates, the day on the calendar turns gray. If you are choosing a group blackout date, the day on the calendar turns yellow. The following image shows an example of global (August 2 and 9) and group (August 11, 19, and 30) schedule blackout dates.
Note: Global schedule blackout dates apply to all groups. Any day can be both a global and group-specific blackout date.
A confirmation window opens to tell you that the dates have been saved.
The blackout dates you saved appear in the Schedule Blackout Dates calendar and are displayed in the right pane.
How to: |
You can import a file that contains blackout dates to the ReportCaster Development Interface.
To import schedule blackout dates:
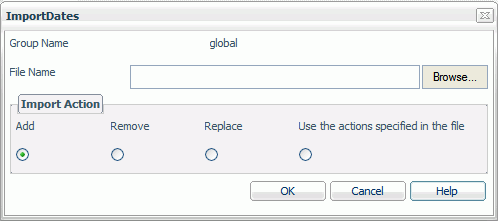
The Import Dates dialog box opens, as shown in the following image.
The following confirmation message is displayed:
Blackout Dates have been successfully imported.
Select Save on the Schedule Blackout Dates toolbar to save the changes.
Note: The imported blackout date changes do not take effect until you save them.
The Schedule Blackout Dates calendar is updated with the blackout date changes.
How to: |
You can extract the existing blackout dates in the ReportCaster Development Interface to a file.
To extract schedule blackout dates:
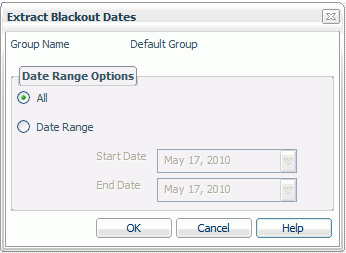
The Extract Blackout Dates dialog box opens, as shown in the following image. The group name from which you are extracting the blackout dates appears at the top of the window.
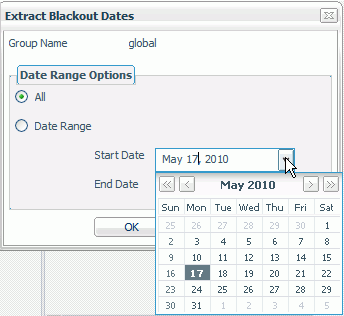
If you select Date Range, type or select the Start Date and End Date. To select a date, click the down arrow next to the field. A calendar opens, as shown in the following image, from which you can choose a date.
A window opens asking if you want to open or save the file.
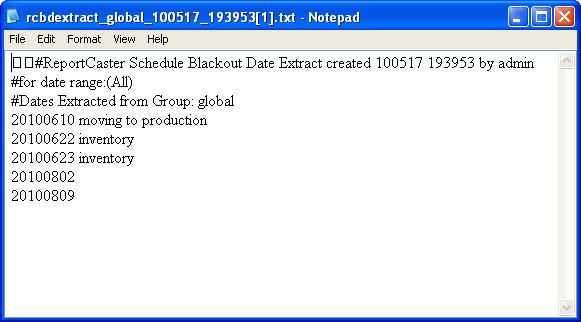
If you choose to open the file, a window opens displaying the contents of the extracted content. The following is an example of an extracted file.
If you choose to save the file:
Note: The default extract file name is rcbdextract_GroupName_YYMMDD_HHMMSS.txt, where GroupName is the name of the group the blackout dates are extracted from, YYMMDD and HHMMSS are the date (year, month, day) and time (hour, minute, second) that the file was created.
| WebFOCUS |