Content management enables you to create pointers to
the following:
- PMF views.
- WebFOCUS procedures
that can be used in the PMF viewing panels (Today and Analysis).
- Web-available
content.
PMF has several predefined categories for administrator-distributed
content, including Administration, Analysis, Audit, CPM/BPM Practice,
History, Measures Detail, Objective, Perspective, Projects &
Processes, Saved, and Today. You can categorize content to control where
it appears on the Analytics tab for an administrator, or on the
Document List of the Action gadget for a user.
You can also create up to 10 custom categories for the content
that you manage.
Parameter sets saved from the Analysis Designer are also stored
as content under the Saved category. Content contains references
to stored procedure names and, for Saved views, stores blocks of
parameters and controls how PMF distributes and manages these views.
When creating access to content, make sure to click the Preview button.
If the content pointed to is valid, PMF launches that content in
a new window. This is a good way to test the content before making
it available to administrators in the Analytics tab or users in
the Document List.
For details about the fields and options available in the New
Content Access and Edit Content Access panels, see Manage Tab - Content.
x
Procedure: How to Add Content by Linking to a WebFOCUS Procedure
-
In the Manage tab, click the Content panel button.
-
Click New.
The New Content Access panel opens, as shown in the following image.

-
In the Content field, type the name of the WebFOCUS procedure (without
the .fex extension) for the view that you want to add.
-
Type a description of the procedure in the Description field.
-
Select the check box for each category from which the procedure
can be accessed.
On the Analytics tab, an administrator will see the category
in the Type drop-down list. When the administrator clicks that category,
the description that you specified for the procedure will be displayed
in the View drop-down list.
A user accesses the content of
a selected category through the Document List of the Action gadget.
-
Optionally
create one or more custom categories from which administrators and
users can access the WebFOCUS procedure. To create a custom category:
-
Left-click a User Type field, type a
name for the custom category, and press Enter.
-
Select the check box next to the new custom category to associate
the content with it.
-
Make any other changes in the New Content Access panel as needed.
-
Click Save to save the specified access
to the content.
x
Procedure: How to Add Content by Linking to a Web Page
-
In the Manage tab, click the Content panel button.
-
Click New.
The New Content Access panel opens, as shown in the following image.

-
Select the Web Page check box.
-
In the URL field, type the exact URL to the Web content that
you want to add.
Note: The URL field is named Parameters before you
select the Web Page check box.
-
Type a description of the Web content in the Description field.
-
Select the
check box for each category from which the Web content can be accessed.
On the Analytics tab, an administrator will see the category
in the Type drop-down list. When the administrator clicks that category,
the description of the Web content that you specified in this procedure
will be displayed in the View drop-down list.
A user accesses
the content of a selected category through the Document List of the
Action gadget.
-
Optionally
create one or more custom categories from which administrators and
users can access the Web content. To create a custom category:
-
Left-click a User Type field, type a
name for the custom category, and press Enter.
-
Select the check box next to the new custom category to associate
the content with it.
-
Make any other changes in the New Content Access panel as needed.
For more information about the fields in the New Content
Access panel, see Manage Tab - Content.
-
Click Save to save the specified access
to the content.
x
Procedure: How to Add Existing Content to Analytics Tab Categories
You
can add existing content to categories on the Analytics tab.
-
In the Manage tab, click the Content panel
button.
-
Navigate to the Content tree, expand the desired folder, and
select the content that you want to add to categories on the Analytics
tab.
The Edit Content Access panel opens, as shown in the following image.

-
Select one or more of the following check boxes for the categories
from which the content can be accessed.
-
Administration
-
Analysis
-
Audit
-
CPM/BPM
Practice
-
History
-
Measures
Detail
-
Objective
-
Perspective
-
Projects
& Processes
-
Saved
-
Today
-
Optionally,
create one or more custom categories from which administrators and
users can access the content. To create a new custom category:
-
Left-click a User Type field, type a
name for the custom category, and press Enter.
-
Select the check box next to the new custom category to associate
the content with it.
-
Click Save to save the specified access
to the content.
To verify,
navigate to the Type drop-down list on the Analytics tab, and click one
of the categories that you selected previously on the Edit Content
Access panel. The content that you added in this procedure appears
in the View drop-down list. Repeat for each selected category.
x
Procedure: How to Add an Operational Report as Content
You
can add an operational report as content and link it to any measure,
objective, project, or process defined in PMF. Doing this makes
the operational report available through the Operational
Report option when you click the measure, objective,
project, or process in any PMF view.
-
You must first link the desired operational report to one or more
categories shown in the following list. To do this, see How to Add Existing Content to Analytics Tab Categories.
- Measures
Detail. To link the operational report to a measure.
- Objective.
To link the operational report to an objective.
- Projects
& Processes. To link the operational report to a project or process.
-
Navigate to the Author tab and click the Measures, Objectives, Projects,
or Processes panel button.
-
Select the desired measure, objective, project, or process.
-
Depending on the panel that opens, select the desired operational report
from the Measure Report, Objective Report, Project Report, or Process
Report drop-down list.
-
Click Save to save the specified access
to the content.
To
verify, click the desired measure, objective, project, or process
in any PMF view and select the Operational Report option.
The operational report that you specified in this procedure is displayed
in a new window.
x
Procedure: How to Convert a Saved View Into a Today Page
-
In the Analytics tab, select Analysis in
the Type drop-down list.
-
Select Analysis Designer in the View
drop-down list.
-
Click Run.
The following image shows the Analysis Designer.
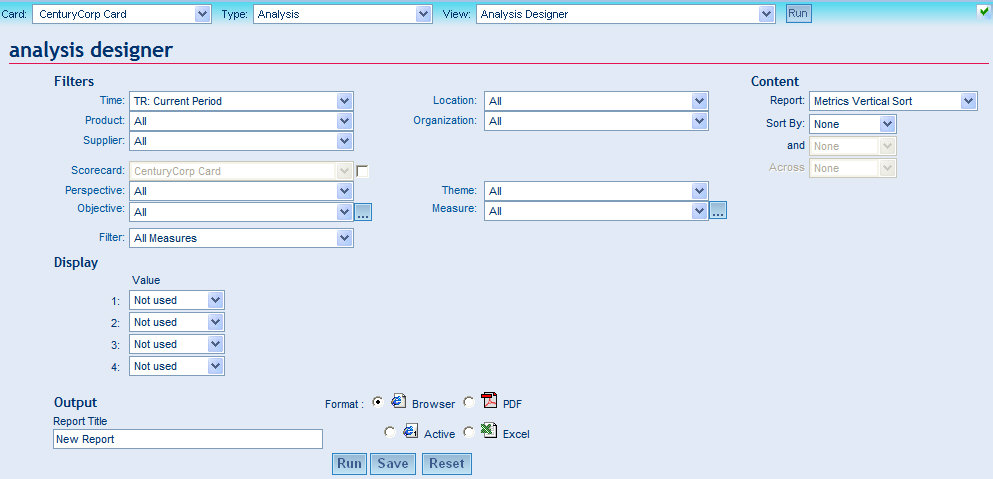
-
Specify
parameter values and optionally run the view to display the results.
-
Type
a Report Title for the view and click Save to
save the view and its specified parameter values as content.
-
Navigate
to the Manage tab and click the Content panel
button.
-
Navigate
to the Content tree, expand the desired folder, and select the content
that you saved.
The Edit Content Access panel opens.
-
Select
the Today check box.
Edit the other fields and options as needed. For more information
about the fields in the Edit Content Access panel, see Manage Tab - Content.
-
Click Save.
The content
is now available as a Today page and can be assigned to specific users.
xCreating a Custom Category
You can create up to 10 custom categories for the content
that you manage. Administrators can see the custom categories and
their associated content on the Analytics tab. Users can see the
custom categories and the content on their Dashboard in the Document
List, which is accessed through the Action gadget.
x
Procedure: How to Create a Custom Category
In this
procedure, you will create a custom category and associate content
with it, using the New Content Access panel.
You can also
create a custom category using the Edit Content Access panel. For instructions,
see How to Add Existing Content to Analytics Tab Categories.
-
In the Manage
tab, click the Content panel button.
-
Click New.
The New Content Access panel opens. The User Type fields
enable you to create custom categories for the content that you
manage.
-
Left-click
a User Type field, type a name for the custom
category, and press Enter.
-
Click the
check box next to the new custom category to associate content with
it.
In the following image, a new custom category is named
Benchmark.

-
In the applicable
fields, supply the information for the content that will be associated
with the custom category.
In the following image, the WebFOCUS procedure named benchmarkview
is associated with the custom category named Benchmark.

-
If applicable,
select the check box for each additional category from which users
can access the content.
-
Make any
other changes to the New Content Access panel as needed.
For more information about the fields on the New Content
Access panel, see Manage Tab - Content.
-
Click Save to
save the specified access to the content.
As an administrator, you can see the custom category in
the Type drop-down list, and the associated content in the View
drop-down list, on the Analytics tab. In the following image, the
custom category is named Benchmark, and the description of the associated
procedure is Performance vs. standardized data.

xMapping Parameters to an Operational Report
You can drill to any WebFOCUS operational report from
a PMF view by mapping PMF parameters.
PMF automatically passes the following
information from drill-down contexts:
|
Property
|
Parameter
|
|---|
|
Scorecard Name
|
&SCORECARD_NAME
|
|
Scorecard ID
|
&SCORECARD
|
|
Perspective Name
|
&PERSPECTIVE_NAME
|
|
Perspective ID
|
&PERSPECTIVE
|
|
Measure Name
|
&MEASURE_NAME
|
|
Measure ID
|
&MEASURE_SERIES
|
|
Dimensional values
|
&[dimension name]_LEVEL[level #]_VALUE
|
To use these parameters in your operational reports, you may
need to map the parameters passed from PMF to the parameters used
in your report.
For example, suppose you have an operational report that displays
outage data for all regions and warehouses, and you would like to
drill out to this report from a PMF view and pass the region and
warehouse information to select the proper filters in the operational report.
You already have WHERE clauses embedded in the operational report
to filter by the REGION and WAREHOUSE fields in your operational
data. The operational report is already set up to receive the ®N
parameter for the region and the &WHOUSE parameter for the warehouse.
In PMF, you already store information about your warehouse locations
in a location dimension, which has Region as Level 1 and Warehouse
as Level 2. You select a PMF view and drill to a particular warehouse
location. Next, you click a measure and select the Operational
Report option. You want PMF to filter the designated operational
report for just the warehouse displayed in the current PMF view.
You need to edit your operational report using WebFOCUS code,
Developer Studio, or a GUI such as Power Painter. Start by adding
-DEFAULT commands at the top of the report as follows:
-DEFAULT &LOCATION_LEVEL01_VALUE = ' ';
-DEFAULT &LOCATION_LEVEL02_VALUE = ' ';
Next, add a utility program and parameters to the top of the
report to allow it to receive the parameter values from PMF as follows:
-SET &DIM_NAME = 'LOCATION';
-SET &DIM_VALUE = &LOCATION;
-INCLUDE gadg_dim_parms
The first -SET command provides the dimension name for the utility
program to use for outbound parameters. The second -SET passes a
fully qualified internal dimension filter value to the utility program.
Finish by mapping the fields to your variables as follows:
-SET ®N = IF &LOCATION_LEVEL01_VALUE NE ' ' THEN TRUNCATE(&LOCATION_LEVEL01_VALUE);
- SET &WHOUSE = IF &LOCATION_LEVEL02_VALUE NE ' ' THEN TRUNCATE(&LOCATION_LEVEL02_VALUE);
Note: The WebFOCUS TRUNCATE function is used in the preceding
code to remove the trailing spaces that are automatically added
to all parameters being passed out of PMF.
The following is an example of an operational report that was
mapped to PMF parameters, saved as content, and made available in
the Analytics tab.

Note: You can use the logic described in this topic to
pass parameters from the PMF gadget layer to an operational report.
As a result, you can place the operational report on a PMF dashboard
as a gadget. For more information, see Turning a WebFOCUS Report Into a Gadget.