Configuration and Monitoring

In this section:

This section provides detailed descriptions of new configuration and monitoring features.


Top of page

x
Custom Mapping Users to Groups

How to:

You can map users to groups using a custom FOCEXEC.


x
Procedure: How to Custom Map Users to Groups
  1. From the Workspace menu, select Access Control.
  2. Right-click the Security Providers folder and select Change Groups Provider.

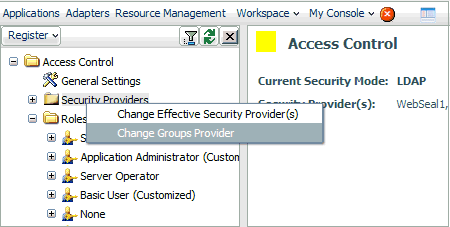
    The Change Groups Provider pane opens.

  3. Select user defined procedure from the Groups Provider drop-down menu.

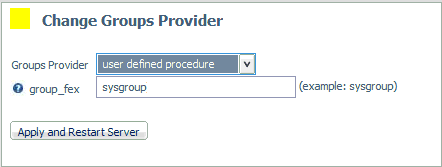
  4. Enter the name of the fex in the group_fex field. This procedure is custom for each site and has to return the group list for a connected user. It will override the Security Provider group membership for a connected user.
  5. Click Apply and Restart Server.

Top of page

x
Killing Agents by Connected User ID

How to:

You can kill the agents associated with a connected user ID from the Data Agents pages of the Web Console or from the command line.


x
Procedure: How to Kill Agents by Connected User ID

In the Web Console, look for a row for the agent in the Data Services Agents pane that is currently connected to the desired user ID, then right-click that row and select Kill Agents With The Same User ID, as shown in the following image.

To kill agents from the command line, the syntax is:

edastart -killuser <userid>

In addition, for the z/OS platform, a z/OS operator MODIFY command can also be used, as follows:

/F <server_jobname/started tast>,-killuser <userid>

Top of page

x
Emitting a Custom Message From a Quiesced Server

How to:

A server administrator can enter a custom message that will be displayed for a new user connection to the server when the server is in Quiesce mode.


x
Procedure: How to Set a Custom Message for a Quiesced Server

To define a custom message that will be delivered from a quiesced server:

  1. From the Workspace menu, select Configuration/Monitor.
  2. In the navigation pane, right-click the Server folder and select Quiesce Connections.

  3. Enter the message in the quiesce_msg field.

  4. Click Submit.

    You will be asked if you want to disable new connections.

  5. Click OK.

Note: This feature is only available to a user having server admin privileges.


Top of page

x
Queuing User Connections After the Maximum Limit Is Reached

How to:

The max_connections_per_user property for a Data Service specifies the maximum number of connections to the Data Service allowed for each user. When a user exceeds the maximum number allowed, additional connections requested by that user are refused, and the server displays the following message:

Connection refused due to the max_connections_per_user (n) 
being exceeded

where n is the number of allowed connections.

You have the option to queue user connections that are refused by the server, using the queue_max_user_conns property on the Data Service Properties page. That option is available only if the Queuing property for the Data Service is on.


x
Procedure: How to Queue User Connections to a Data Service
  1. On the Web Console menu bar, click Workspace, then Configuration/Monitor.
  2. In the Configuration/Monitor navigation tree, expand the Data Services folder.
  3. Right-click the service for which you want to queue user connections, for example, DEFAULT.
  4. From the menu, click Properties.

    The Properties page for the selected Data Service opens.

  5. In the Queuing field, select on from the drop-down list.
  6. In the max_connections_per_user field, type the maximum number of connections allowed for each user.
  7. In the queue_max_user_conns field, select y from the drop-down list to enable the queuing of connections that exceed the number specified in the max_connections_per_user field.

    In the following image, Queuing is turned on, max_connections_per_user is set to 3, and queue_max_user_conns is enabled.

    Properties page for Data Service with the queuing of connections set to y

  8. Click Save to save the new settings. You must restart the server for the settings to take effect.

Top of page

x
Multiple Cluster Manager Configurations

Advanced parameters have been added for multiple cluster nodes. The parameters include:

These parameters work on the cluster node level and override the values defined in the CLM node.


WebFOCUS