Publishing WebFOCUS Web Parts

In this section:

To publish WebFOCUS Web Parts for Microsoft SharePoint Portal Server 2007, you must perform the following steps:


Top of page

x
Installing the WOAS_Cab.CAB File

How to:

The following section describes how to install the WOAS_Cab.CAB file on the SharePoint Portal Server.

Note: The WOAS_Cab.CAB file is not packaged with the WebFOCUS installation and is provided separately.


x
Procedure: How to Install the WOAS_Cab.CAB File

Perform the following steps to install the WOAS_Cab.CAB file.

  1. Copy the WOAS_Cab.CAB file to a directory on the SharePoint Portal Server. For example, drive:\webparts.
  2. Copy the stsadm.exe file from the following directory:
    drive:\Program Files\Common Files\Microsoft Shared\web server 
    extensions\12\BIN

    to the directory you created in the previous step (for example, drive:\webparts)

    where:

    drive

    Is the location where SharePoint Portal Server is installed.

  3. Enter the following from the MS-DOS command prompt:
    stsadm -o addwppack -filename drive:\webparts\WOAS_Cab.CAB -force 
    -globalinstall

    where:

    drive

    Is the location where SharePoint Portal Server is installed.

    This Web Part is now installed in a global access cache on the SharePoint Portal Server. The following message appears.

    Operation completed successfully

    Note: To delete a Web Part installation from the configuration, enter the following from the MS-DOS command prompt:

    stsadm -o deletewppack -name WOAS_Cab.CAB
  4. Log on to the SharePoint Portal Server.


Top of page

x
Configuring the WebFOCUS Web Part .DWP Files

How to:

Reference:

The following section describes how to configure the WebFOCUS Web Part .dwp files.

Note: You must perform this configuration for each WebFOCUS Web Part file before you add it to the SharePoint Portal Server.


x
Procedure: How to Configure the WebFOCUS Web Part .DWP Files

Perform the following steps to configure each Web Part .dwp file.

  1. Open each .dwp file with a text editor and change "localhost" to the name of the machine where WebFOCUS is installed. For example:
    xmlns="WOAS_ContentViewer">http://localhost/ibi_apps/components/woas/g
    overnor/WOAS_view.jsp?SID=_LogonUser_&view=search</Link> 

    to

    xmlns="WOAS_ContentViewer">http://dshbdqa/ibi_apps/components/woas/gov
    ernor/WOAS_view.jsp?SID=_LogonUser_&view=search</Link>
  2. Repeat this procedure for each WebFOCUS Web Part .dwp file.


x
Procedure: How to Add WebFOCUS Web Parts

To add WebFOCUS Web Parts to the Microsoft SharePoint Portal Server:

  1. Log on to the SharePoint Portal Server.

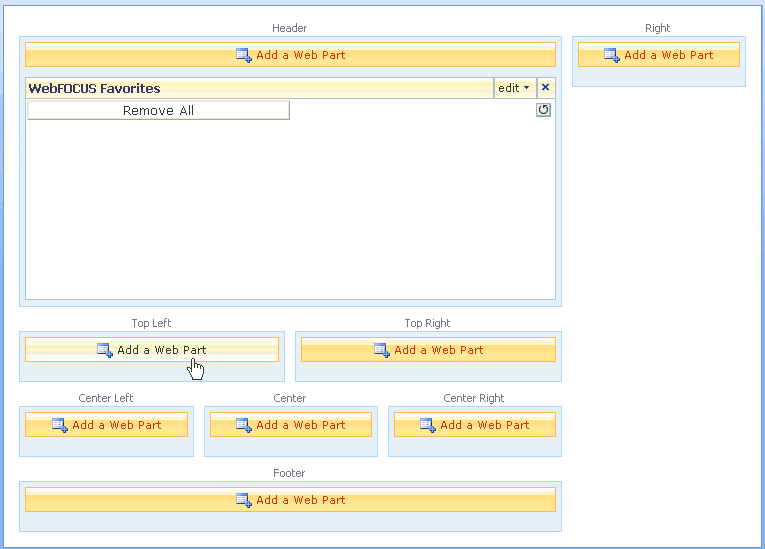
  2. Select Personalize this Page from the Welcome drop-down list.

    The following page opens.

  3. Select a location for the Web Part and click Add a Web Part.

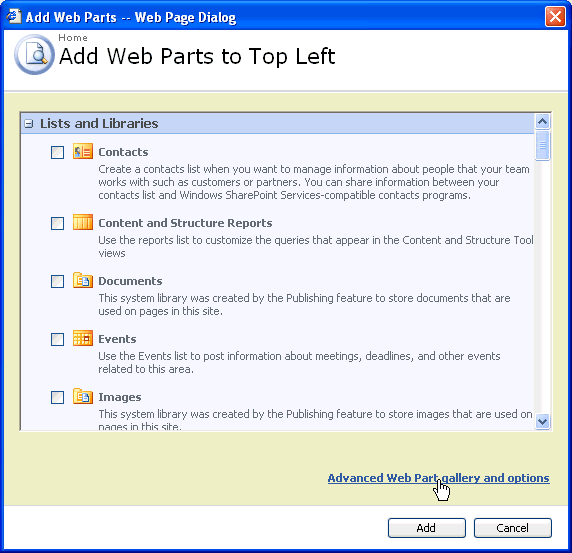
    The Add Web Parts - Web Page Dialog window opens.

  4. Click the Advanced Web Part gallery and options link.

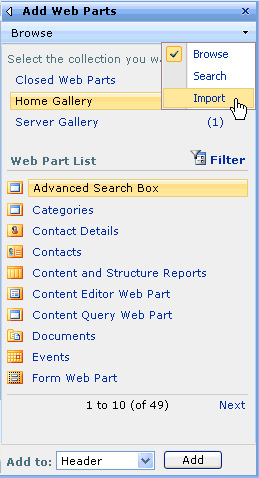
    The Add Web Parts pane opens on the right.

  5. Select Import from the Browse drop-down list.

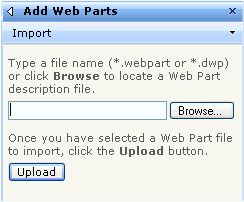
    The Import mode is activated in the Add Web Parts pane.

  6. Click Browse.

    The Choose file dialog box opens.

  7. Browse to the machine where WebFOCUS is installed and select the Web Part you want to add from the following directory:
    \ibi\WebFOCUS77\worp\components\webparts2
  8. Click Open. The Web Part is listed in the Add Web Parts pane.
  9. Click Upload.

    The Web Part is added to the Microsoft SharePoint Portal Server.


x
Reference: Sample WebFOCUS Web Part .DWP File

The following syntax shows how a WebFOCUS Web Part .dwp file is structured. In this case, the WebFOCUS Domain Web Part is used as an example.

<?xml version="1.0" encoding="utf-8"?>
<WebPart xmlns:xsd="http://www.w3.org/2001/XMLSchema" 
xmlns:xsi="http://www.w3.org/2001/XMLSchema-instance" 
xmlns="http://schemas.microsoft.com/WebPart/v2">
  <Title>WebFOCUS Domain List</Title>
  <FrameType>Default</FrameType>
  <Description>Used for viewing WebFOCUS generated Content</Description>
  <IsIncluded>true</IsIncluded>
  <ZoneID>TopZone</ZoneID>
  <PartOrder>1</PartOrder>
  <FrameState>Normal</FrameState>
  <Height />
  <Width />
  <AllowRemove>true</AllowRemove>
  <AllowZoneChange>true</AllowZoneChange>
  <AllowMinimize>true</AllowMinimize>
  <IsVisible>true</IsVisible>
  <DetailLink />
  <HelpLink />
  <Dir>Default</Dir>
  <PartImageSmall />
  <MissingAssembly />
  <PartImageLarge />
  <IsIncludedFilter />
  <Assembly>WOAS_ContentViewer, Version=1.0.0.0, Culture=neutral,   
  PublicKeyToken=1d47861a7788f05b</Assembly>
  <TypeName>WOAS_ContentViewer.ContentViewer</TypeName>
  <Link 
xmlns="WOAS_ContentViewer">http://localhost/ibi_apps/components/woas/gove
rnor/WOAS_view.jsp?SID=_LogonUser_&view=domain</Link>
</WebPart>

WebFOCUS