Customizing Dashboard Pages for a Public or Group View
From the Dashboard View Builder, Managed Reporting Administrators,
MR Security Object Managers, and Group Administrators can customize
the Dashboard page for a selected public or group view, which overrides
the default view, without editing any files. The View Builder Edit
Settings button launches the View Settings dialog box, which provides the
settings to enable and disable features, display or hide types of
reports in the Domain Tree, change the appearance of the view, and
perform other customizations. The dialog box is divided into three
panes, Settings, User Links, and Redirects.
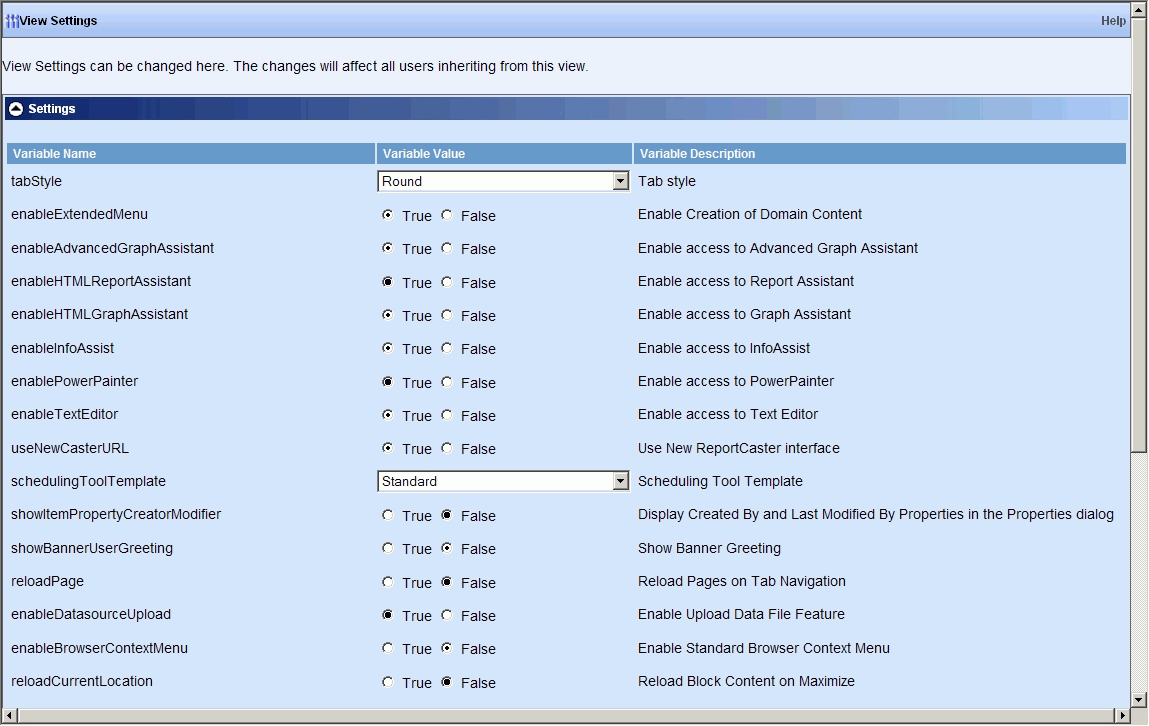
The following image shows the View Settings dialog box, Settings
pane. Use the scroll bar to view all of the settings, and access
the User Links and Redirect settings.
The following image shows the View Settings
dialog box, expanded User Links and Redirect panes, which are initally
collapsed when you enter the View Settings dialog box. The bottom
of the dialog box includes the View Settings dialog box buttons,
Save Settings, Reset to Default, and Close.

xConfiguring Dashboard Settings
The following is a list of the settings available in
the Settings pane.
-
Tab style. Round
(display round corner tabs) or Square (display square corner tabs).
To apply globally for all views, see How to Display Square Corner Page Tabs in All Views.
-
Enable Creation of Domain Content. True
(enable administrators and developers to create Standard Reports,
Reporting Object, and Other Files) or False (disable this functionality).
To apply globally for all views, see How to Enable the Creation of Standard Reports, Reporting Object, and Other Files in All Views.
-
Enable access to Advanced Graph Assistant. True
(make this tool available to users working in Dashboard) or False
(hide this tool from users working in Dashboard). To apply globally
for all views, see Globally Enabling Reporting Tools in Dashboard.
-
Enable access to Report Assistant. True
(make this tool available to users working in Dashboard) or False
(hide this tool from users working in Dashboard). To apply globally
for all views, see Globally Enabling Reporting Tools in Dashboard.
-
Enable access to Graph Assistant. True
(make this tool available to users working in Dashboard) or False
(hide this tool from users working in Dashboard). To apply globally
for all views, see Globally Enabling Reporting Tools in Dashboard.
-
Enable access to InfoAssist. True
(make this tool available to users working in Dashboard) or False
(hide this tool from users working in Dashboard). To apply globally
for all views, see Globally Enabling Reporting Tools in Dashboard.
-
Enable access to Power Painter. True
(make this tool available to users working in Dashboard) or False
(hide this tool from users working in Dashboard). To apply globally
for all views, see Globally Enabling Reporting Tools in Dashboard.
-
Enable access to Text Editor. True
(make this tool available to users working in Dashboard) or False
(hide this tool from users working in Dashboard). To apply globally
for all views, see Globally Enabling Reporting Tools in Dashboard.
-
Use New ReportCaster interface. True
(Selecting Tools/ReportCaster opens the new ReportCaster Interface.
Right-clicking a report and selecting Schedule opens the new multi-tabbed
interface.) False (Selecting Tools/ReportCaster opens the legacy
HTML ReportCaster Interface. Right-clicking a report and selecting
Schedule opens the ReportCaster single page Scheduling tool). To
apply globally for all views, see How to Change the ReportCaster Scheduling Tool in All Views.
-
Scheduling Tool Template. Shows
the template that will be passed to the RepotCaster Scheduling tool.
Select the template you want from the drop-down list. The default
template is Standard.
-
Display Created By and Last Modified By Properties in the Properties dialog. True
(display the Create By and Last Modified By properties in the Dashboard
Properties dialog box) or False (hide these properties). To apply
globally for all views, see Displaying Optional Properties in Dashboard.
-
Show Banner Greeting. True
(display welcome message) or False (hide message). To apply globally
for all views, see Displaying a Welcome Message in the Banner.
-
Reload Pages on Tab Navigation. True
(reload pages) or False (do not reload pages).
-
Enable Upload Data File Feature. True
(enable feature) or False (disable feature).
-
Enable Standard Browser Context Menu. True
(enable menu) or False (disable menu).
-
Reload Block Content on Maximize. True
(reload block) or False (do not reload block).
-
Show Properties Share option for Deferred Reports output. True
(display Share Report check box) or False (hide check box). To apply
globally for all views, see Hiding the Share Report Option for Finished My Reports.
-
Show Properties Share option for OLAP Reports. True
(display Share Report check box) or False (hide check box). To apply
globally for all views, see Hiding the Share Report Option for Finished My Reports.
-
Show Folder Block as Collapsible Tree. True
(display folder block as a tree) or False (display standard folder
block). To apply globally for all views, see How to Display a Collapsible Tree in the Folder Blocks of All Views.
-
Hide Reporting Objects from these Roles. Select
from a valid list of user roles. To apply globally for all views,
see Hiding Report Types in the Domain Tree.
-
Hide My Reports from these Roles. Select
from a valid list of user roles. To apply globally for all views,
see Hiding Report Types in the Domain Tree.
-
Hide Shared Reports from these Roles. Select
from valid list of user roles. To apply globally for all views,
see Hiding Report Types in the Domain Tree.
-
Hide Other Files from these Roles. Because
Other Files are hidden by default from all user roles except the
Developer role, the Managed Reporting Administrator role, and any
custom role based on either of these two roles, you can effectively
hide Other Files from only the previously mentioned roles. To apply
globally for all views, see Hiding Report Types in the Domain Tree.
-
Hide Standard Reports from these Roles. Select
from valid list of user roles. To apply globally for all views,
see Hiding Report Types in the Domain Tree.
Note: The list of user roles you can select from includes
Analytical User, Content Manager, Developer, Library User Only,
MR Administrator, MR Group Authorization Manager, MR Security Object
Manager, No Privileges, Power User, Run Only User, User, any custom
user roles you have created, and the ability to select all user
roles that have access to the selected view.
xConfiguring Dashboard User Links
The following image shows the View Settings dialog box
User Links pane, which you can access by clicking the down-arrow
to the left of User Links.

The User Links pane contains the Available Links list box and
the Selected Links list box. When a personal view is created, all
banner links that were made available by the administrator are selected
to display in the view by default. You can remove links from the Selected
Links list box and add back previously removed links that are in
the Available Links list box.
xConfiguring Dashboard Redirects
The following image shows the View Settings dialog box
Redirects pane, which you can access by clicking the down-arrow
to the left of Redirects.

The Redirects pane contains the Redirect context type drop-down
menu and the Redirect URL text box. When users log off from a view,
they are redirected to the Welcome Page by default. You can redirect
users to a different logoff window by selecting context-redirect
or x-redirect from the Redirect context type drop-down list and
entering the desired URL in the Redirect URL field. The context-redirect
option is the default setting and is used to add additional segments
to the default redirect URL to redirect a user to a different URL inside
the application context upon logoff. The x-redirect option is used
to redirect a user to a fully qualified URL outside the application.
For more information, see Customizing the Logoff Window.
All changes made to the selected view
are saved in the following location:
\ibi\WebFOCUS77\worp\worp_users\viewname\view-config.xml
where:
- viewname
Indicates the name of the customized
view created in the View Builder.
When all Settings, User Links, and Redirects changes are completed
for the view, click the Save Settings button.
If you click the Reset to Default button,
the customized view is deleted from the view-config.xml file and all
default settings are restored. Click Close to
return to the View Builder.