Applying Custom Styling to a Graph

In this section:

You can customize your graph using StyleSheets and SET commands. You can set the graph width and height, set fixed scales for the X and Y axes, enable the Graph Editor, and use Graph API calls to further customize your graph.

For details on customizing graph headings and footings, see Using Headings, Footings, Titles, and Labels.


Top of page

x
Setting the Graph Height and Width

How to:

The width (or horizontal axis) of each graph, which includes any surrounding text, is automatically set to 760 pixels. When setting the graph width, you should allow for the inclusion of any text required for the vertical axis and its labels along the left margin.

To maximize display space, you can limit the size of your labels through the use of either AS phrases or DECODE expressions.

The height (or vertical axis) of your graph is automatically set to 405 pixels.

The vertical axis is automatically set (VAUTO=ON) to cover the total range of plotted values. The height of the axis is set as high as possible (taking into consideration the presence of any headings or footings and the need to provide suitably rounded vertical class markers). The range is divided into intervals called "classes." The scale is normalized to provide class values rounded to the appropriate multiples and powers of 10 for the intervals plotted on the axis.


x
Syntax: How to Set the Graph Width
SET HAXIS={nn|760}

where:

{nn|760}

Is a positive numeric value. The default is 760 pixels.

Note: The maximum HAXIS size for SVG graphs is 40 inches.


x
Syntax: How to Set the Graph Height
SET VAXIS={nn|400}

where:

{nn|400}

Is a positive numeric value. The default is 400 pixels.

Note: The maximum VAXIS size for SVG graphs is 40 inches.


Top of page

x
Customizing Graphs Using SET Parameters

How to:

Reference:

The GRAPH environment includes a set of parameters that control the appearance of the graph and offer some additional control when you run the request.

For example, the BSTACK parameter enables you to specify that the bars on a bar graph are to be stacked rather than placed side by side.


x
Syntax: How to Use SET Parameters With GRAPH Requests

To set the parameters that control the GRAPH environment, use the appropriate variation of the SET parameter.

SET parameter=value,parameter=value...

For a list of supported GRAPH parameters, see Values and Functions of SET Parameters for Graphs.

Note:


Example: Using SET Parameters With GRAPH Requests

The following shows how to set the height (Y-axis) and width (X-axis) for a graph.

SET HAXIS=75,VAXIS=40
GRAPH FILE filename 
.
.
.
END


x
Reference: Values and Functions of SET Parameters for Graphs

Graph SET Parameter

Values

Parameter Function

3D
ON|OFF

When ON, a three-dimensional chart is produced. When OFF, a two-dimensional chart is produced. ON is the default.

AUTOTICK
ON|OFF

When ON, tick mark intervals are automatically set. ON is the default. (See also HTICK and VTICK.)

BARNUMB
ON|OFF

When ON, places the summary values at the ends of the bars on bar graphs or slices on pie graphs. OFF is the default.

BSTACK
ON|OFF

When ON, specifies that the bars on a bar graph are to be stacked rather than placed side by side. OFF is the default.

GRAPHEDIT
graphedit

As of WebFOCUS 8.0, this parameter has been deprecated. For information about editing charts, see the WebFOCUS InfoAssist User’s Manual.

GRID
ON|OFF

When ON, specifies that a grid is to be drawn on the graph at the horizontal and vertical class marks (see also VGRID). OFF is the default.

HAUTO
ON|OFF

When ON, specifies automatic scaling of the horizontal axis unless overridden by the user. If OFF, user must supply values for HMAX and HMIN. ON is the default.

HAXIS

Specifies the width in characters of the horizontal axis. This parameter can be adjusted for graphs generated offline. HAXIS is ignored for online displays since the width of the graph is automatically adjusted to the width of the display area.

HCLASS
nnn

Specifies the horizontal interval mark when AUTOTICK=OFF (see also HTICK).

HISTOGRAM
ON|OFF

When ON, a histogram is drawn instead of a curve when values on the horizontal axis are not numeric. ON is the default.

HMAX
nnn

Specifies the maximum value on the horizontal axis when the automatic scaling is not used (HAUTO=OFF).

HMIN
nnn

Specifies the minimum value on the horizontal axis when the automatic scaling is not used (HAUTO=OFF).

HSTACK
ON|OFF

When ON, specifies that the bars on a histogram are to be stacked rather than placed side by side. OFF is the default.

HTICK
nnn

Specifies the horizontal axis tick mark interval when AUTOTICK is OFF (see also HCLASS).

LOOKGRAPH
option

Specifies the graph type. For more information, see Determining Graph Styles Using LOOKGRAPH.

PIE
ON|OFF

When ON, specifies that a pie graph is desired. OFF is the default.

VAUTO
ON|OFF

When ON, specifies automatic scaling of the vertical axis unless overridden by the user. If OFF, the user must supply values for VMAX and VMIN. ON is the default.

VAXIS

Specifies page length in lines. This parameter can be adjusted for graphs generated offline. VAXIS is ignored for online displays since the height of the graph is automatically adjusted to the display area.

VCLASS
nnn

Specifies the vertical interval mark when AUTOTICK=OFF (see also VTICK).

VGRID
ON|OFF

When ON, specifies that a grid is to be drawn on the graph at the horizontal and vertical class marks (see also GRID). OFF is the default.

VMAX
nnn

Specifies the maximum value on the vertical axis when the automatic scaling is not used (VAUTO=OFF).

VMIN
nnn

Specifies the minimum value on the vertical axis when the automatic scaling is not used (VAUTO=OFF).

VTICK
nnn

Specifies the vertical axis tick mark interval when AUTOTICK is OFF (see also VCLASS).

VZERO
ON|OFF

Determines whether values along the Y-axis are stored or ignored. If ON, missing data along the Y-axis is treated as zero. If OFF, missing data along the Y-axis is ignored and values are not stored in the plot matrix. OFF is the default.


Top of page

x
Setting Fixed Scales for the X-Axis

How to:

The horizontal scale is automatically set to cover the total range of values to be plotted (HAUTO=ON). The range is divided into intervals called "classes." The scale is normalized to provide class values rounded to the appropriate multiples of 10 for the intervals plotted on the axis.

To assign fixed upper and lower limits (useful when producing a series of graphs where consistent scales are needed), you can turn off the automatic scaling mechanism and set new limit values by setting HAUTO=OFF.


x
Syntax: How to Set Fixed Scales for the X-Axis
SET HAUTO=OFF, HMAX=nn, HMIN=nn

where:

HAUTO

Is the automatic scaling facility. If HAUTO is ON, any values for HMAX and HMIN are overridden.

HMAX=nn

Sets the upper limit on the horizontal axis. The default is 0.

HMIN=nn

Controls the lower limit on the horizontal axis when HAUTO is OFF. The default is 0.

Note:


Top of page

x
Setting Fixed Scales for the Y-Axis

How to:

To give the vertical scale fixed upper and lower limits (useful when producing a series of graphs where consistent scales are needed), you can turn off the automatic scaling mechanism and set fixed limits using the SET VAUTO=OFF command.


x
Syntax: How to Set Fixed Scales for the Y-Axis
SET VAUTO=OFF, VMAX=nn, VMIN=nn

where:

VAUTO

Is the automatic scaling facility. If VAUTO is ON, any values for VMAX and VMIN are overridden.

VMAX=nn

Sets the upper limit on the vertical axis when VAUTO is OFF. The default is 0.

VMIN=nn

Controls the lower limit on the vertical axis when VAUTO is OFF. The default is 0.

Note:


Top of page

x
Customizing Graphs Using the Graph API and HTML5 JSON Properties

How to:

You can further enhance your graph output by manually adding API calls inside the ON GRAPH SET STYLE * and ENDSTYLE commands in the GRAPH request. If you are creating an HTML5 graph, you can also include JavaScript Object Notation (JSON) methods and properties. When you save changes the corresponding API calls and properties will be written to the graph StyleSheet.

For reference information about the Graph API, see the WebFOCUS Graphics manual.

When you include both JSON and API calls in the StyleSheet section of the request, the API calls are parsed first, then the JSON. Therefore, if the JSON sets the same property as an API call, the JSON will take precedence. In general, the later declarations overwrite the properties set in earlier declarations.


x
Syntax: How to Customize a Graph Using the Graph API
GRAPH FILE filename 
graph commands 
ON GRAPH SET STYLE *
*GRAPH_SCRIPT 
API calls 
*END
*GRAPH_JS 
JSON 
*END
WEBFOCUS StyleSheet commands 
ENDSTYLE
END

where:

filename

Specifies a data source for the graph.

API calls

Are API calls. They must be included in a GRAPH_SCRIPT block within *GRAPH_SCRIPT and *END declarations. A request can contain multiple GRAPH_SCRIPT blocks anywhere within the style section. For reference information about the Graph API, see the WebFOCUS Graphics manual.

JSON

Are JSON methods and properties that apply to HTML5 graph output. They must be included in a GRAPH_JS block within *GRAPH_JS *END declarations. A request can contain multiple GRAPH_JS blocks anywhere within the style section. For reference information about the JSON methods and properties, see the Creating HTML5 Charts With WebFOCUS Language manual.

WEBFOCUS StyleSheet commands

For details on StyleSheet commands, see Creating and Managing a WebFOCUS StyleSheet.


Example: Customizing Graphs Using the Graph API

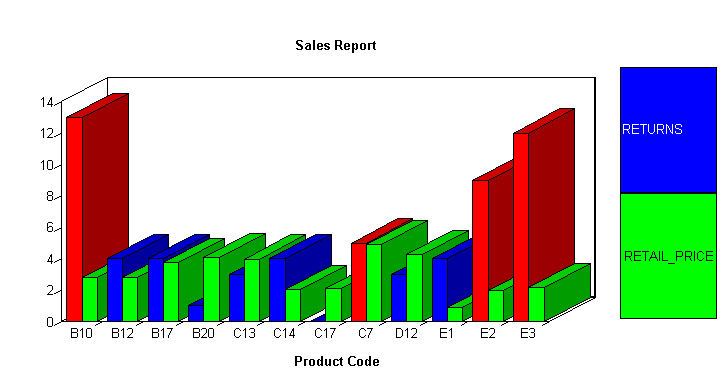
The following annotated example illustrates how to customize a graph using ON GRAPH SET STYLE *. The Graph API code is highlighted in the request.

   GRAPH FILE SALES
   SUM RETURNS
   RETAIL_PRICE
   ACROSS PROD_CODE AS 'Product Code'
   ON GRAPH SET STYLE *
   *GRAPH_SCRIPT
1. setLegendMarkerPosition(4);
2. setO1LabelRotate(0);
3. setTitleString("Sales Report");
4. setTextJustHoriz(getTitle(),1);
   *END  
   DEFMACRO=COND0001, MACTYPE=RULE, WHEN=RETURNS GT 4,$
   TYPE=DATA,MACRO=COND0001,ACROSSCOLUMN=RETURNS,COLOR=RED,$
   ENDSTYLE
   END

where:

  1. Displays legend text inside the legend marker.
  2. Displays the X-axis labels horizontally.
  3. Displays the title (Sales Report) without quotes.
  4. Centers the title.

The output is:


WebFOCUS