Using a Source Control System to Manage Procedures and Synonyms
Once you have created source control folders and created
associations in the Data Management Console, the next step is to
put the files under source control. In other words, you need to
add them to a source control folder. You can add individual files or
select a group of files from an application directory.
Files that have been added to a source control system need to
be checked out before changes can be made. Checking files back in
creates a history of their development.
x
Procedure: How to Add Files to a Source Control System
To track and manage changes, DataMigrator
files must first be added to a source control system. This can be
performed by developers or the manager. In either case, each new
file needs to be added to the source control system just one time. Once
the file has been added to the source control system, the rest of
the developers can attain the copy from the source control system
by invoking Get Latest Version.
Note: Files
that are added or checked into a source control system become read-only
until they are checked out.
In the navigation pane of the
Data Management Console:
-
Right-click an application directory, multiselected objects,
an individual flow, stored procedure, or synonym, select Source Control,
and then click Add/Check In.
The Add/Check In Files dialog box opens.
-
Select the files you want to add to source control. Files that
are added are automatically checked in.
Tip: You can use the Select All check
box to both select and deselect all the files.
-
Optionally, you can check the files out by selecting the Keep
files checked out check box.
-
Optionally, you can add comments by typing them into the Comment text
box. If you are adding multiple files, they will all have the same
comment.
-
Click OK.
Note: The default listing for files in the Add/Check
In dialog box is by Type. To list them by name, click the Files column heading.
Icons
display a lock to indicate that the files are under source control.
If you
open your source control program, you will see that the files from
the DataMigrator application directory have been added to the corresponding
project folder. The synonym (dminv) has a .mas extension and the
stored procedure (dmdefs) has a .fex extension. The flow (dmdemo)
has two files stored in source control. The source code is stored
in the file with the .fex extension. The file with the .etg extension
holds the information required for the DMC interface.
x
Reference: Add/Check In Files Dialog Box
The Add/Check In Files dialog
box is available by right-clicking an application directory, multi
selected objects, an individual flow, stored procedure, or synonym,
selecting Source Control, and then Add/Check
In.
The
Add/Check In Files dialog box has the following fields options:
-
Select All
-
Allows you to select or deselect all of the files in the
application directory.
-
Files/Type/Action
-
Shows all of the files in the application directory. The
files can be sorted by file name, type, or action.
-
Keep files checked out
-
Allows you to keep a file checked out that is being added
or checked in. A source managed file must be checked out before
you can make changes to it.
-
Comment
-
Allows you to add comments for the files.
x
Procedure: How to Get Latest Version From Source Control System
Once
files have been added to source control, you can invoke Get Latest
Version to attain a copy of the latest files from the source control
system.
In the navigation pane of the Data Management Console:
-
Right-click
an application directory, multi selected objects, an individual
flow, stored procedure, or synonym, select Source Control,
and then click Get Latest Version.
The Get Latest Version window will appear.
-
Click OK.
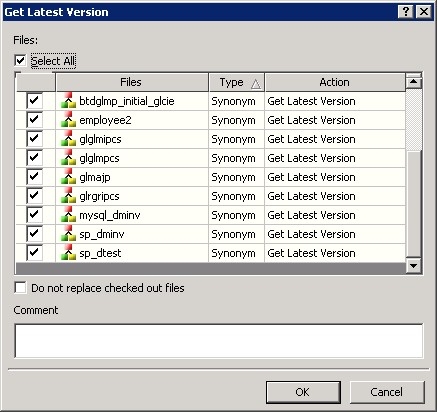
Note: If you invoke the Get Latest Version from
application directory, the Get Latest Version dialog box will list
all the files that have been added to the source control system.
There is a Select All option to get all the files from source control
system, or you can optionally select the individual files that you
want, as shown in the following image.
x
Procedure: How to Check Files Out of Source Control
For
files that are being source managed, you must check them out before
you can make and save changes. Until the files are checked out,
they remain read-only.
In the navigation pane of the Data
Management Console:
-
Right-click an application directory, multi selected objects,
an individual flow, stored procedure, or synonym, select Source Control,
and then click Check Out.
The Check Out dialog box opens.
-
Select the files you want to check out.
Tip: You can use the Select All check box to both
select and deselect all the files.
-
Optionally, add comments by typing them into the Comment text
box. If you are checking out multiple files, they will all have
the same comment.
-
Click OK.
Icons in the application directories display a red check
mark to indicate that the files have been checked out.
Note: The
default listing for files in the Check Out dialog box is by Type. To
list them by name, click the Files column
heading.
If you open the source control program, you will
see that the files that you checked out from the Data Management
Console have been checked out of the source control program. These
files are no longer read-only, which allows you to make changes
before checking them back in to source control.
If a data
source has an Access File associated with it, the Access File will
also be automatically checked out, in the same way that an .etg
file is checked in or out with its associated flow.
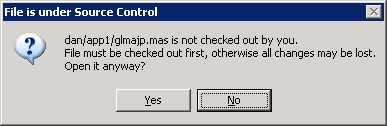
Note:
- If you try
to edit a file that has been added to source management without checking
it out, the following message appears:
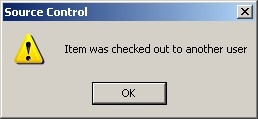
- If you try
to check out a source-managed file that has already been checked
out by another user, the following message appears:
x
Reference: Check Out Files Dialog Box
The Check Out
Files dialog box is available by right-clicking an application directory, multi
selected objects, an individual flow, stored procedure, or synonym,
selecting Source Control, and then clicking Check Out.
The
Check Out Files dialog box has the following fields and options:
-
Select All
-
Allows you to select or deselect all of the files that have
been checked in and/or added to the application directory.
-
Files/Type/Action
-
Shows all of the files that have been checked in or added
to the application directory. The files can be sorted by file name,
type, or action.
-
Comment
-
Allows you to add comments for the files.
x
Procedure: How to Check Files Into Source Control
After
you have made changes to files, you must check them back into your
source control system to maintain a record of those changes. Files
that are checked in are copied back to the server.
In the
navigation pane of the Data Management Console:
-
Right-click an application directory, multi selected objects,
an individual flow, stored procedure, or synonym, select Source Control,
and then click Add/Check In.
The Add/Check In dialog box opens.
-
Select the files you want to check in. Only files that have
been checked out have Check In as the possible action. The action
for files that have not been added to source control is Add File.
Tip: You can use the Select All check box to both
select and deselect all the files.
-
Optionally, you can keep files checked out by selecting the Keep
files checked out check box.
-
Optionally, you can add comments by typing them into the Comment text
box. If you are checking in multiple files, they will all have the
same comment.
-
Click OK.
Note: The default listing for files in the Add/Check
In dialog box is by Type. To list them by name or action, click
the Files or Action column
headings.
x
Procedure: How to Undo a Check Out From Source Control
If
you decide that you do not want to make changes to a file, you can
undo its check out from the source control system. The file becomes
read-only again, and source control maintains the version as it
existed before the file was checked out.
In
the navigation pane of the Data Management Console:
-
Right-click an application directory, multi selected objects,
an individual flow, stored procedure, or synonym, select Source Control,
and then click Undo Check Out.
The Undo Check Out dialog box opens.
-
Select the files whose check out you want to undo.
Tip: You can use the Select All check box to both
select and deselect all the files.
-
Click OK.
Note: The default listing for files in the Undo
Check Out dialog box is by file name. To list them by Type, click
the Type column heading.
x
Reference: Undo Check Out Dialog Box
The Undo Check
Out Files dialog box is available by right-clicking an application directory,
multi selected objects, an individual flow, stored procedure, or
synonym, selecting Source Control, and then
clicking Undo Check Out.
The Undo Check
Out Files dialog box has the following fields and options:
-
Select All
-
Allows you to select or deselect all of the files that have
been checked out.
-
Files/Type/Action
-
Shows all of the files that have been checked out from the
application directory. The files can be sorted by file name or type.
x
Procedure: How to View the History, Versions, and Differences of a File
The source management history records
of a file each date and time it was checked in, as well as the user
involved.
Note: This
procedure uses Visual SourceSafe, but other source control programs
should work analogously.
In the navigation
pane of the Data Management Console:
-
Right-click an individual flow, stored procedure, or synonym, select Source
Control, and then click History.
The History dialog box opens, showing the flow, stored
procedure, or synonym.
-
Click OK.
The History Options dialog box opens.
-
Optionally, use the Include Labels or Labels
Only check boxes to show labeled activity.
Note: Labels can be useful to distinguish versions
of a particular file. You can assign labels from the SourceSafe
File menu, or from the History Details dialog box that is available
from the Data Management Console History of dialog box.
-
Optionally, use the From and To fields to specify a date range
for the history.
-
Optionally, use the User field to specify the history for a
specific users activity.
The History of dialog box opens, showing the user, date,
and time for each check in.
In
Visual SourceSafe, the History of dialog box allows you to view
a version of the file, see or set details like labels and comments,
get the latest version, compare the difference between two versions,
pin or unpin the file, rollback the file to an earlier version and
discard later versions, or generate a report on the file activity.
Different source control programs may provide a different set of
options.
x
Procedure: How to Deploy Latest Files From Source Control to Central Application Directory
The
manager can deploy the latest files from source control to central
application directory. Since the working directory of a manager
is the central application directory, all they need to do is invoke
Get Latest Version from each application directory or an individual
flow, stored procedure, or synonym.
In the navigation pane
of the Data Management Console:
-
Right-click
an application directory, multi selected objects, an individual
flow, stored procedure, or synonym, select Source Control,
and then click Get Latest Version.
The Get Latest Version dialog box will open.
-
Click OK.
Note: If you invoke the Get Latest Version from
application directory, the Get Latest Version dialog box will list
all the files that have been added to the source control system.
There is also a Select All option which gets all the files from the
source control system.