Selecting and Managing Columns

In this section:

You are now ready to select the columns of data you want to load into the data targets. You can perform a variety of operations on the selected columns.

Right-click the SQL object and notice the options on the menu.


Top of page

x
Select and Create Columns
  1. Right-click the SQL column object and click Column Selection.

    The Column Selection dialog box opens. You can identify column types at a glance:

    Icon

    Description

    Key column

    Regular column

    Index Column Icon

    Index column

    Virtual column

  2. You want the sales force to be able to track and evaluate product and store information, so double-click the columns PROD_NUM from DMINV(T1), and STORE_CODE from DMORD(T2) in the Available Columns list. This moves them into the Selected Columns list.
  3. Next, you want to specify a time period. In this case, you want to select YEAR and MONTH, to provide the sales force with the ability to analyze sales on a monthly basis.

    Double-click the column YEARMONTH in the Available Columns list to move it into the Selected Columns list. (This is the column you created earlier as a Source Transformation.)
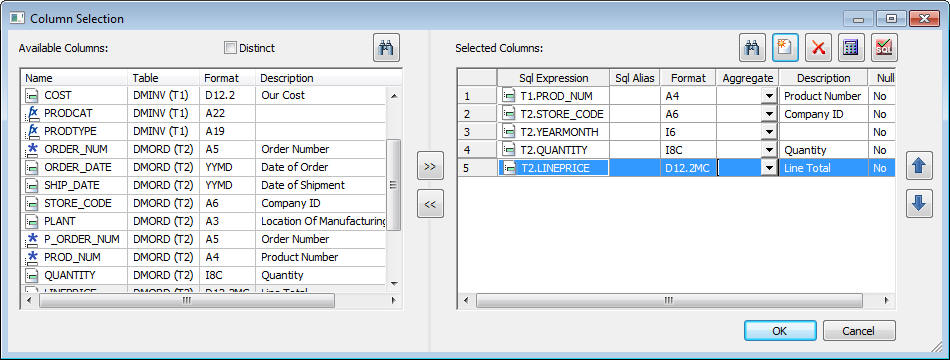
  4. Now, add the columns you will use to measure sales. Double-click QUANTITY and LINEPRICE in the Available Columns list to select columns. The Column Selection window should now look like the image below:

    Column Selection

  5. Next, you want to calculate the line item cost of goods. This transformation can be done using an SQL calculation to create the column.

    To open the SQL Calculator, click the Insert Columns button above the Selected Columns list.

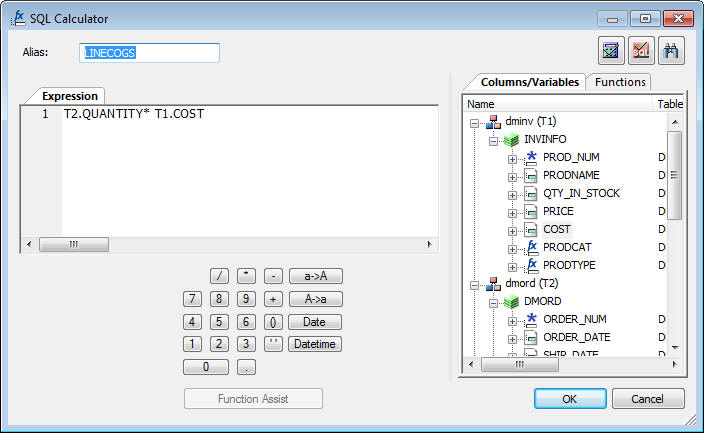
    1. In the Alias box, enter LINECOGS.
    2. Ensure that the Columns/Variables tab is selected, and then double-click T2.QUANTITY in the tree. The column appears in the Expression box.
    3. Click the multiplication sign (*) on the calculator keypad.
    4. Double-click T1.COST in the tree to complete the expression.

      The SQL Calculator should look like the image below:

      SQL Calculator

  6. Click OK to close the SQL Calculator and return to the Column Selection window.

    Notice that the expression has been added at the bottom of the Selected Columns list. The expression is in the first column and the alias you assigned is in the second column.

  7. Since you want to generate month level detail, you must aggregate on the key columns, and then on the year/month column. This is done by adding the Group attribute to each column.

    Under Selected Columns, click T1.PROD_NUM, then select Group By from the drop-down menu in the Aggregate column.

    Repeat this step for T2.STORE_CODE and for T2.YEARMONTH.
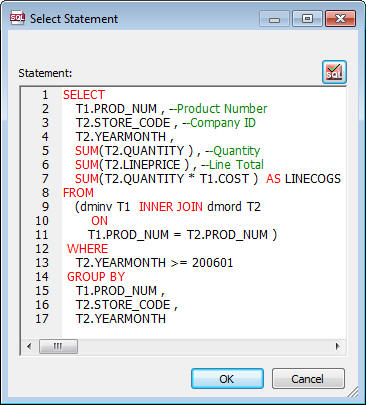
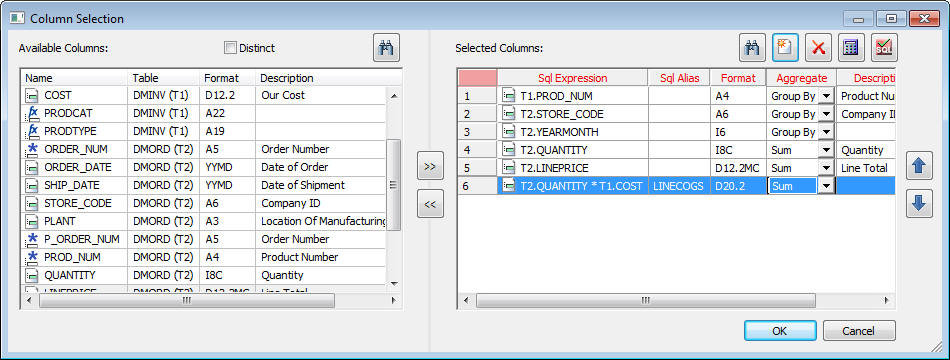
  8. Finally, let us sum the three measures: T2.QUANTITY, T2.LINEPRICE, and LINECOGS. You can multi-select them.

    Under Selected Columns, press the Ctrl key and click T2.QUANTITY, T2.LINEPRICE, and LINECOGS. Choose Sum from the drop-down menu in the Aggregate column. Sum is applied to all three columns, as shown in the following image.

    Column Selection

  9. Click OK to close the Column Selection window and return to the object view in the Data Flow tab.

Top of page

x
Filter the Data

You have identified the columns you want to extract from the source data, but the data in the source goes back several years and only the last few years are really relevant to the salespeople who need to make product decisions for the coming year. Therefore, you are going to define a selection criterion to limit the retrieval to the appropriate years.

  1. Right-click the SQL object again, and this time click WHERE Filter. The WHERE Filter Calculator opens to assist you in constructing the expression. Notice that this calculator is suitable for creating a wide range of selection criteria.

    As you can see, the columns here are represented by the same icons used in the Selected Columns dialog box. Notice that YEARMONTH is a virtual column, rather than a real database column. You can filter on real or virtual columns.

  2. To limit record retrieval to the time period beginning in January, 2006:
    1. Double-click T2.YEARMONTH in the Column list. YEARMONTH is displayed in the Expression box.
    2. Click >= (greater than or equal to) in the calculator pad below the Expression window.

      Click the numbers 2 0 0 6 0 1 on the pad, or type 200601 directly into the Expression box to specify the year and month.

    The expression in the WHERE Filter Calculator should look like the following image:

    Where Calculator

    Tip: Though it is not required for this tutorial, you can build an SQL calculation using any ANSI SQL function. Simply click the Functions tab to see the available functions and arguments.

  3. For now, click OK to complete the filtering expression.
  4. Right-click the SQL object and click SQL Statement. The window should look like the following image:

    Select statement

  5. Click the Test SQL Statement button to see the results, as shown in the following image.

    Test SQL Statement

    Note: The number of records retrieved will depend on the Run Options set from Tools and Options, and the database you choose for your sample data.

  6. Click the red X to close the Test SQL Statement window, and click OK to close the Select Statement window.

Next Step: You are ready to create the data targets into which your source data will be moved, based on the mapping and rules you defined in the SQL columns object.


iWay Software