Configuring Authentication
Authentication is the process of validating user credentials.
Individuals who use WebFOCUS may have user IDs and passwords managed
by other systems. WebFOCUS Managed Reporting and the Reporting Server
can each be configured to authenticate users to an external security
system, or to trust that authentication has already taken place.
Users benefit because they do not have to logon multiple times or
manage separate user ID/password combinations. If a user logs onto
WebFOCUS with credentials from an outside security package, the
package provides some type of authentication confirmation to the
WebFOCUS Client or the Reporting Server. This information may be
in the form of a browser cookie or a logon ticket and may be needed
by the Reporting Server in order for it to access and retrieve the
data required by the WebFOCUS application.
Depending on your operating environment,
user credentials can be validated by:
- The operating system
on which the server is running (OPSYS security).
- A list of users stored
in the server file named admin.cfg (PTH security).
- An LDAP or Active
Directory repository (LDAP security).
- A DBMS (DBMS security).
- A custom user-supplied procedure (CUSTOM security).
Multiple security providers can be configured. You can configure
additional providers using the Web Console Access Control page.
xConfiguring OPSYS Authentication
When security is set to OPSYS, the user credentials from the
client connection are authenticated by the native security system
of the operating system. The server then allocates a data access
agent that impersonates the user so that access to files or other objects
is controlled by the native system.
Profiles for operating system users are supported on all platforms.
On Windows, Active Directory groups are supported based on the win_primgroup_adsi
setting.
The server will automatically run in security OPSYS mode if no
other security mode has been configured and the server process has
been granted sufficient privileges. If the server process does not
have sufficient privileges for operating system authentication,
and no other security mode has been configured, the server runs
with security OFF.
Details about OPSYS security requirements
are provided in the Server Installation manual, where
specific sections are provided for each platform. Refer to this
manual for installation instructions and platform-specific setup
steps. The following is a summary of the OPSYS requirements:
-
On UNIX, the
startup tscom300 executable must have root setuid authority.
-
On Windows, the
server must be started as a service under SYSTEM account (Administrators
Group authority) or as a user ID with Windows Administrator authority.
On
Windows, the Server Administrator password is required for this
security mode. If the password is not provided in the configuration,
the server starts in safe mode and displays a message to that effect.
Multiple administrators are allowed. For more information on creating
server administrators and other roles, see Registering Users and Groups in a Role.
-
On z/OS, the
MVS load library must be APF-authorized, and for HFS deployment,
certain HFS executables must be given +a authorization.
-
On IBM i (formerly
known as i5/OS), the ownership of certain library files must be
changed to have QSECOFR ownership and, therefore, authority.
-
On OpenVMS, the
account starting the server must have a specific set of privileges
to have proper authorities.
Note that some system specific settings in the edaserve.cfg file
are provided to allow further adjustments of the authentication
mechanism. Those relevant for some UNIX systems are:
-
require_logon_privilege (AIX
only. Allows no login IDs to access the server.)
-
update_security_db (AIX
and HP-UX only. Registers failed login attempts.)
For Windows systems, the logon_method setting
(for interactive, network, or batch) is relevant to explicit connections.
Note: For more information on limiting user access to
the Web Console, see Configuring General Server and Web Console Actions.
x
Procedure: How to Enable Primary Group Support for Windows Active Directory
When
the Reporting Server runs on the Windows platform with OPSYS security
mode against an Active Directory, you can set the win_primgroup_adsi keyword
to support Active Directory primary group notation. When you set
the parameter to y, the server uses the primary group of the user
as the name for the group profile and for some access controls under
the Web Console. (Note that you can only set the primary group from
Windows Active Directory interface to Users management.) In order
to take advantage of this setting, you must ensure that the Windows
machine that hosts the server resides in the same domain as the
Active Directory.
-
Access the
Web Console with a server administrator user ID.
-
Click Access
Control.
The Access Control page opens.
-
Open the Security
Providers folder in the navigation pane.
-
Right-click OPSYS and
select Properties.
The OPSYS Security Configuration page opens.
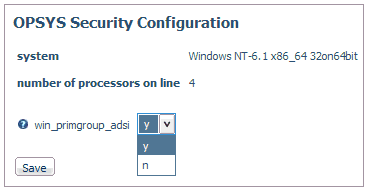
-
Select y from
the win_primgroup_adsi drop-down menu.
-
Click Save.
x
Procedure: How to Configure OPSYS Security Mode
This
procedure assumes that the server is already running in non-OPSYS
security mode.
-
Access the
Web Console with a server administrator user ID.
-
Click Access
Control.
The Access Control page opens.
The server security mode is displayed
on the Access Control page.
-
Right-click
the Security Providers folder in the navigation
pane, and select Change Provider.
The Change Provider page opens.
Note: For
more information about changing security providers, see Considerations for Changing the List of Security Providers From
the Web Console.
-
Select OPSYS from
the Primary Security Provider drop-down list.
The Change Provider page opens.
-
Supply the
Server Administrator user ID and password. Alternatively, you can
enter a new user ID and password. It will be added to the admin.cfg
file as a Server Administrator.
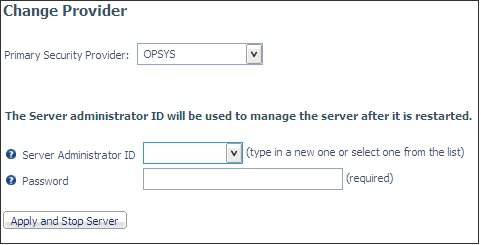
-
Click Apply
and Stop Server.
Note: If you change the privileges of tscom300,
the server will start with security OPSYS by default. For more information,
see the Server Installation manual.
-
For z/OS
Unified Server only. Starting with z/OS 1.7, the z/OS security
package provides extended password support. If this option is enabled,
you must add mixed_case_password=on to the edaserve configuration
file before starting the server in security mode OPSYS. For HFS
deployment, this file is in $EDACONF/etc and for PDS deployment
it is in qualif.servertype.CONF.CFG, where servertype is determined
by your license key.
-
If the server
is not running, start it using the instructions for your platform
in the installation guide.
The server will start in OPSYS security mode.
-
Examine
the edaprint.log file. If it indicates errors, stop the server, correct
the errors, then start it with security OPSYS.
-
Restart
your browser and connect to the Web Console. When prompted, enter
a valid operating system user ID and password.
If
you wish to register other users in a role or group or create new
roles, first connect as a Server Administrator. Then follow the
instructions in Registering Users and Groups in a Role.
x
Preventing Unsecured Server Starts After Upgrades
If
the environment variable EDAEXTSEC is explicitly set to OPSYS, and
the server fails to start because it lacks system privileges to
start in OPSYS mode, the server start aborts and error messages
are written to the edaprint log file.
This feature prevents an unsecured
server start after a software upgrade if any of the required post-upgrade,
reauthorization steps are missed on a UNIX, IBM i, or z/OS HFS
deployment. This is not applicable to other platforms. The setting
may be placed in any normal server start-up shell or profile that
a site is using or in the server edaenv.cfg configuration file.
The messages vary slightly by platform.
The edaprint messages
are:
Configured security is 'ON' as set by EDAEXTSEC variable.
Server
has no root privilege. (UNIX)
Server is not
APF-authorized. (z/OS HFS)
TSCOM300.PGM has
no QSECOFR authority. (IBM i)
Workspace initialization aborted.
(EDA13171) UNABLE TO START SERVER
x
Using Password Phrases for Authentication on z/OS
Starting with z/OS 1.8, IBM introduced password phrases
which can be used for authentication, and starting with z/OS 1.10
password phrases can be used for TSO Logon as well. Password phrases
can be from 14 to 100 characters long.
z/OS IDs can have both a password (1 to 8 bytes) and a passphrase
(from 14 to 100 bytes). The two forms of credentials are independent.
Changing one does not change the other. The server recognizes the
type of credential being presented by its size (sizes between 9
and 13 are invalid on z/OS).
No special configuration is needed to enable password phrases.
When a users log into the Web Console, there are two possible
ways they can change their passwords or passphrases:
- On the initial Web
Console Logon page. This option is disabled by default. For more
information on enabling this option, see How to Change Passwords on the Web Console Logon Screen.
- After the initial
logon, by choosing Change Password on the My
Console menu. A new screen opens with three separated
fields (old password, new password, and confirm new password).
x
Procedure: How to Change Passwords on the Web Console Logon Screen
By
default, passwords cannot be changed on the Web Console Logon page
because the following parameter is in effect:
password_change_wclogin = n
To
enable the option to change passwords when logging into the Web Console:
-
Select Access
Control from the Web Console menu bar.
-
Right-click Access
Control on the tree and select Settings from
the context menu.
-
Change the
value of the password_change_wclogin parameter to y.
On
the same configuration page, you can change the delimiter used to separate
the user ID from the password or passphrase to any valid character
accepted by the operating system. By default, the delimiter is a
comma:
password_change_delimiter= ,
Once
the option to change passwords on the Web Console Logon page is
enabled, users can change their passwords or passphrases by entering
the following in the password field of the Web Console Logon page
(if the password delimiter has been changed, use that character
between the old and new passwords instead of the comma):
old_password,new_password
When
password_change_wclogin = y, passwords and passphrases
cannot contain the password delimiter character.
When password_change_wclogin
= n (the default), the setting for password_change_delimiter
is ignored, and passwords can contain all valid characters allowed
by the operating system.
x
Configuring Linux and AIX Pluggable Authentication Modules
(PAMs)
In a Linux or AIX environment, OPSYS security can be
configured to use Pluggable Authentication Modules.
x
Procedure: How to Configure PAM Security on Linux and AIX
-
Select Access Control on the
Web Console menu bar.
The Access Control Page opens.
-
Right-click the OPSYS security provider and select Properties from
the context menu.
-
Select y from the security_pam drop-down
list.
This parameter is only applicable for the Linux and AIX
operating systems. The parameter defines if the server uses the
Pluggable Authentication Modules mechanism to implement security.
If y, the server uses PAM calls, if n the
server uses native UNIX security calls.
-
Click Save and Restart Server.
xConfiguring PTH Authentication
PTH security mode only controls access to the Web Console.
In this security mode, there is no impersonation by data agents
or authentication of a non-Web Console connected user. From the
operating system point of view, all server processes run as a single
user ID, and access to the Web Console is controlled by
authenticating names against those defined in the admin.cfg file
unless authenticate_all_pthuser is set to
y. The setting is available on the PTH Security Configuration page,
which can be accessed by right-clicking PTH in
the Security Providers folder on the Access
Control navigation pane.
You must configure the Server Administrator password before starting
a server in this security mode, either by providing it at installation
time or by configuring it in the Web Console. For details, see Registering Users and Groups in a Role.
PTH security mode supports profiles for users and groups on all
platforms.
Note: For more information on limiting user access to
the Web Console, see Configuring General Server and Web Console Actions.
x
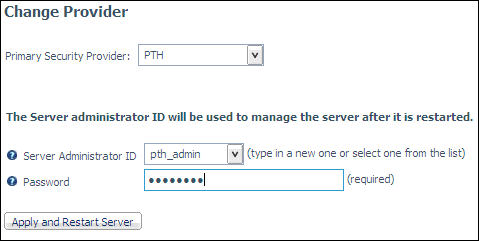
Procedure: How to Configure a PTH Security Provider
-
Select Access
Control on the Web Console menu bar.
-
Right-click
the Security Providers folder, and select Change
Provider.
The Change Provider page opens.
-
Select PTH from
the list of providers in the last Security Provider drop-down box
and enter a Server Administrator ID and Password.
-
Click Apply
and Restart Server.
The Select an Option dialog box is displayed, as shown
in the following image.
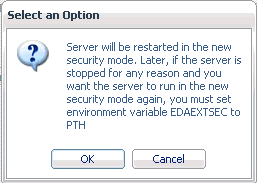
Once
the server has restarted, the PTH security provider has icons for
adding and viewing its users and groups.
-
If the server
is not running, start it using the instructions for your platform.
The server will start in PTH security mode.
-
Examine
the edaprint.log file. If it indicates errors, stop the server,
then start it with security OFF to correct the errors.
-
Restart
your browser and connect to the Web Console. When prompted, enter
a valid PTH user ID and password.
If
you wish to add other PTH users, first connect as a PTH user defined
as server administrator. Then follow the instructions in How to Create and Register Users With PTH Security.
Note: A common problem
when switching from OPSYS to PTH is the existence of files in EDATEMP
that cannot be removed due to insufficient privileges. To handle
this problem, use edastart -cleardir (or member ICLRDIR on the z/OS
platform) in OPSYS mode to clear the directory before switching.
x
Configuring Password Properties for a PTH Security Provider
When the Server Administrator creates or updates a user
under a PTH security provider, by default the password never expires,
can be any length, and are not case-sensitive.
The Server Administrator can configure a new or existing user
password to expire after a specified number of days, can set a minimum
length for passwords, and can enable case-sensitive passwords.
x
Procedure: How to Configure Password Properties for a PTH Security Provider
To
assign an expiring password:
-
Select Access
Control. Then:
- For a new
user, add the user by right-clicking PTH Users and
selecting New.
- For an existing
user, open the Properties page by:
- Right-clicking PTH
Users and selecting Show All.
- Right-click the user
and select Properties.
By default, the Password
never expires box is checked.
-
Uncheck the Password never
expires box.
The current date is saved in admin.cfg as admin_passdate for
this user. This is the last password change date.
-
Click:
-
Save,
if you are adding a new user.
-
Update,
if you are updating an existing user.
The Properties page
for the user will show the number of days until password expiration.
-
Configure the number of days before
passwords expire and whether they are case sensitive:
-
Right-click the PTH Security Provider and select Properties.
-
Set pthpass_lifetime to
the number of days after which the password should expire.
-
To make the passwords case-sensitive, select y from
the pthpass_casesensitive drop-down list.
-
To set a minimum length for passwords, enter a number
of characters in the pthpass_length entry field.
-
Click Save and Restart Server.
When the password expires, the user gets a password expired message
on the logon screen and is provided with a New Password field
in order to enter a new password.
At
this time, the new password and new password change date are recorded
in admin.cfg.
Note that changing the password by selecting Change Password from
the My Console menu also resets the password
change date.
-
Optionally,
configure a warning message to begin displaying a specified number
of days before the password expires.
xConfiguring DBMS Authentication
In this section: How to: Reference: |
In this security mode, there is no impersonation by
data agents, but connection credentials are authenticated against
a configured DBMS. This technique is called password passthru,
as user IDs and passwords supplied by the client are passed to the
DBMS for authentication.
DBMS security mode supports profiles for users on all platforms.
Profiles for groups are not supported.
Note: For more information on limiting user access to
the Web Console, see Configuring General Server and Web Console Actions.
x
Procedure: How to Configure DBMS Authentication
This
procedure assumes that the server is already running.
-
Access the
Web Console with a server administrator user ID.
-
From the
Adapter pane, configure a DBMS adapter and connection.
-
Select the Password
Passthru security option on the Adapter configuration
pane.
Note
that the Test button, which appears next
to the Configure button, will not work until
your restart the server with Security DBMS in step 5. Do not restart
the server at this point.
-
Select Access
Control. The Access Control page opens.
The server security mode is displayed on the Access Control page.
-
To add the
DBMS provider, expand the Security Provider folder, right click DBMS,
and choose New.
-
Enter a
name for the DBMS provider.
-
Select a security_dbms from
the drop-down list.
This option identifies the database engine used to authenticate
incoming requests.
-
Select a security_connection from
the drop-down list. This list shows all DBMS connections that are
configured with Password Passthru.
This option identifies the database connection used to
authenticate incoming requests.
-
At this
point, it is a good idea to click the Test button
to make sure the DBMS connection is working. You will be prompted
for a password for the selected user ID. Click Continue.
The DBMS will authenticate this ID. If it is a valid DBMS ID, a
message will be returned indicating that authentication was successful.
If the ID is not a valid DBMS ID, the DBMS will return messages
indicating that authentication was not successful.
-
Right-click
the Security Providers folder in the navigation
pane, and select Change Provider.
The Change Provider page opens.
-
Select DBMS from
the Security Mode drop-down menu.
-
Supply the
Server Administrator user ID. Alternatively, you can enter a new
user ID that will be added to the admin.cfg file as a Server Administrator.
-
If the server
was started with security mode OPSYS, click the Apply
and Stop Server button. Otherwise, click the Apply
and Restart button.
- If you click Apply
and Stop Server, the server stops. Start it manually
in DBMS security mode.
- If you click the Apply
and Restart button, the server restarts in security
mode DBMS.
Note: For more information about
changing security modes, see Considerations for Changing the List of Security Providers From
the Web Console.
-
If the server
is not running, start it using the instructions for your platform.
The server will start in DBMS security mode.
-
Examine
the edaprint.log file. If it indicates that there were any errors, stop
the server and then start it with security OFF to correct the errors.
-
Restart
your browser and connect to the Web Console. When prompted, enter
a valid DBMS user ID and password.
If
you wish to add other DBMS users, first connect as a DBMS user defined as
server administrator. Then follow the instructions in Registering Users and Groups in a Role.
Note: A common problem
when switching from OPSYS to a DBMS provider is the existence of
files in EDATEMP that cannot be removed due to insufficient privileges.
To handle this problem, use edastart -cleardir (or member ICLRDIR
on the z/OS platform) in EDAEXTSEC=OPSYS mode to clear the directory
before switching.
x
Reference: Usage Notes for DBMS Security
- If an error is detected
in the security_dbms definition, the DBMS is down, or your DBMS
user ID is invalid, you will not be able to access the Web Console
or connect to the server. In these situations, you must bring the
server down using the line console and correct the problem.
- The server may have
other DBMS connections defined, but only one DBMS connection can
be used for user authentication.
x
Reference: Password Passthru and Security DBMS
Security
DBMS (using password passthru) is supported for the following engines:
- DB2
- Informix
- MS SQL Server
- MySQL
- Oracle
- Sybase
- Teradata (ODBC)
- SAP R/3-ECC
- SAP BW
- Essbase
- Web Services
x
Logon Ticket Authentication for Logging Onto the SAP Portal
Single sign-on (SSO) enables users to login to the SAP
portal with their credentials and then access WebFOCUS components,
such as the Reporting Server with the SAP R/3 and SAP BW adapters,
the Web Console, and the WebFOCUS client (Managed Reporting) without
a secondary logon. This is achieved in the following manner:
- The user logs on
to the SAP portal with a user ID and password. The portal authenticates
the user and places a MYSAPSSO2 cookie in the browser.
- When the user accesses
the Web Console or the WebFOCUS servlet, the servlet will not do
the authentication, but will, instead, trust the user ID and use
it in the Managed Reporting environment and in the Web Console security
scheme. For example, a user may be given server_admin or application_admin
level privileges on the Reporting Server (using the admin.cfg file).
- When the user runs
a backend SAP report, the cookie is processed and passed to the
SAP RFC connection that provides access to the SAP data.
x
Procedure: How to Ensure Compliance With SSO Prerequisites for SAP BW and SAP
R/3
Complete
the following steps to ensure that prerequisites have been met:
-
Export the
public key certificate from the SAP portal into $EDACONF/etc.
-
Set Server
security to DBMS.
-
Configure
the SAP/BW or SAP R/3-ECC connection for Password-Passthru.
-
Ensure that
Security DBMS with Password-passthru to SAP/BW or SAP R/3-ECC is
working.
-
Ensure that
SAP RFCSDK 6.40, SAP SSOEXT, and SAP SECULIB 5.4 are in the path.
(Check your Operating System or consult a system administrator for details.)
Once
prerequisites have been satisfied, complete the SSO verification procedure.
x
Procedure: How to Complete SSO Verification
-
From the
SAP portal (http://sapportal.mydomain.com:50000),
execute a command that requires authentication (using a logon screen
from the Portal).
This generates an SSO cookie.
-
Overwrite
the SAP portal url with the one for the WebFOCUS Reporting Server,
using the same domain (for example, http://iwayserv.mydomain.com:8101).
At this point, no logon screen should pop up since the
user is logged in and SSO login has been successfully verified.
xConfiguring LDAP Authentication
In LDAP (Lightweight Directory Access Protocol) security
mode, there is no impersonation by data agents, but connection credentials
are authenticated against the established directory services. From
the operating system point of view, all server processes run as
a single user ID.
LDAP security mode is presently supported on Windows, UNIX, IBM i,
and the Unified Server (HFS and PDS deployments).
LDAP security mode supports profiles for LDAP users and LDAP
groups.
Note: For more information on limiting user access to
the Web Console, see Configuring General Server and Web Console Actions.
x
Procedure: How to Configure an LDAP Security Provider
-
Logon to
the server with Server Administrator credentials.
-
Open the Access
Control page.
-
If this is the first LDAP security
provider being configured:
-
Right-click the LDAP folder under Security
Providers, and select Properties from
the context menu.
-
Select the LDAP vendor from the drop-down list and click Continue.
If you choose OpenLDAP on LINUX, you will see two additional fields, ldap_libldap
and ldap_liblber. These parameters specify the names of the OpenLDAP
libraries that the server module loads at run time. The path to
the libraries should be available to the server at run time. You
are prompted to specify the library name at run time. If you do
not supply a different name a default library name is used.
-
Under the Security
Providers folder, right-click LDAP and
select New.
The LDAP Security Provider Configuration page opens.
-
Enter or
select values for the following properties.
Note: If the properties for a specific category
are not visible, click the down arrow on the separator bar for that
category to display them.
Connection Properties
- LDAP_PROVIDER
-
Specifies a name for this provider.
- ldap_host
-
Is a host identifier consisting of a host name or an IPv4
dotted string representing the IP address of a host running the
LDAP server to connect to.
Alternatively, it may contain a
list of space-delimited host identifiers. Each host identifier may
include a trailing colon and port number. In the case where more
than one host identifier is specified, each host identifier in turn
will be contacted until a connection can be established. For example:
directory.example.com
192.0.2.0
directory.example.com:1050 people.catalog.com 192.0.2.0
- ldap_port
-
Is a positive integer that defines the TCP port number used
to connect to the LDAP server. Note that ldap_port is ignored for
any host identifier which includes a colon and port number. The
server default port is 389 or 636 (for SSL connection).
- ldap_secure_connection
-
Specifies whether the server uses a Secure Socket
Layer (SSL) session with the LDAP server. Select No or Yes.
The server default is No.
LDAP (Lightweight
Directory Access Protocol) security mode supports Secure Sockets
Layer (SSL) API calls to establish an SSL/TLS connection. Using
server authentication only, the Reporting Server initiates API calls
to verify that the LDAP server being connected to is the same server
that provided certification.
You can set the LDAP
secure connection from the Web Console:
- Select No,
the default value, if you do not wish to enable SSL.
- Select Yes to
enable an encrypted Secure Sockets Layer (SSL) session with the
LDAP server.
If you have selected IBM, Sun, or Novell
as the your ldap_lib_vendor, when you select Yes in the ldap_secure_conection
field, additional options are added to the Connection tab:
- For Sun and IBM,
ldap_ssl_certificate is added.
- For Novell, ldap_ssl_certificate
and ldap_ssl_certification_encoding are added.
ldap_ssl_certificate.
Enter the name of the LDAP attribute used by the API to establish
the SSL/TLS connection. The server employs server authentication
only, checking through API calls that the LDAP server you are connecting
to is the one that provided the certificate. Values depend on the LDAP
vendor, as follows:
-
Novell
API specifies the file name, including path, of the
Trusted Root Certificate that the LDAP server provided for authentication.
-
Sun/Netscape
API specifies the path to cert7.db, Netscape certificate
database, excluding the file name, that the LDAP server provided
for authentication.
-
IBM API specifies
the file name, including the path, for ldapkey.kdb (IBM key database
file that the LDAP server provided for authentication). The ldapkey.sth
password stash file should be in the same directory. Note that in
addition to IBM LDAP client libraries, Global Security Kit libraries
are needed to make SSL work. On Windows machines, GSK must be installed.
-
Microsoft
API ignores the ldap_ssl_certificate configuration parameter
since it is not used in an Active Directory. The server certificate
should be installed in a certificate store.
ldap_ssl_certificate_encoding.
For Novell, select the standard used to encode the certificate from
the drop-down list. Encryption and file format depend on API vendor
specifications. The options are B64 and DER.
- security
-
Determines the type of bind used. Can be one of the following.
- Anonymous
-
The bind is performed using no credentials. This is the internal
default value.
- Windows security (NEGOTIATE)
-
The reporting server authentication is performed against
Active Directory utilizing a Windows-specific API.
The bind
is done under the credentials supplied by the client in the authentication process.
The
windows machine that hosts the reporting server should be in the
same domain as Active Directory.
The internal parameter ldap_ad_only should
be set to y and ldap_user_attribute should
have the value sAMAccountName or userPrincipalName.
NEGOTIATE
mode is mutually exclusive with Explicit mode where ldap_principal
and ldap_credentials determine an account that performs the bind.
For a trusted client, NEGOTIATE mode is not supported.
- Explicit
-
The bind is performed under the account that is defined by
configuration parameters ldap_principal and ldap_credentials.
Note: When
connecting to Active Directory using Explicit or NEGOTIATE, ldap_user_attribute
should have the value sAMAccountName or userPrincipalName.
- ldap_principal
-
Specifies the DN of a service account with sufficient access
rights to locate user entries in the directory. Consists of attribute=value
pairs, separated by commas. This parameter is required when the
LDAP provider is configured with a security setting that requires
credentials in order to initiate a search for a user, group, or
related information.
- ldap_credentials
-
Contains the password of the service account defined in ldap_principal.
- ldap_search_timeout
-
Specifies the timeout in seconds for ldap_search. The server
default value is 60 seconds.
User properties
- ldap_user_base
-
Specifies the DN of the entry that serves as the starting
point for the search. Consists of attribute=value pairs, separated
by commas.
- ldap_user_scope
-
Specifies the scope with which the LDAP realm should search
for users. Select Subtree, Onelevel,
or Base:
Subtree scope
indicates that the LDAP realm should search everything under the
base DN.
Onelevel scope tells the LDAP
server to only search entries one level down from the base DN.
Base indicates
that the search should be done at the search base only.
The
server default is Subtree.
- ldap_user_class
-
Specifies the object class used when searching for user entries.
The server default is person.
- ldap_user_attribute
-
Specifies the LDAP attribute used when searching for user
entries. uid is the default value for LDAP
and sAMAccountName is the suggested value
for Active Directory. One possible reason to change the default
value would be to allow users to logon with an email address instead
of a user ID. In this case, you might change the value to mail or userPrincipalName (if
this corresponds with the name of the appropriate attribute in your
directory).
- ldap_user_group_attribute
-
Specifies the LDAP attribute used to identify a group in
a user object.
The Active Directory standard is Memberof.
- ldap_user_description
-
Specifies the name of the attribute whose value contains
description of an object (user, group). The server default is description.
- ldap_user_email
-
Specifies the name of the attribute whose value contains
the user email address. The server default is mail.
Group properties
- ldap_group_base
-
Specifies the DN of the entry that serves as the starting
point for the search. The server default is the ldap_user_base value.
- ldap_group_scope
-
Specifies the scope with which the LDAP realm should search
for groups. Select Subtree, Onelevel,
or Base:
Subtree scope
indicates that the LDAP realm should search everything under the
base DN.
Onelevel scope tells the
LDAP server to only search entries one level down from the base
DN.
Base indicates that the search
should be done at the search base only.
The server default
is Subtree.
- ldap_group_class
-
Specifies the object class used when searching for group entries.
The server default is groupofuniquenames.
The Active Directory standard is group.
- ldap_group_attribute
-
Specifies the LDAP attribute used to identify the name of
the group. The server default is cn.
- ldap_member_attribute
-
Specifies the LDAP attribute used to identify users in a
group. The server default is uniqueMember.
The Active Directory standard is Member.
- ldap_nested_groups
-
Disables or enables LDAP nested groups support. Select No or Yes.
The server default is No, which disables
nested group support.
Note: ldap_user_class,
ldap_user_attribute, ldap_group_class, ldap_group_attribute are
parameters that form a search filter.
The search filter standard
syntax conforms to the following structure:
(&(Property_Name=Property_Value)(Property_Name=Property_Value))
If
you change value of the ldap_user_class and ldap_group_class parameters
to an asterisk (*), the search filter syntax can be reduced to the
following simplified form (although group support will not work
properly):
(Property_Name=Property_Value)
By
specifying an asterisk for these parameters, you achieve simplified
search filter syntax, but in effect, disable group support.
-
To test
the connection, click Test.
A Test LDAP Connection logon window opens.
-
Enter a valid user ID and password for this LDAP security provider.
-
Click Continue.
If your configuration and credentials are valid, a window
opens telling you that you were successfully authenticated.
If
they are not valid, you will get a corresponding message.
-
To save
this configuration, click Save.
The Change Effective Security Provider(s) page opens.
-
Select a Security Provider name from the drop-down list.
Note: Each time you select an LDAP Security Provider, another
Security Provider drop-down box is generated.
-
Enter or select the user ID of the Server Administrator. The
user must be a valid server administrator in the LDAP database.
-
If the server was not started in LDAP security mode, the button at
the bottom of the page says Apply and Stop Server.
Click the button and manually start the server in LDAP security
mode.
If the server is already running in LDAP security mode,
the button at the bottom of the page says Apply and Restart
Server. Click the button and wait for the server to
restart.
-
If the server
was started with security mode OPSYS, click the Apply
and Stop button. Otherwise, click the Apply and
Restart button.
- If you click Apply
and Stop, the server stops; proceed with Step 9.
- If you click Apply
and Restart button, the server restarts in LDAP security
mode.
Note: For more information about changing
security modes, see Considerations for Changing the List of Security Providers From
the Web Console.
-
If the server
is not running, start it using the instructions for your platform.
The server will start in LDAP security mode.
-
Examine
the edaprint.log file. If it indicates errors, stop the server,
then start it with security OFF to correct the errors.
-
Restart
your browser and connect to the Web Console. When prompted, enter
a valid LDAP user ID and password.
-
When you
start the server in LDAP security mode, you can select an LDAP Provider
from the Security Provider drop-down list.
By default, the primary (first) LDAP security provider is selected.
Note: A
common problem when switching from OPSYS to LDAP is the existence
of files in EDATEMP that cannot be removed due to insufficient privileges.
To handle this problem, use edastart -cleardir (or member ICLRDIR
on the z/OS platform) in EDAEXTSEC=OPSYS mode to clear the directory
before switching.
x
Procedure: How to Remove an LDAP Security Provider From the Web Console
-
Logon to
the server with Server Administrator credentials.
-
Select Access
Control.
The Access Control page opens.
-
Right-click
the security provider that you want to remove in the Security
Providers folder and select Remove from
the context menu.
A dialog box opens asking you to confirm that you want
to remove the provider.
-
Click OK.
x
Reference: LDAP Vendor Library Prerequisites
Important: Although
the Server supports a number of vendor libraries for each platform,
as described in the following chart, Information Builders recommends
that, whenever possible, you use the native libraries for your Operating System.
System
Requirements. LDAP Security mode requires the appropriate LDAP
vendor library files to be available to the server at run time:
- If the LDAP vendor
library files are not currently available on the server platform,
download them from the appropriate vendor Web site, unzip them if necessary,
and transfer them to the server platform.
- Edit the library
path or (on Windows) the system path to include the location of
the library files.
Windows: The LDAP vendor library
files for Windows systems are:
|
Sun
|
IBM
|
Novell
|
Microsoft
|
|---|
|
libnspr4.dll libplc4.dll libplds4.dll nsldap32v50.dll nsldappr32v50.dll nsldapssl32v50.dll nss3.dll sasl32.dll ssl3.dll
(64
bit NA)
|
libidsldap.dll libibmldapdbg.dll
|
ldapsdk.dll ldapssl.dll
(64
bit NA)
|
wldap32.dll advapi32.dll
|
IBM z/OS and IBM i: The LDAP
vendor library files for IBM z/OS and IBM i systems are:
|
z/OS
|
statically linked
|
|
IBM i
|
statically linked
|
UNIX: The LDAP
vendor library files for UNIX systems are:
|
OS
|
Vendor
|
|---|
|
Sun (Sun ONE Directory Server Resource
Kit 5.2.1, except as noted)
|
IBM
|
Novell
|
OpenLDAP
|
|---|
|
AIX
|
libldap50.so libnspr4.so libnss3.so libplc4.so libplds4.so libprldap50.so libsasl.so libssl3.so libssldap50.so
(64
bit NA)
|
statically linked
|
libldapsdk.so
(64 bit NA)
|
N/A
|
|
HP
|
libldap50.sl libnspr4.sl libnss3.sl libplc4.sl libplds4.sl libprldap50.sl libsasl.sl libssl3.sl libssldap50.sl
(see
notes following chart)
|
statically linked
(64 bit NA)
|
libldapsdk.sl libldapssl.sl
(64
bit NA)
|
N/A
|
|
Linux
|
libldap50.so libnspr4.so libnss3.so libplc4.so libplds4.so libprldap50.so libsasl.so libssl3.so libssldap50.so
(64
bit NA)
|
libibmldap.so libldapiconv.so
(64
bit NA)
|
libldapsdk.so libldapssl.so
(64
bit NA)
|
libldap_r.so liblber.so
|
|
SunOS 5.8
|
libldap50.so libnspr4.so libnss3.so libplc4.so libplds4.so libprldap50.so libsasl.so libssl3.so libssldap50.so
|
libibmldap.so
|
libldapsdk.so libldapssl.so
(64
bit NA)
|
N/A
|
|
SunOS 5.9 and 5.10
|
libldap.so
(Native SunOS library)
|
libibmldap.so
|
libldapsdk.so lilbldapssl.so
(64
bit NA)
|
N/A
|
Note:
- NA = Not Available
from vendor.
- LDAP SSL for Novell
is not supported on the AIX platform.
- Statically linked
builds do not required external libraries.
- When using third-party
libraries, complete products should be installed and the associated
libraries must be on the library path of the server before start
up. The library path is driven by different variables depending
on platform (Windows: PATH, HP-UX: SHLIB_PATH, AIX: LIBPATH, USS:
LIBPATH, IBM i: Library Path, Other UNIX's: LD_LIBRARY_PATH).
- Libraries shown in
this table are the main libraries our module is linked with; they may,
in turn, load a chain of system libraries, which also need to be
present.
- Not all vendors provide
64 bit versions, but, when available, they are configurable.
- Before starting the
configuration steps, independently verify your LDAP connection and
any configuration ids being used. Testing may be done by downloading
and installing an LDAP connection test tool such as Softerra LDAP
Browser, at http://www.ldapbrowser.com/.
Example: Making Sun LDAP Library
Files Available
To make Sun LDAP
library files available to the server at run time:
- Access the product
download Web site for Sun ONE Directory Server Resource Kit 5.2.1:
http://www.sun.com/download/products.xml?id=3f74a0db
(Note
that this URL is correct as of the date these Release Notes were
published. Third-party URLs are subject to change.)
- Click the Download link
at the bottom right of the Web page. (Do not click the Downloads
menu option at the top of the page.)
The login page opens. You
will be prompted for a registered user login or to register.
- Enter either your
Sun username and password. If you do not have an account, click Register
Now and follow the prompts to create an account and then
log in. This is free.
- Accept the license
agreement.
- Download the appropriate
platform package. Select the optimized package, not the debug version.
- Once downloaded,
unzip the file, and then unzip the second zip file contained within the
first.
- Navigate to the directory
in which you unzipped the downloaded file, and then cd to the lib
subdirectory.
- FTP the files you
need (as indicated in LDAP Vendor Library Prerequisites), in binary format, to their
own directory on the server platform.
- Edit the library
path to include the location of the library files you just FTPed.
xConfiguring Custom Authentication
Security provider CUSTOM supports using non-standard security
storage. You can create DBMS tables to store users, groups, and
passwords. You must write procedures to read these tables to authenticate
users.
When you a custom provider, you need to enter the name of a procedure
for authentication that you created beforehand. If you do not enter
a procedure name in the cust_authenticateuser field during custom
provider configuration, and you make it the primary provider using
the Change Provider page, the server will prompt for a default server administrator.
You can use this user ID to connect to the server when it is restarted.
If you change the primary provider to a custom provider with a cust_authenticateuser
procedure entered, the procedure will be used for user authentication.
If your authentication procedure does not work correctly, you
can make any corrections needed by starting the server with security
OFF, connecting to the Web Console, and editing the cust_authenticateuser
procedure.
The custom security mechanism has to be created prior to configuring
the security provider and must be provided when the CUSTOM provider
is added to the server provider configuration. It must perform the
following standard security tasks:
- Retrieve the user ID and its password to authenticate the
user on connecting to the server.
- Retrieve the list of users and groups on user and group registration.
- Retrieve the list of users in each group.
- Retrieve user membership in all available groups.
x
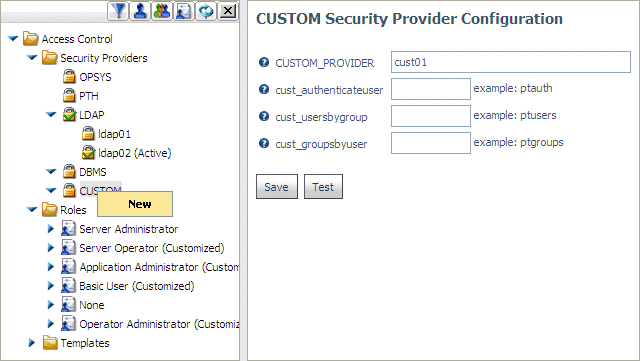
Procedure: How to Configure a Custom Security Provider
-
On the Access Control page, right-click CUSTOM and
select New from the context menu.
The CUSTOM Security Provider Configuration page opens.
-
Enter values for the following parameters:
- CUSTOM_PROVIDER
-
Is a name to assign to the security provider.
-
cust_authenticateuser
-
Is the name of the procedure that authenticates users. For
information about creating an authentication procedure, see Creating an Authentication Procedure for a Custom Provider.
If
you do not specify an authentication procedure, you can identify
a default server administrator user ID and password to use when
connecting to the server. For information, see How to Specify a Default Server Administrator for a Custom Security
Provider.
-
cust_usersbygroup
-
Is the name of the procedure that returns the list of all
users or, if the group name is passed to the procedure, the list
of all users in the group. For information about creating a procedure
that returns users, see Creating a Procedure That Returns Users.
-
cust_groupsbyuser
-
Is the name of the procedure that returns the list of all
groups or, if a user ID is passed to the procedure, the list of
all groups for the user ID. For information about creating a procedure
that returns groups, see Creating a Procedure That Returns Groups.
The
procedures can be located under the server configuration directory (EDACONF/catalog),
the installation directory (EDAHOME\catalog), or in an application that
is on the application path of every user.
We suggest that
the synonyms used by custom provider procedures be copied to the
directory EDACONF/catalog/custom. This will cause the server to
protect adapter connections used by custom procedures. This means
that only the Server Administrators will have access to security
data in those synonyms. All other users attempting to use this adapter
connection will get an unauthorized message.
-
To test your configuration, click Test.
-
When you are satisfied with the test results, click Save.
Your custom security provider is listed under
the CUSTOM item on the Access Control tree.
-
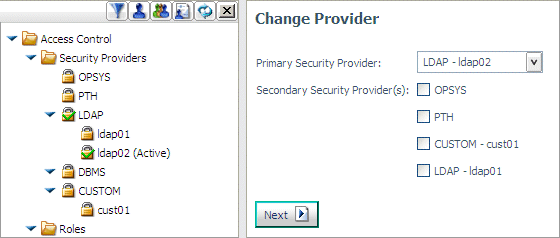
Select the appropriate primary security provider from
the drop-down list and click Next.
If you are changing primary providers, you may be asked
to select or enter a Server Administrator user ID.
-
Click Save and Restart Server.
x
Procedure: How to Specify a Default Server Administrator for a Custom Security
Provider
When
you configure a custom security provider, you are responsible for
creating and identifying a procedure that will authenticate the
credentials entered by the user attempting to connect to the server.
If you configure a new custom provider as the primary provider,
or change to the custom provider as the primary provider and have
not entered the name of an authentication procedure, you can specify
a default Server Administrator ID.
-
On the Access Control page of the Web Console,
either right-click Security Providers and
select Change Provider or right-click CUSTOM under
Security Providers, and select New from the
context menu.
If you are changing to an
existing Custom provider, continue with step 3. If you are creating
a new provider, the CUSTOM Security Provider Configuration page opens:
-
Enter a name for the custom provider or accept the default
name. If you entered the name of an authentication procedure, we
recommend that prior to saving your configuration, you test it by
clicking Test.
The Testing CUSTOM Security
page displays, prompting you for a user ID and a password:
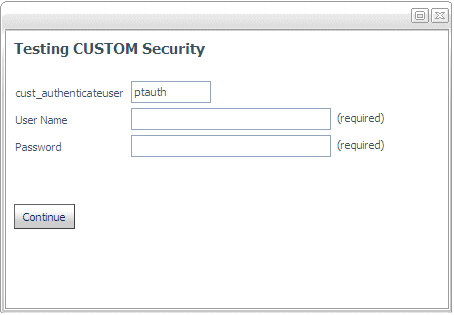
Test the configuration with
a valid user ID and an invalid user ID. In each case, check that
the authentication procedure is returning the correct code to the
server.
-
When you are satisfied with the results of your tests,
click Save.
The Change Provider Page
opens.
-
Select your custom provider as the primary provider and
click Next.
The Change Provider page
displays fields for entering Server Administrator credentials:
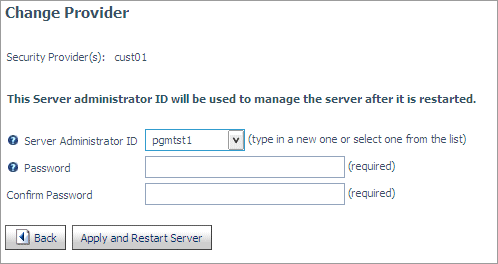
- Select or enter a Server
Administrator user ID in the Server Administrator ID field.
- Enter a Server Administrator password in the Password field.
- Reenter the password in the Confirm Password field.
-
Click Apply and Restart Server.
x
Reference: Creating an Authentication Procedure for a Custom Provider
The
authentication FOCEXEC for a custom provider must check the user
ID and password passed to the Reporting Server against the custom
provider data source and return a code that defines to the Reporting
Server the status of those credentials.
The
server calls your authentication FOCEXEC using the following syntax:
EX ptauth USERID=user1, PASSWD=pass1
where:
- ptauth
Is the authentication procedure entered in the cust_authenticateuser
field of the CUSTOM provider configuration page.
A simple
example of an authentication procedure, ptauth.fex, is provided
in the home/catalog directory.
- user1
Is the user ID to be authenticated. It is stored in a variable
named &USERID.
- pass1
Is the corresponding password to be authenticated. It is
stored in a variable named &PASSWD.
The
authentication procedure must authenticate this user ID and password combination
against the data source that contains the user credentials.
If
the password is stored in encrypted form in the data source, the
authentication procedure must encrypt the password using the same
encryption process prior to authenticating it.
The authentication procedure must return
a code to the Reporting Server based on the result of the authentication
process. The syntax is:
-SET &a = SETAUTH(error_code, 'primary_group');
where:
- a
Can be any valid variable name, for example &A.
- error_code
Must be one of the following integers:
- 0
Indicates that the user ID and password are valid.
- 1
Indicates that the user ID is invalid.
- 2
Indicates that the password is invalid.
- 3
Indicates that the user ID has expired.
- 4
Indicates that the password has expired.
- 5
Indicates that another error occurred.
- primary_group
Returns the primary group for the user, Enter the group ID
enclosed in single quotation marks. If there is no primary group,
enter two consecutive single quotation marks. For example:
-SET &A = SETAUTH(2, '');
You can provide messages in the authentication
procedure using the -TYPE command. For example:
-INVALIDPASS
-TYPE invalid password
-SET &A = SETAUTH(2, '');
The message will display
when you click the Test button on the CUSTOM Security Configuration
page.
When a user actually attempts
to log onto the server, the server will:
- Log the user
on, if the credentials are valid.
- Prevent the user from logging on, if the credentials are not
valid. In this case, the server will display a standard message
on the logon page identifying the nature of the error.
x
Reference: Creating a Procedure That Returns Users
The
procedure entered in the cust_usersbygroup field on the CUSTOM Provider
Configuration page has to return either all users or, if passed
a group ID, all users for that group.
The
procedure should retrieve the following fields (some are mandatory,
some are optional) from the data source that stores all user IDs
and their properties:
- User ID
-
Mandatory
Contains alphanumeric
user IDs with a maximum length of 99 (A99).
- User Description
-
Optional
Contains alphanumeric
descriptive information with a maximum length of 97 (A79).
- User Email Address
-
Optional
Contains an alphanumeric
email address with a maximum length of 127 (A127).
- Group ID
-
Mandatory
Contains alphanumeric
group IDs with a maximum length of 99 (A99).
After retrieving the fields, you must
issue the PCHOLD FORMAT COMT FORMATTED command to place them in
a comma-delimited file with each field value enclosed in double quotation
marks. For example:
ON TABLE PCHOLD FORMAT COMT FORMATTED
ON TABLE SET PAGE-NUM OFF
ON TABLE SET HOLDATTR  OFF
The procedure should be
able to retrieve the list of all users and user list for one group.
The following procedure sets the variable
&ID to all by default. It tests this
variable to see if a specific user ID was passed to the FOCEXEC
and branches accordingly:
-DEFAULT &ID=all;
TABLE FILE USERINFO
-IF &ID=all THEN GOTO L1 ELSE GOTO L2;
-L1
PRINT DST.USERID DST.USERDESC DST.UEMAIL
-GOTO END1
-L2
PRINT USERID USERDESC UEMAIL GROUPID NOPRINT IF GROUPID EQ &ID
-END1
ON TABLE PCHOLD FORMAT COMT FORMATTED
ON TABLE SET PAGE-NUM OFF
ON TABLE SET HOLDATTR  OFF
END
A simple example of a users procedure, ptusers.fex,
is provided in the home/catalog directory.
x
Reference: Creating a Procedure That Returns Groups
The
procedure entered in the cust_groupsbyuser field on the CUSTOM Provider
Configuration page has to return either all groups or, if passed
a user ID, all groups for that user.
The
procedure should retrieve the following fields (some are mandatory,
some are optional) from the data source that stores all user IDs
and their properties:
- Group ID
-
Mandatory
Contains alphanumeric
group IDs with a maximum length of 99 (A99).
- Group Description
-
Optional
Contains alphanumeric
descriptive information with a maximum length of 97 (A79).
- User ID
-
Mandatory
Contains alphanumeric
user IDs with a maximum length of 99 (A99).
After retrieving the fields, you must
issue the PCHOLD FORMAT COMT FORMATTED command to place them in
a comma-delimited file with each field value enclosed in double quotation
marks. For example:
ON TABLE PCHOLD FORMAT COMT FORMATTED
ON TABLE SET PAGE-NUM OFF
ON TABLE SET HOLDATTR  OFF
The procedure should be
able to retrieve the list of all groups and group list for one user.
The following procedure sets the variable
&ID to all by default. It tests this
variable to see if a specific group ID was passed to the FOCEXEC
and branches accordingly:
-DEFAULT &ID=all;
TABLE FILE USERINFO
-IF &ID=all THEN GOTO L1 ELSE GOTO L2;
-L1
-L1
PRINT DST.GROUPID DST.GROUPDESC
-GOTO END1
-L2
PRINT GROUPID GROUPDESC USERID NOPRINT IF USERID EQ &ID-END1
ON TABLE PCHOLD FORMAT COMT FORMATTED
ON TABLE SET PAGE-NUM OFF
ON TABLE SET HOLDATTR  OFF
END
A simple example of a group procedure, ptgroups.fex,
is provided in the home/catalog directory.
xAuthenticating Users Across Multiple Security Providers
The Reporting Server can search across multiple LDAP
sources, DBMS providers, and a PTH server when authenticating users.
The security provider selected on the Primary Security Provider
drop-down list is the primary provider. Secondary providers are
listed below with a check box you can use to activate them.
When authenticating or assigning privileges for a provider that
is not the primary provider, the user ID is a two-part name consisting
of the provider name and the user ID:
provider\userid
The authentication is done based on the primary provider for
a one-part name and based on the provider specified for a two-part
name.
The Server Administrator can add and remove security providers
from the list at any time.
For instructions on configuring PTH and LDAP security providers,
see Configuring PTH Authentication or Configuring LDAP Authentication.
x
Procedure: How to Change the Security Provider List
If you want to change the list of security providers:
-
Logon to
the server with Server Administrator credentials.
-
Right-click
the Security Providers folder and select Change
Provider from the context menu.
The Change Provider page opens.
-
You can
select providers from the drop-down list and check boxes in the order
you need.
Note:
- When you change the primary security provider, you can enter
or select a new effective administrator ID. You can also change
the effective administrator ID by going to the Access Control page,
right-clicking Access Control at the top
of the Access Control tree, and selecting Change Admin
ID from the context menu.
- When registering and assigning privileges for a user or group
for a provider that is not the primary provider, the server uses
a two-part name consisting of the provider name and the user or
group name (for example, ldap2/user1 or ldap2/group3). If you change
the primary provider on the list, the names may not be in the correct
format for the provider that was originally primary and the provider
that is now primary. Therefore, you may have to re-register the
users and groups for those providers.
x
Reference: Considerations for Changing the List of Security Providers From
the Web Console
You
can configure multiple security providers and change security modes
using the Web Console. When changing security providers, it is important
to make sure that there is a valid Server Administrator user ID
for that provider.
Switching between security modes is done
by changing the security provider from the Web Console, which will
prompt you for server restart.
Environment variable EDAEXTSEC
is only used to override the security provider setting that is stored
in edaserve.cfg file.
xPlatform-Specific Methods for Setting EDAEXTSEC
|
Platform
|
Start Method
|
Actions
|
|---|
|
Windows
|
Start Menu
|
Under the main software folder for the server,
select Start Security ON or Start
Security OFF.
|
|
As a Service under a local system account
|
Set the system environment variable EDAEXTSEC, under My
Computer, Properties, Advanced tab,
to one of the following values: OPSYS or OFF.
Restart Windows
to initialize.
|
|
As a Service under the current account
|
Set the system environment variable EDAEXTSEC, under My
Computer, Properties, Advanced tab,
to one of the following values: OPSYS or OFF.
Restart Windows
to initialize.
|
|
UNIX
|
Command prompt or Script that calls edastart
|
Export the variable setting in the edastart
shell script, or before any calls to the shell script, as follows
export EDAEXTSEC=security_mode where: - security_mode
Is one of the following: OPSYS or OFF.
|
|
z/OS Unified Server
|
JCL
|
Place the variable in the EDAENV allocation
of the IRUNJCL member of the configuration library
EDAEXTSEC=security_mode where: - security_mode
Is one of the following: OPSYS or OFF.
|
|
IBM i
|
QSH command prompt or QSH script that calls
edastart
|
Export the variable in the edastart shell
script, or before any calls to the shell script, as follows
export EDAEXTSEC=security_mode where: - security_mode
Is one of the following: OPSYS or OFF.
|
|
CALL {lib}/TSCOM300 or CL that calls TSCOM300
or CL that calls QSH, which, in turn, calls the edastart shell script
|
Before the call to TSCOM300, add the following
ADDENVVAR ENVVAR(EDAEXTSEC)
VALUE(security_mode)
where: - security_mode
Is one of the following: OPSYS or OFF.
|
|
OpenVMS
|
Command prompt or DCL script
that calls edastart
|
Before calling edastart.com
or in edastart.com, add the following
DEFINE EDAEXTSEC security_mode where: - security_mode
Is one of the following: OPSYS or OFF.
You
can also define the logical EDAEXTSEC in the EDAENV.COM file. |
|
Any
|
Any
|
Use the Web Console (Workspace, Configuration
Files folder, Miscellaneous folder, Environment
- edaenv.cfg) to edit the edaenv.cfg file and add the
following:
EDAEXTSEC=security_mode where: - security_mode
Is one of the following: OPSYS or OFF.
Note: After
a change, a hard restart of the server must be done. |
xEnabling Trusted Connections
You can configure the server to accept trusted connections.
x
Procedure: How to Enable Trusted Connections
-
From the
Web Console menu bar, choose Access Control.
-
Right-click Access
Control in the navigation pane, and select Settings.
The Access Control Settings page opens.
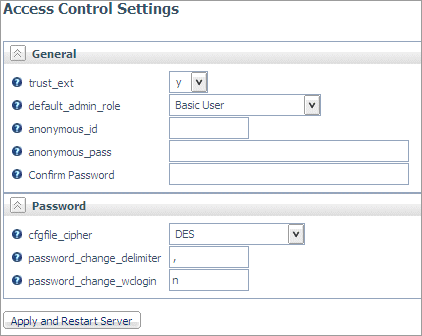
-
Select y from
the trust_ext drop-down menu. For OPSYS,
the default is y. For all other security
modes, the default is n.
Note: For LDAP security mode, authentication must
be configured with ldap_principal and ldap_credentials for trusted
connections to work.
-
For non-Windows
server, enter y in the trust_nt field.
This specifies that Windows clients can be trusted. Since Windows
requires a password to impersonate a user, this cannot be used on
Windows Servers. On MVS, this keyword can be set in the service
section of the server configuration file. The default is n.
-
Click the Apply
and Restart button.
xSetting an Anonymous User ID
An authorized server administration can set an anonymous
user ID that can access the Web Console when the user ID/password
fields on the Web Console login screen are blank and the user clicks Log
in.
This anonymous user ID provides the ID and, in turn, the user
rights for the Web Console and the server. Further configuration
for the anonymous user can be achieved by creating a user profile
for the anonymous user ID. If an anonymous ID matches a user in
the admin.cfg list, the applicable role and privileges are applied.
Note: On Windows, for security mode OPSYS only, you must
turn IWA security off to use this feature. From the Workspace folder
in the navigation pane, open the Special Services and
Listeners folder, right-click HTTP,
and select Properties. Click the Security
IWA check box to deselect it.
x
Procedure: How to Set an Anonymous User ID
-
Log on to
the Web Console using a user ID that has server administration rights.
-
Select Access
Control from the Web Console menu bar.
-
Right-click Access
Control in the navigation pane, and select Settings.
The Access Control Settings pane opens.
-
Enter a
user ID in the anonymous_id field.
-
Enter a
password in the anonymous_pass field and
repeat it in the Confirm Password field.
-
Click Apply
and Restart Server.
xConfiguring User Password Settings
You can configure the following password settings for
any security provider:
- View or change the
password separator character.
- Enable users to change
passwords from the Web Console login page.
- Control the start
time of warning messages on operating systems that support password
expiration.
x
Viewing or Changing the Password Separator Character
When an application has the option to change a user
password, the old and new passwords are sent to the server using
a separator character (by default, a comma). For example:
old_password,new_password
The separator character is defined by the password_change_delimiter
field. The separator needs to be reset if the current separator
character is contained in the password itself or if it is allowed
by the server.
This feature is not supported when Security Mode is OFF.
x
Procedure: How to View or Change the Password Separator Character
-
From the
Web Console menu bar, select Access Control.
-
Right-click Access
Control in the navigation pane, and select Settings.
The Access Control Settings page opens.
-
In the password_change_delimiter field,
enter a single character to use as the delimiter between an old
and new password. (The default character is a comma.)
Note that you cannot use the designated password_change_delimiter character
in a password.
-
Click Apply
and Restart Server.
x
Enabling Password Changes From the Web Console Login Page
A Server Administrator can allow users to change their
password from the Web Console login page. By default, users cannot
change their passwords from the Web Console login page.
x
Procedure: How to Enable Password Changes From the Web Console Login Page
-
Log onto the Web Console with Server Administrator privileges.
-
From the
Web Console menu bar, choose Access Control.
-
Right-click Access
Control in the navigation pane, and select Settings.
The Access Control Settings page opens.
-
Enter y in
the password_change_wclogin field. The default
is n.
-
Click the Apply
and Restart Server button.
x
Login Password Expiration Warning
On Operating Systems that support password expiration,
you can specify that a warning message be displayed a specified
number of days prior to the expiration date. The message will appear
after the initial login screen. You must then click the Continue button
to open the Web Console. Users can employ standard tools to change
their passwords before expiration occurs.
Note: The password expiration warning is supported only
on Operating Systems where IDs are configured to expire and this
extended security feature is active for the user ID. However, expiration
warning is not currently supported on the Windows platforms.
x
Procedure: How to Initiate Notification of an Imminent Password Expiration
-
From the
menu bar, select Workspace.
-
In the navigation
pane, expand the Special Services and Listeners folder,
then click HTTP and select Properties from
the context menu. The Listener Configuration pane opens.
-
Expand the Advanced group.
-
In the PASS_EXPIRE_NOTIFICATION field,
enter the number of days prior to expiration that you want the warning
to begin to appear when a user whose password is about to expire
logs in.
-
Click the Save
and Restart Server button.
xSaving Authentication Credentials for the Next Web Console Login
The Web Console login screen has a check box for saving
the current User ID and password so that the user does not have
to enter them in subsequent logins.
To save your credentials, check the Remember me on
this computer box and click Log in.
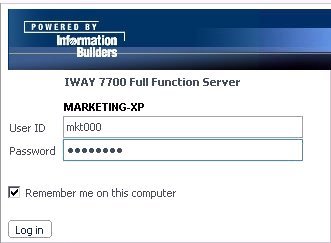
The credentials are stored in a browser cookie and are used for
subsequent logins to the Web Console as long as the cookie is not
deleted from the client computer.