Tutorial: Using Change Data Capture
Change Data Capture loads data targets using only the
rows that have changed since the last load. This approach is useful
when dealing with large databases that would take too much time
and resources to reload completely.
The source table used in this tutorial is an inventory table
called dminv that is created by running Create Sample Procedures
and Data. The source table is in DB2 or UDB.
The tutorial has the following steps:
- Create a target table
and perform an initial load.
- Enable database table
for logging.
- Create a synonym
for table log records.
- Create a DataMigrator
direct load flow.
- Update the source
table.
- Run the flow and
view results.
- Schedule the flow.
Example: Creating a Target Table and Performing an Initial Load
The
first step is to create a data flow that creates the target table
and loads it with data from the current contents of the source table.
- Create a new data
flow in an application directory that is in the server path, like
baseapp.
- Select dminv as
a source.
- Select all the columns
from PROD_NUM through COST.
- Add a new target,
selecting a database type, entering newinv as the name, and specifying
one key.
- Save the flow as dminv_init.
- Run the flow.
- Open the newinv target
and click Sample Data to confirm that the
data was loaded correctly.
Note: Key column(s)
are required for loading a table to uniquely identify each row so
that Insert/Update/Delete processing can be performed.
Example: Enabling the Database Table for Logging
To
use Change Data Capture, the source database must be configured
to use database logging. In most organizations this must be done
by a database administrator. To enable the database for logging,
see Enabling the Database for Logging.
This example uses dminv as
the source table. To create this table, see How to Create Sample Procedures and Data.
The database table must be enabled for logging
and the procedure depends on the database being used.
If you
are using:
-
Microsoft SQL Server 2008
-
The table must have CDC enabled. This can be done from Microsoft
SQL Server Management Studio. You must be a member of the db_owner
database role to run the stored procedure. Issue the following commands:
exec sys.sp_cdc_enable_table @source_schema = 'dbo', @source_name = 'dminv', @role_name = NULL
select is_tracked_by_cdc FROM sys.tables WHERE name = 'dminv'
You
will see a 1 if the table is enabled, a 0 otherwise.
-
UDB and DB2
-
The table must have capture mode enabled. This can be done
from the DB2 Command Center or a stored procedure.
Note: For
IBM i users, start the program strsql from the user
ID that will run the CDC flows and issue the following commands:
CREATE COLLECTION database CHGPRF CURLIB(database)
-
Oracle 10 and 11
-
The table must have all data columns logged. This can be
done from the Oracle SQL Developer or a stored procedure.
Add supplemental log information for an
entire database by entering:
ALTER DATABASE ADD SUPPLEMENTAL LOG DATA (ALL) COLUMNS;
or
for individual tables by entering:
ALTER TABLE dminv DATA CAPTURE CHANGES
Example: Creating a Synonym for a Log Table
A
synonym for a log table allows reading from the database log records
for a selected table. The synonym contains the same columns as the
table itself plus three additional columns that identify changes
to the table.
This
synonym can be used as a source in a data flow with the special
load type of IUD Processing. IUD is an abbreviation for Insert/Update/Delete.
Note: A
synonym for a log table is not a substitute for a synonym for the
table itself. A synonym is still needed for the table to be able
to read or write from the table directly.
To create a synonym
for a log table, in the DMC:
- Right-click an application
directory in the navigation pane and choose New and
then Synonym.
The Select Adapter window
opens.
- Select a connection
and click OK.
The Select Synonym Candidates
window opens.
- From the Restrict
object type to drop-down menu, select Table Log Records.
Optionally,
check Filter by owner/schema check box and for object name enter dminv.
- Click Next.
- Select the check
box in front of DMINV.
Under the Default synonym name, click DMINV and change
the name to DMINV_LOG, as seen in the following image.
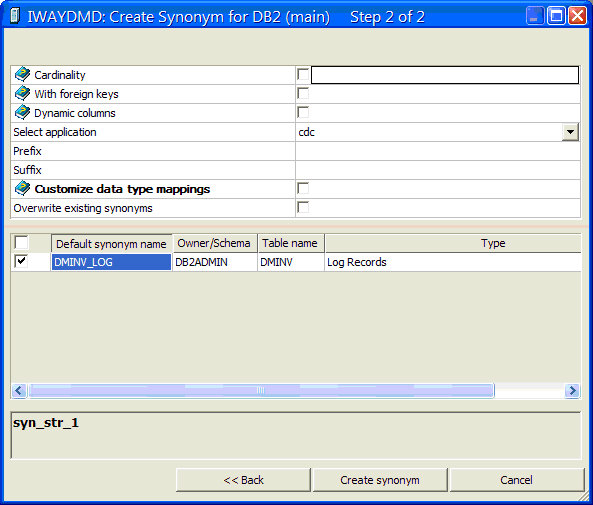
- Click Create
synonym. The Create Synonym Status window opens.
- Click Open
First Synonym. The synonym opens by default to the Field
View. If it does not, click the tab to switch to that view. Select
the segment name if it is not already highlighted.
- In the DB Log Parameters
settings, input CHKPT for START, YES for
CHKPT_SAVE, and leave CHKPT_FILE blank.
The window now looks
like this:
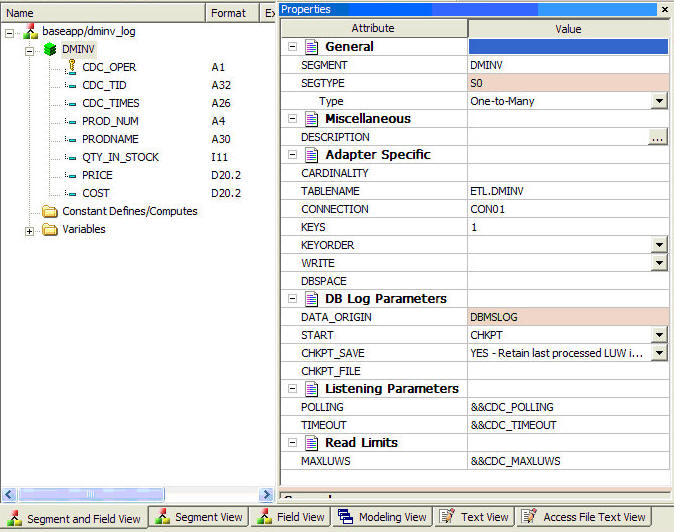
Note
that the first three columns for the synonym are added automatically
and are used for DataMigrator IUD processing. They have the following
functions:
- CDC_OPER is the operation
type (Insert, Update, or Delete).
- CDC_TID is the Transaction
ID.
- CDC_TIMES is the
time stamp.
Example: Creating a DataMigrator Data Direct Load Flow
In
this step, we will create a DataMigrator direct load flow to copy
data from the log table to the target table.
Note: Using a direct load flow with
the checkpoint option ensures that all rows read from the log are
written to the target table before the checkpoint file is updated. This
ensures that the flow can be re-run from the original checkpoint
if it cannot write to the target table (for example, if the database
is not running).
While a data flow can also be used, it does
not provide this assurance. The read and write operations are separate
so that the checkpoint file is updated when the log is read.
- Right-click an application
directory and select New and then Direct
Load Flow.
- Drag dminv_log to
the left side of the flow.
- Drag newinv to
the right side of the flow.
- Right-click newinv and
select Properties.
The target properties
page opens.
- For the Load Type
drop-down menu, select IUD Processing.
- For the IUD Control
column drop-down, select CDC_OPER, as shown
in the following image.
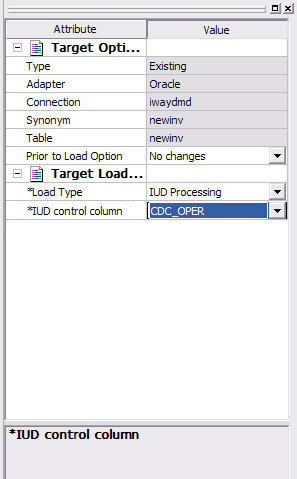
Click
the X to close the properties page.
- Right-click newinv and
select Target Transformations.
The Transformations
window opens.
- Click the Automap
 button
to map the source to target columns.
button
to map the source to target columns.Click OK to
close the window.
- Click the Save button
and save the flow as dminv_cdc.
Example: Updating the Source Table
To
test the Change Data Capture process, make changes to the dminv
source table. In this example, three rows are inserted, one row
is updated, and one is deleted.
- Start the client
for your database (DB2, Oracle, or SQL Server) and connect to the
server.
For SQL Server, enter the line:
begin transaction;
- Enter the following
lines:
insert into dminv values ('2001','Compact Flash',1000,50,25) ;
insert into dminv values ('2002','Memory Stick',1000,80,40) ;
insert into dminv values ('2003','Memory Stick Pro', 1000,200,100) ;
update dminv set QTY_IN_STOCK=500 where prod_num = '2002' ;
delete from dminv where prod_num = '2001' ;
- For SQL Server, enter
the command:
commit transaction;
For
Oracle or DB2, enter the command:
commit work;
Example: Reviewing the Log
Note
that the CDC configuration saves a checkpoint of the last transaction
processed. However, when you run a Sample Data report using the
synonym for the log table, the checkpoint is not saved.
The following image shows a
Sample Data report for the log.

Example: Running the CDC Flow and Viewing the Results
- Open the CDC flow
you created. Click the Run button and select Submit.
- Click the View
Last Log button. The following image shows the log report
for the flow.

Note
that the statistics show the number of rows inserted, updated, and deleted.
Close
the report.
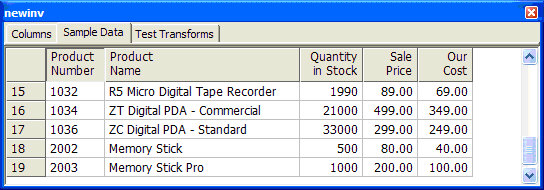
- In the open flow,
dminv_cdc, double-click the newinv target
table and select the tab Sample Data. The
following image shows that the changes were applied correctly.
Note: To
return the dminv table back to its original state, enter the following
lines in a stored procedure, where db is
the engine used, and run them:
SQL db delete from dminv where prod_num > '2001' ;
END
SQL db commit;
END
Example: Scheduling the Flow
The
final step in setting up Change Data Capture processing is scheduling
the flow so that it runs periodically and processes transactions.
- Switch to the process
flow view by clicking the Process Flow tab.
- Drag the Schedule
 button
into the workflow and double-click it to open the Schedule Properties
window.
button
into the workflow and double-click it to open the Schedule Properties
window.
- Select a Schedule
type, Interval type, and Interval value to run the flow.
- Save the flow.
x
When
you request sample data for a log table, a dialog box opens so that
you can supply values to override the parameters in the synonym.
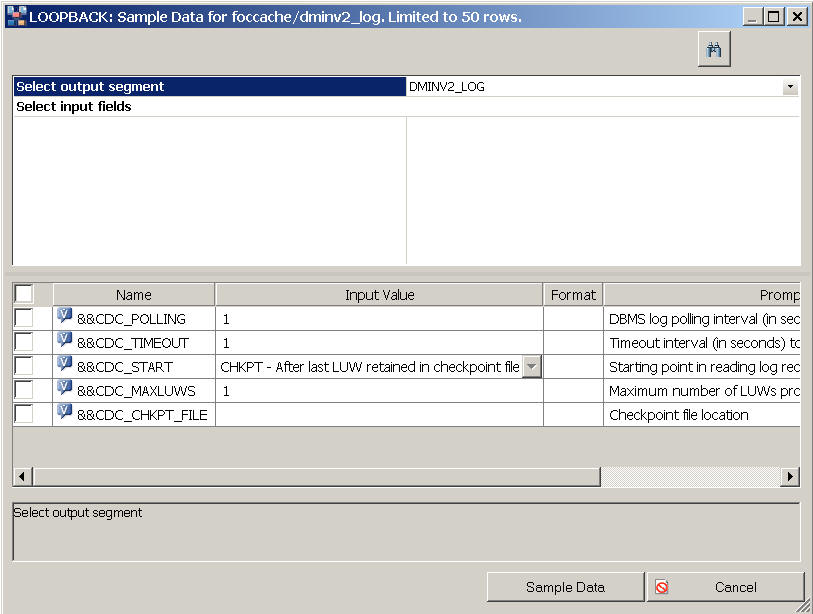
For
example, you can sample data from a log table without creating a
checkpoint by checking the check box in front of &&CDC_CHKPT_SAVE
and entering the value NO.
You can also specify where to
start reading the log by specifying a value for &&CDC_START.
The values are the same as those specified in the synonym.