User preferences allow you to set up your DMC environment. These
settings are available on the Home tab, in the Tools group, by selecting Options.
The Options dialog box opens with General settings in the right
pane.
x
Procedure: How to Set User Preferences
-
On the
Home tab, in the Tools group, click Options.
The Options window opens and the General settings
page appears in the right pane.
You can set preferences
for the following:
-
Select
the check boxes for the settings that you want to apply.
-
Click OK.
x
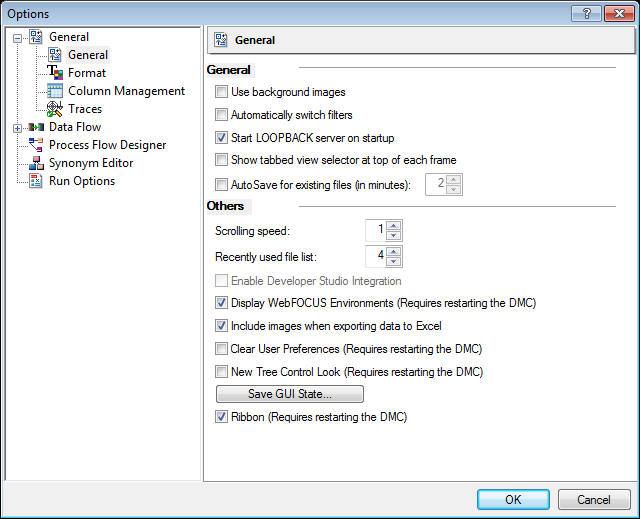
Reference: User Preferences - General
General
user preferences include using background images, automatically
switching and synchronizing trees, determining the location of messages,
and controlling scrolling speed.
The General Settings
window is available on the Home tab, in the Tools group, by clicking Options.
The
General settings window has two sections, General and Others.
The
General section has the following fields and options:
-
Use background images
-
Set a blue background image for the workspace.
-
Automatically switch filters
-
Switches filters automatically depending on what
flow view is open. Clicking the data flow tab will switch on the
Synonyms filter, while clicking the Process Flow tab will switch
on the Procedures filter.
-
Start LOOPBACK server on startup
-
This option is enabled if you start the DMC from
a Windows server installation. The local LOOPBACK server will start
automatically, if it isn't running, when you start the DMC. When
you close the DMC, the LOOPBACK server is stopped. This option is
not enabled if you start the DMC from a client installation.
-
Show tabbed view selector at top of each frame
-
Moves workspace tabs, like Data Flow, Process Flow,
and Text View, to the top. If this option is not checked, by default,
they appear at the bottom of the frame.
-
Auto Save for existing files (in minutes)
-
When selected, select the number of elapsed minutes
before automatically saving any open files. By default this feature
is not enabled.
The Others
section has the following options:
-
Scrolling speed
-
Determines the speed at which a flow scrolls when
you drag an object outside the viewable window. It can be set in
relative units of 1 to 10. The default is 1.
-
Recently used file list
-
Select the number of files to display in the recently
use file list from 0 to 16. The default is 4.
-
Enable Developer Studio Integration
-
Enables use of the Synonym Editor in Developer Studio.
-
Display WebFOCUS Environments (Requires restarting the DMC)
-
If not selected, the WebFOCUS Environments option
is disabled and does not appear in the navigation pane.
-
Include images when exporting data to Excel
-
Enables data to be exported with images included.
-
Clear User Preferences (Requires restarting the DMC)
-
Clears all user set preferences and returns them
to default values.
-
New Tree Control Look (Requires restarting the DMC)
-
Uses
Windows 7 style chevrons to indicate a folder can be expanded.
-
Save Gui State
-
Used
for diagnostics, saves the current state. This file is only needed
if requested by customer support.
-
Ribbon - (Requires restarting the DMC)
-
Select this option to enable the Ribbon. Deselect
it to use the classic toolbar.
x
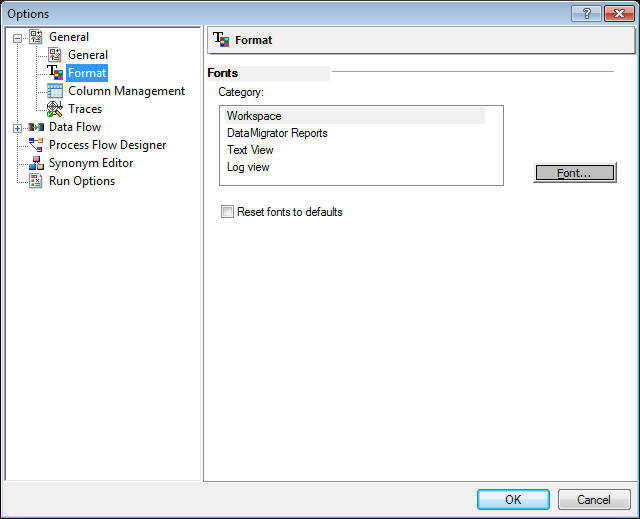
Reference: User Preferences - Format
Format
user preferences include settings colors and fonts for the Data
Console interface.
The Format settings window is available
on the Home tab, in the Tools group, by clicking Options.
The
Fonts section has the following fields and options:
-
Category list box
-
Allows you to set the font for text in the process
flow workspace, reports, text views, and log views.
-
Font
-
Launches a dialog box for changing font settings.
-
Reset fonts to defaults
-
Restores the default fonts.
x
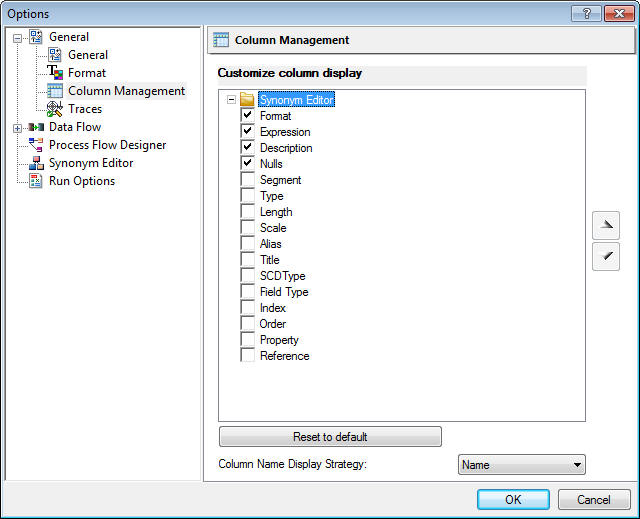
Reference: User Preferences - Column Management
Column
Management user preferences enable you to select which columns to
display on the grids for transformations, column selection, joins,
sorts, sources, and targets. You can also set the column display
order. The settings apply to all column-related dialog boxes.
The
Column Management settings window is available on the Home tab,
in the Tools group, by clicking Options.
The
Column Management settings window has the following fields and options:
-
Customize column display
-
Lists columns that can be added to the grid using
the check boxes.
-
Column Name Display Strategy
-
Controls the information that appears in trees and
grids.The available options are Name, Title, or Description. If
no Title or Description exists the display will default to the Name.
The
default settings are shown. Not all columns are on every grid. The
following columns can be added:
-
Expression
-
Is the expression for the column.
-
Type
-
Is the type of object in an application directory.
-
Length
-
Is the column length.
-
Scale
-
Is the maximum number of digits to the right of the
decimal.
-
Alias
-
Assigns an alternative name for a column, or the
real column name for a DBMS synonym.
-
Title
-
Supplies a title to replace the column name that
is normally used in reports.
-
SCD Type
-
Is used for processing slowly changing dimensions.
-
Field Type
-
Indicates that a field is an index (I) and/or is
read-only.
-
Table
-
Is the synonym that contains the column.
-
Format
-
Is the type and length of a column data as stored.
-
Description
-
Is a description or comments about the column.
-
Nulls
-
Indicates whether the column can contain null data.
Note: You
can change the display order of the columns by moving them up or down
using the arrows. You can also change the Column Name
Display Strategy to control what appears in trees and
grids.
x
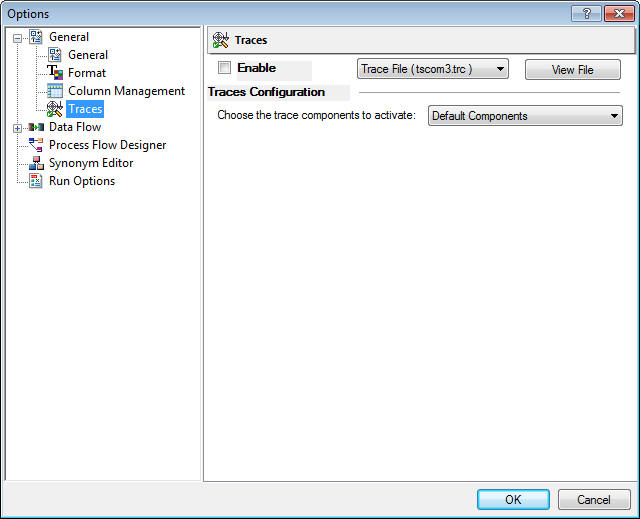
Reference: User Preferences - Traces
The
Traces settings window is available on the Home tab, in the Tools
group, by clicking Options.
The
Traces settings window has the following options:
-
Enable
-
This setting enables you to perform tracing of the application
to debug problems. You can choose the components activated in the
trace files tscom3.trc and connection.trc. These trace files reflect
the operations between the client and the server. You can view
these trace files from the DMC.
-
Output To
-
Allows you to select where you will view the results of the
trace. Options are Trace File or Console Log.
-
View File
-
Click this button to view the trace file.
-
Choose the trace components to activate
-
Allows you to specify which components will be traced.
x
Reference: User Preferences - Data Flow Designer
Data
Flow Designer user preferences include using application directories, automatically
selecting and mapping all columns, adding join objects and conditions,
and performing validation.
The Options window is available
on the Home tab, in the Tools group, by clicking Options.
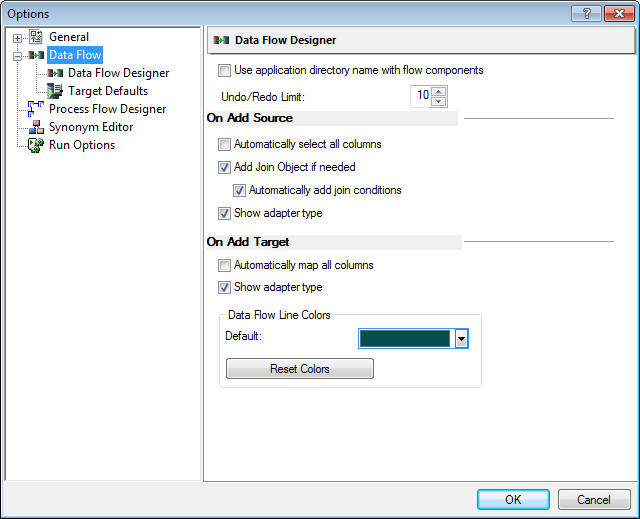
The
Data Flow Designer settings page has two sections, On Add Source
and On Add Target.
-
Use application directory name with flow components
-
Includes the application directory name for objects
in data flows.
-
Undo/Redo Limit
-
Specifies
the maximum number of undo operations allowed in the Data Flow Designer.
The
On Add Source section has the following fields and options:
-
Automatically select all columns
-
Selects all columns in a source.
-
Add Join Object if needed
-
When two sources are dragged onto the workspace,
connects sources to each other and to the SQL Object using join
objects.This is the default.
-
Automatically add join conditions
-
Creates an inner join if two data sources have a
column with a primary/foreign key relationship or with the same
name and format and that column is a key column in one of the sources.
This is the default. This option also creates source/lookup column
joins when using the DB_LOOKUP function.
-
Show adapter type
-
This option appears for Source and Target. When selected,
the adapter type (for example, Flat File or MS SQL Server) appears
under the synonym name.
Note: On
Add Source settings affect new sources that are added to a flow.
The
On Add Target section has the following fields and options:
-
Automatically map all columns
-
Automatically maps all source columns to target columns
of the same name.
-
Show adapter type
-
This option appears for Source and Target. When selected,
the adapter type (for example, Flat File or MS SQL Server) appears
under the synonym name.
-
Data Flow Line Colors
-
A drop-down menu of available colors for Data Flow
lines.
-
Reset colors
-
Restores the default colors.
x
Reference: User Preferences - Target Defaults
Target
Defaults user preferences allow you to set default Prior to Load
Values for each category of targets. You can also set commit levels
for targets. All targets in the current and subsequent flows will
use the commit level default set here.
The Options window
is available on the Home tab, in the Tools group, by clicking Options.
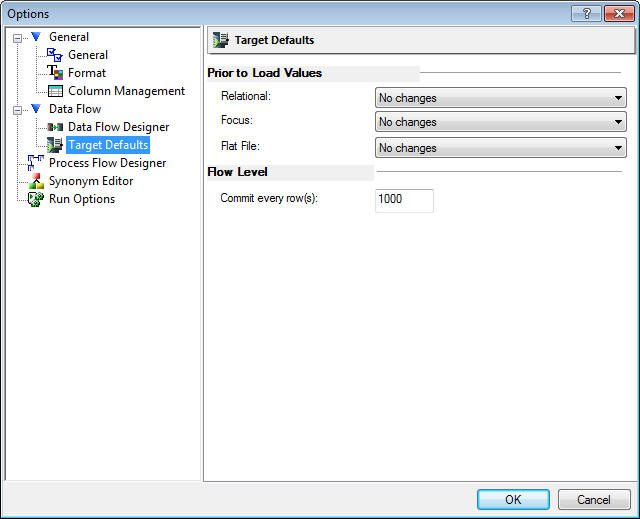
The
Target Defaults settings page has the following options:
Prior to Load Values:
-
Relational
-
-
No changes
-
Does not delete the records already in a data
target.
-
Delete all rows from table
-
Deletes all rows and creates a database log.
-
Truncate table
-
Deletes all rows from the table but does not generate
a database log. This is a faster option than Delete all rows from
table because no database log is generated. If the target database
does not support truncate, a delete is performed.
-
Focus
-
-
No changes
-
Does not delete the data target.
-
Drop Table
-
Deletes and recreates the data target.
-
Flat File
-
-
No changes
-
Does not delete the data target.
-
Delete File
-
Deletes and recreates the data target.
Flow Level:
-
Commit every row(s)
-
Specifies the number of rows to process before issuing
a commit to a relational database target or a CHECK to a FOCUS target.
A
value of zero (0) means that a COMMIT is only issued when the flow completes.
Note: This
setting will be applied to all targets in a flow.
When
several flows are loading multiple tables, it may be desirable to
not issue a commit until all the flows have completed successfully.
In this case, a special value of NONE can be used to mean that DataMigrator
should not issue any COMMIT commands. This means that it is the
responsibility of the user to issue a COMMIT (or ROLLBACK) when
appropriate. This can be done by creating a Process Flow that runs any
required Data Flows and checks the return code for each Data Flow.When
all flows have completed successfully, the Process Flow should then
call a stored procedure that issues the COMMIT command, or if any
Data Flow has failed, a ROLLBACK command.
This option
should be used with caution. If no COMMIT or ROLLBACK is issued,
the target tables could be locked.
x
Reference: User Preferences - Process Flow Designer
Process
Flow Designer user preferences include using application directories.
The
Options window is available on the Home tab, in the Tools group,
by clicking Options.
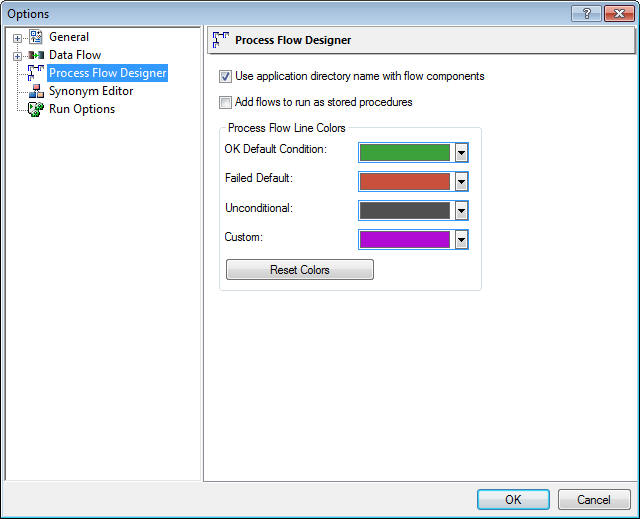
The
Process Flow Designer settings page has the following options:
-
Use application directory name with flow components
-
Includes the application directory name for objects
in process flows.
-
Add flows to run as stored procedures
-
When flows are added to a process flow, the Run as
stored procedure check box is automatically selected.
-
Process Flow Line Colors list box
-
Allows you to set colors for connector lines in process
flows.
OK Default Condition. Changes
the color of the OK connector in process flows.
Failed Default. Changes
the color of the Failed connector in process flows.
Unconditional. Changes
the color of connectors in data flows and unconditional connectors
in process flows.
Custom Line Color. Changes
the color of the custom connector in process flows.
-
Reset colors
-
Restores the default colors.
x
Reference: User Preferences - Synonym Editor
Synonym
Editor user preferences include using the application name with
the synonym, supporting the extended option, and showing parent
segments in the Join Editor.
The Options window is
available on the Home tab, in the Tools group, by clicking Options.
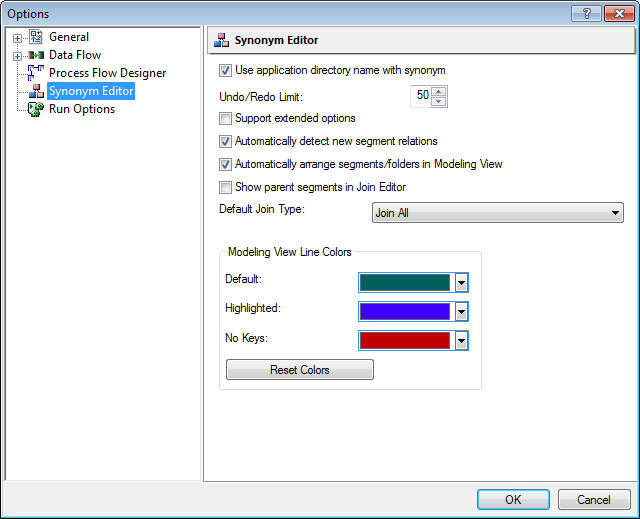
The
Synonym Editor settings page has the following fields and options:
-
Use application directory name with synonym
-
If selected, an application directory name will be
used when selecting a synonym name for both referencing to an existing
synonym, and a transformation with db_lookup.
-
Undo/Redo Limit
-
Specifies
the maximum number of undo operations allowed in the Synonym Editor.
-
Support extended options
-
If selected, the Sort and Styles buttons appear on
the Synonym Editor toolbar and the Insert menus.
-
Automatically detect new segment relations
-
When you create a new synonym in the modeling view
of the Synonym Editor with the Automatically detect new segment
relations option selected and select or drag these three tables
into the work area (modeling view), the relationships (joins) will automatically
be created for you based on the foreign key information in the access file.
-
Automatically arrange segments/folders in Modeling View
-
If you select or drag multiple or individual tables
while in Modeling View, they will be automatically arranged for
you.
-
Show parent segments in Join Editor
-
If selected, controls whether or not columns in parent
segments are displayed in the Join Editor for a cluster join or
a synonym that references, or includes, other synonyms.
-
Default Join Type
-
Allows you to select the default Join type. Options
are Join All or Join Unique.
-
Modeling View Line Colors list box
-
Allows you to set colors for connector lines in the
modeling view.
Default. Changes the
color lines in the modeling view.
Highlighted. Changes
the color of the highlighted lines in the modeling view.
No keys. Changes
the color of lines with no keys in the modeling view.
-
Reset colors
-
Restores the default colors.
x
Reference: User Preferences - Run Options
Run
Options user preferences include determining the number of rows
to retrieves when sampling data and keeping your server connection
alive.
The Options window is available on the Home
tab, in the Tools group, by clicking Options.
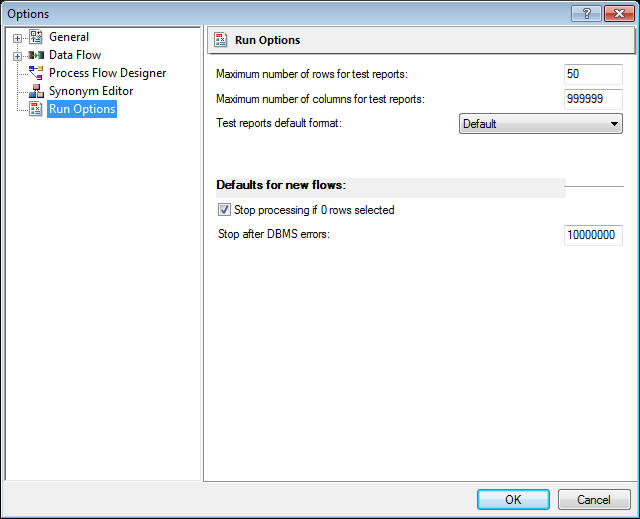
The
Run Options settings page has the following fields and options:
-
Maximum number of rows for test reports
-
Sets the number of rows retrieved to produce sample
data when testing transformations or SQL. The default is 50.
-
Maximum number of columns for test reports
-
Sets the number of columns retrieved to produce sample
data when testing transformations or SQL. The default is to retrieve
all columns (with a highest value setting of 999999).
-
Test reports default format
-
Sets the format of reports for retrieving sample
data when testing transformations, or SQL. The default is Default.
There are seven report formats available:
-
Default. Formats
numeric and date columns based on edit options in the synonym.
-
HTML. Produces
the report in HTML format.
-
HTML - Plain Text. Produces
the report in plain text format.
-
active report. Produces
an HTML active report designed for offline analysis.
-
Excel. Produces
the report in Excel format.
-
PDF. Produces
the report in PDF format.
-
Unformatted. Does
not apply formatting to numeric and date columns.
-
Stop processing if 0 rows selected
-
Allows you to stop processing if no data is returned.
This setting is the default for new flows. You can override this
option for an individual flow by resetting that flow execution properties.
-
Stop after DBMS errors
-
Allows you to stop processing the number of DBMS errors received
if the number of errors specified is exceeded. This setting is the
default for new flows. You can override this option for an individual
flow by resetting that flow execution properties.