xMigrating a Resource Management Repository on UNIX, Windows,
UNIX System Services, and IBM i
For these platforms, the migration procedure is executed
in a Web Console session.
Note: IBM i was formerly known as i5/OS.
x
Procedure: How to Migrate a Resource Management Repository on UNIX, Windows,
UNIX System Services, and IBM i
To
start the migration job:
-
Click the Resource Management link in
the toolbar.
-
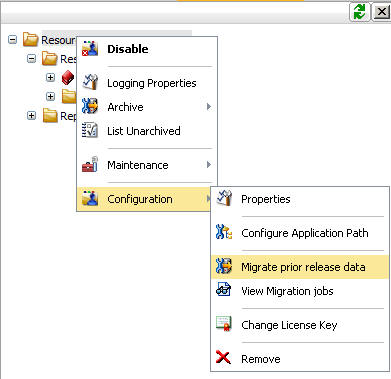
Right-click Resource Management - Active/Inactive in
the navigation pane, select Configuration,
and then select Migrate prior release data,
as shown in the following image.
Note: You can
also perform this task by clicking the Workspace link
in the toolbar, right-clicking Workspace in
the navigation pane, and selecting Migrate, General.
-
The Resource Management Migration page opens, as shown
in the following image.

-
From the drop-down menu, select the release number you
are migrating from. Options include 53x, 710-712, 713-718, 76x,
7700-7702, and 7703.
-
For all releases, you will need to enter the path to
the EDACONF directory of the release being migrated. Examples are
C:\ibi\srv76\wfs for Windows and /home1/ibi/srv76/wfs for Unix.
-
Enter the path to the EDAHOME directory of the release
being migrated.
Note: This is only required is the old release is
version 7703.
-
Click Next.
The Resource Management Migration pane opens, as shown
in the following image.
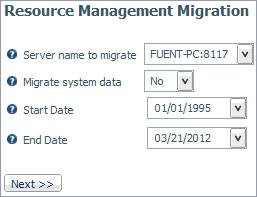
-
Select the server name used by Resource Management in
the old release.
-
From the Migrate system data drop-down menu, select Yes if
the previous releases system data should be migrated. If Yes is
selected, SMCNTRL, SMPRMTRS, and SMPRL data will be migrated. Only customBRL
members will be migrated. The SMKNBNAME value in SMCNTRL will not bemigrated
and any Govern and/or Advise values will be set to OFF. Any compiled
rule files must be rebuilt after the migration is completed and
new Govern and/or Advise values must be set. The default value is No.
-
Select the earliest and latest dates of the data to be migrated.
-
Click Next.
The Submit Data Migration Job pane opens.
-
Accept the default date and time, or enter the specific
date and time that you want the migration to run.
-
Click Submit. A confirmation of
the request appears, stating that the deferred execution request
is in queue.
-
To view the progress of the Deferred request, right-click Resource
Management-Active, and select Configuration, View
Migration jobs.
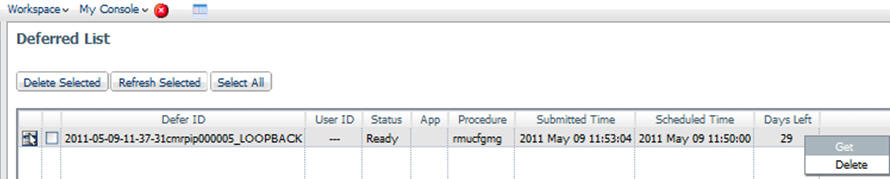
The Deferred List pane opens, displaying the list of deferred
requests and to view the request name that was displayed when the
deferred migration job was scheduled. Examples of request names
are listed in the Deferred ID column, as seen in the following image.
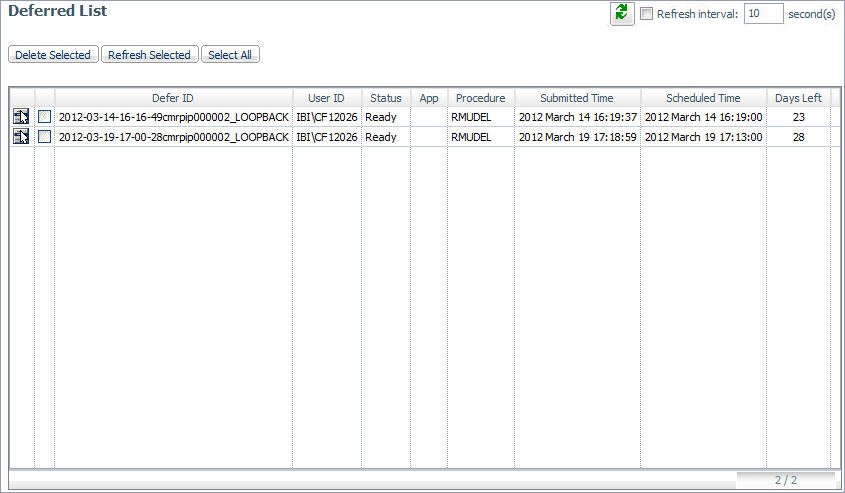
The
Status column shows the state of the deferred request, which can
be Queued, In-progress, or Ready. To see if the status has changed
to Ready, either keep refreshing the page using the refresh options
located at the top of the page, or redisplay the page at a later
time. Once the status is Ready, right-click the request line and
select Get to review the job output.
xMigrating a Resource Management Repository on UNIX, Windows,
UNIX System Services, and IBM i After a Server Refresh
The migration information described below is only applicable
if the server environment has been upgraded by performing the refresh
option during the installation process. To refresh the server, follow
the instructions in the Installation Guide for your platform.
Note: The migration process must be applied to the original
server that was refreshed. If a clone server was setup and the Resource
Management repository was copied to this server for the purpose
of testing , the migration process will not work. There are inter-dependencies
in the RA repository data based on the machine name and port number
used when first configured.
The migration of a Central Relational Repository Model, as described in Configuring a Central Relational Repository Model, is not supported
on a refreshed server environment. A new server environment needs
to be installed and then you must follow
the migration steps that are outlined in Migrating the Resource Management Repository
.
Once the refresh process has completed successfully, start the
server and then the Web console.
The migration is performed from the Web Console and consists
of three phases:
- Migrate configuration file (Required).
- Migrate repository (Optional).
- Remove old files (Optional).
For these platforms, the migration procedure is executed on a
Web Console session.
Note: IBM i was formerly known as i5/OS.
x
Procedure: How to Migrate a Resource Management Repository on UNIX, Windows,
UNIX System Services, and IBM i After a Server Refresh
-
To start the migration process, click
the Resource Management link on the toolbar
in the Web Console. A warning message is displayed, as shown in
the following image.

This warning message
indicates that the structure of the Resource Management repository
has changed. A migration process is required in order to update
the existing repository so that new data columns can be archived
to the repository. If the migration process is not run, monitor
data will still be collected and archived but without the new data
columns.
You can:
- Ignore the message contents
by closing the message window. The repository will still have the
old structure and the warning message will continue to be shown.
- Start the migration process by closing the message window and
right-clicking the warning link in the statistics table. Select Migrate Configuration,
as shown in the following image.

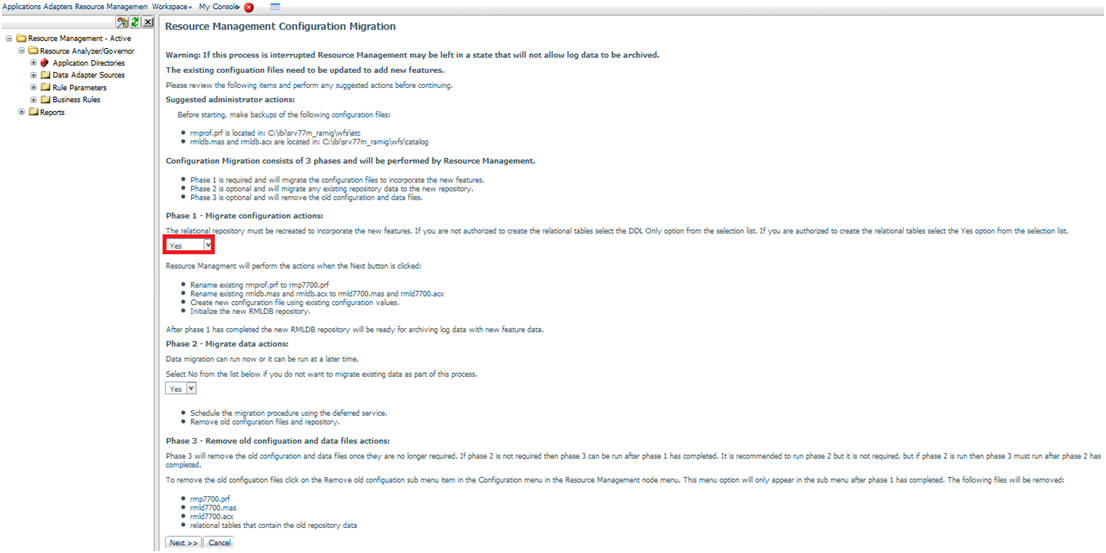
The Resource
Management Configuration Migration pane opens.
-
Select Phase 1 actions from the drop-down menu (for Relational repository
only).
-
DDL Only
-
Select this option if you do not have DBA authority over
the existing Resource Management repository tables. This option
creates a file, rmldb.sql, which contains RDBMS specific DDL.
Click Next to
display the instructions for the location of the rmldb.sql file.
Give this file to the DBA for processing. You must close the browser
at this point in the process. You cannot start phase 2 using the
same browser session or errors will occur while attempting to access
your old database.
Note: Your DBA must create the
new Repository tables in the same location as the original 7.7 tables
and both sets of tables have to be accessible on the same Adapter
connection on the server. The new tables will have the release number
appended to the name. The format will be tablename_release.
Once
the repository tables have been created, return to the Web Console
and click Resource Management. The warning
message opens again. Close the window and right-click on the warning
link in the Statistics table and then click on the Migrate Configuration
entry to continue the Configuration Migration process.
-
Yes
-
Select this option if you have DBA authority over the existing
Resource Management repository tables. New repository tables will
be created with the _7703 suffix, and the process will continue
at Phase 2.
Note: If migrating
a FOCUS repository, there will be no Phase 1 drop-down menu.
-
Select Phase 2 options from the drop-down menu. The process
will resume at phase 2, as shown in the following image.
-
No
-
Select this option if you do not want data to be copied from
the old repository to the new one.
To run the migration process
at a later date, right-click Resource Management in
the navigation pane and select Configuration, Migrate
7700-7702 data.
-
Yes
-
Select this option to copy data from the old repository to
the new one.
-
Click Next to schedule
the migration procedure.
The Deferred Execution pane opens, as shown in the following image.
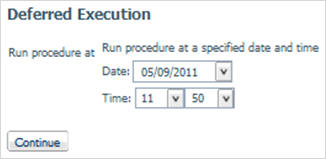
-
Select the date and time for the execution to take
place. Click Continue.
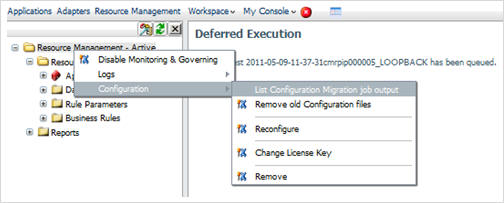
-
To view the List Configuration Migration Job Output,
right-click Resource Management in the navigation
pane and select Configuration, List
Configuration Migration job output, as shown in the
following image.
-
A list of jobs opens. Right-click on the job and select Get to
see if there are any focus errors, as shown in the following image.
-
In the Remove old configuration and data files step (Phase
3), you can choose whether to remove the old configuration files
or perform this action in the future. To perform this step, right-click Resource
Management in the navigation pane and select Configuration, Remove old
Configuration files.
Note: Once you choose to remove the old configuration
files, the option to migrate data will no longer be available.
xMigrating a Resource Management Repository on MVS
This option is only available when migrating data from
release 76. MVS migration is not available for releases 53 and 71.
x
Procedure: How to Migrate a Resource Management Repository on MVS
To
start the migration job:
-
Click the Workspace link
in the toolbar and click Configuration/Monitor.
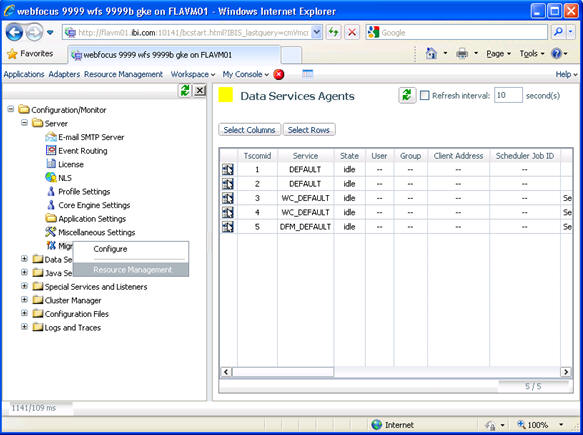
-
Expand the Server folder, right-click Migration,
and select Resource Management, as shown
in the following image.
-
The Resource Management Migration page opens, as shown
in the following image.
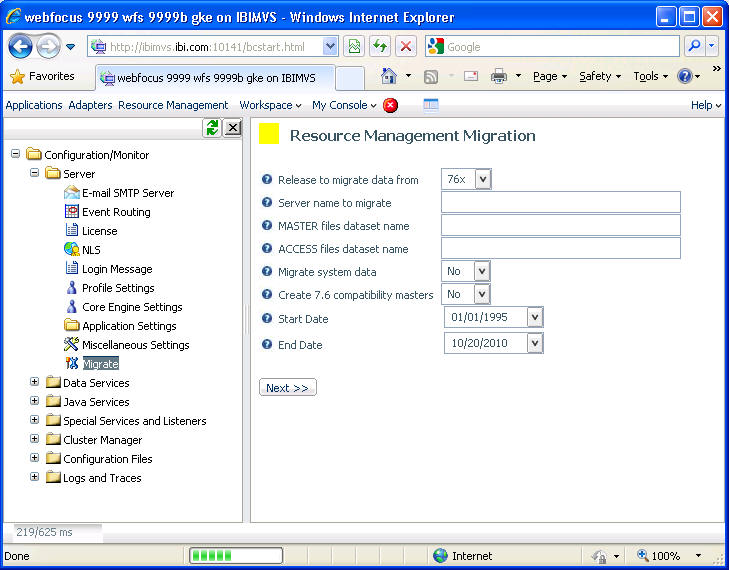
On MVS, the migration
page uses data set names to locate the Resource Management files
to be migrated instead of an ECADONF path value.
The following
options are available:
-
Release to migrate
data from
-
The release number you are migrating from. The only previous
release supported for MVS migration is 76x.
-
Server name to migrate
-
The server name used by Resource Management in the old release.
You can find the server name in the GKESET FOCEXEC.
-
MASTER files dataset name
-
The dataset name that was used to save the MASTER files during configuration
of the previous release.
-
ACCESS files dataset name
-
The dataset name that was used to save the ACCESS files during
the configuration of the previous release.
-
Migrate system data
-
Select Yes if the previous releases
system data should be migrated. If Yes is selected, SMCNTRL, SMPRMTRS
and SMPRL data will be migrated. Only custom BRL members will be
migrated. The SMKNBNAME value in SMCNTRL will not be migrated and
any Govern and/or Advise values will be set to OFF. Any compiled
rule files must be rebuilt after the migration is completed and new
Govern and/or Advise values must be set. The default value is No.
Note: If
multiple migration runs are being made, only migrate the system
data once.
-
Create 7.6 compatibility masters
-
Select Yes if you want to have 7.6
style masters created that will allow existing custom reports to
run. Some modifications to your custom reports may be required.
-
Start Date
-
The earliest date of the data to be migrated. The format
is MM/DD/YYYY. The default value is 1/1/1995.
-
End Date
-
The latest date of the data to be migrated. The format is
MM/DD/YYYY. The default value is the current date.