Scheduling a Process Flow
DataMigrator provides several ways to run data and process flows.
In addition to executing flows immediately, you can use the DataMigrator
internal scheduler to run requests off-hours, on a recurring basis,
or on specified days of the week or month.
Alternatively, you can schedule or execute a flow from an application
other than DataMigrator. For details, see Event-Based Scheduling.
You can also disable a scheduler without removing the Schedule
object from the flow.
You can schedule a process flow to run in the following ways:
-
Run Once. Runs
your flow once.
-
Recurring. Repeats
your flow at an interval that you define.
-
Multi-Day. Runs
your flow on certain days of the month.
-
Run when server starts. Runs your flow every time the
DataMigrator server starts.
When the Scheduler checks for flows, it executes all flows scheduled
to run in the period of time since the Scheduler last checked for
flows.
The DataMigrator Scheduler parameters are controlled from the
Web Console.
- For scheduled
flows to run, the Scheduler must be running. On the DM Configuration
pane, the sched_autostart radio button must
be set to yes.
- The schedule
interval determines how often the scheduler checks for flows to
run. For example, for a flow to run every five minutes, the sched_interval option
on the DM Configuration pane must be set to a value of 300 seconds
or less. The default is 60 seconds.
Note: You can also add or change schedule properties from
the Web Console.
x
Procedure: How to Schedule a Process Flow to Run Once
-
Drag
the Schedule icon into the workspace. It
is automatically connected to the Start object.
Note: A Schedule object is the only allowed input
to the Start object.
-
Double-click
the Schedule object or right-click it and
select Properties to open the Schedule attribute pane.
-
Select Run
Once in the Schedule Type section.
-
Select a start date in the Start Date section by typing the
date in the month/day/year areas, or by clicking the down-arrow
to open a calendar in which you can choose a date. The default is
the current day.
-
Select
a start time in the Start Time section by typing values directly into
the hour/minute/seconds/AM or PM areas, or by highlighting an area
and using the up and down arrows to select new values. The default
is the current time.
-
Close
the pane.
-
Click
the Save button to update the process flow.
x
Procedure: How to Schedule a Process Flow to Run on a Recurring Interval
-
Drag
the Schedule icon into the workspace. It
is automatically connected to the Start object.
Note: A Schedule object is the only allowed input
to the Start object.
-
Double-click
the Schedule object or right-click it and
select Properties to open the Schedule attribute pane.
-
Select Recurring in
the Schedule Type section.
-
Select
an interval type (such as daily, monthly) from the Interval Type section.
-
Specify
an interval number from the Interval Value section to indicate the
frequency of execution. For example, if you select Weekly as your
Interval Type and 2 as your Interval Value, the flow will be executed
every two weeks.
-
Select a start date in the Start Date section by typing the
date in the month/day/year areas, or by clicking the down-arrow
to open a calendar in which you can choose a date. The default is
the current day.
-
Select a start time in the Start Time section by typing values
directly into the hour/minute/seconds/AM or PM areas, or by highlighting
an area and using the up and down arrows to select new values. The
default is the current time.
-
Optionally,
select an end date and time by selecting the Specify End Date check
box. Specify the end date by typing the date in the month/day/year
areas, or by clicking the down-arrow to open a calendar in which
you can choose a date. Specify the time by typing values directly
into the hour/minute/seconds/AM or PM areas, or by highlighting
an area and using the up and down arrows to select new values.
-
Optionally,
specify special date and time ranges. You can configure the scheduler
to run on specific days of the week or month, on the last day of
the month, or specify the beginning and ending times of the daily
time span.
-
Close
the pane.
-
Click
the Save button to update the process flow.
Tip: If
you wish to stop a query from executing regularly, you do not need
to change the schedule. Instead, set Schedule Status to Inactive in
the Schedule attribute pane.
x
Procedure: How to Schedule a Process Flow to Run at Multi-Day Intervals
-
Drag
the Schedule icon into the workspace. It
is automatically connected to the Start object.
Note: A Schedule object is the only allowed input
to the Start object.
-
Double-click
the Schedule object or right-click it and
select Properties to open the Schedule attribute pane.
-
Select Multi-Day in
the Schedule Type section.
-
Select a start date in the Start Date section by typing the
date in the month/day/year areas, or by clicking the down-arrow
to open a calendar in which you can choose a date. The default is
the current day.
-
Select a start time in the Start Time section by typing values
directly into the hour/minute/seconds/AM or PM areas, or by highlighting
an area and using the up and down arrows to select new values. The
default is the current time.
-
Optionally, select an end date and time by selecting the Specify
End Date check box. Specify the end date by typing the date in the
month/day/year areas, or by clicking the down-arrow to open a calendar
in which you can choose a date. Specify the time by typing values
directly into the hour/minute/seconds/AM or PM areas, or by highlighting
an area and using the up and down arrows to select new values.
-
Configure the scheduler to run on specific days of the week
or month, on the last day of the month, or specify the beginning
and ending times of the daily time span.
-
Close
the pane.
-
Click
the Save button to update the process flow.
Tip: If
you wish to stop a query from executing regularly, you do not need
to change the schedule. Instead, set Schedule Status to Inactive in
the Schedule attribute pane. For details about setting flow properties,
see Setting Flow Properties.
x
Procedure: How to Schedule a Process Flow to Run on Holidays
You
can schedule process flow to execute on holidays. The Holiday option
is when Recurring or Multi-Day are selected in the Schedule Type
drop-down menu. For more information, see Specifying Holiday File.
Note: You can only schedule to
run on holidays after you create holiday file.
-
Drag the Schedule icon
into the workspace. It is automatically connected to the Start object.
Note: A Schedule object is the only allowed input
to the Start object.
-
Double-click
or right-click the Schedule object and select Properties.
The Schedule attribute pane opens.
-
Select Recurring or Multi-Day from
the Schedule Type drop-down menu.
-
Select the
option from Run on Holidays drop-down menu. The following options
are available:
-
Run
-
Run on regular scheduled days and on desired holidays.
-
Skip
-
Exclude run on desired holidays.
-
Only
-
Only run on desired holidays.
-
Click the Save button
to update the process flow.
To
verify that the holiday schedule is set, in the navigation pane,
expand the Workspace folder. Then, expand
the Configuration/Monitor and then the Special
Services and Listeners folders. Right-click SCHEDULER and select Scheduled
Events. The Scheduler/Scheduler Events report should
list scheduled flows by the holiday set date.
x
Procedure: How to Schedule a Process Flow to Run When the Server Starts
You can schedule a process flow
to run whenever the DataMigrator server is started. This option
is useful for flows that need to run all of the time, for example,
when using Change Data Capture or File Listener capabilities.
-
Drag the Schedule icon into the workspace.
It is automatically connected to the Start object.
-
Double-click
or right-click the Schedule object and select Properties.
The Schedule attribute pane opens.
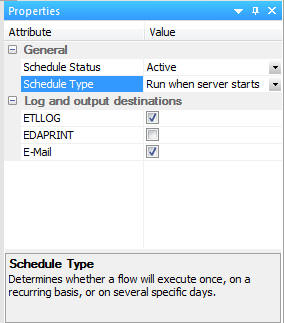
-
Select Run
when server starts from the Schedule Type drop-down
menu, as shown in the following image.
-
Click the Save button to update
the process flow.
x
Procedure: How to Disable a Schedule Object
You
can disable a the schedule of a flow from the Schedule attribute
pane.
-
Double-click
the Schedule object or right-click it and
select Properties to open the Schedule attribute
pane.
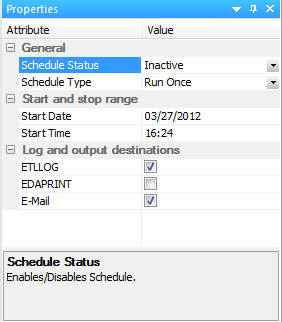
-
Select Inactive from
the Schedule Status drop-down menu, as shown in the following image.
-
Close
the pane.
The Schedule object turns gray in the workspace.
x
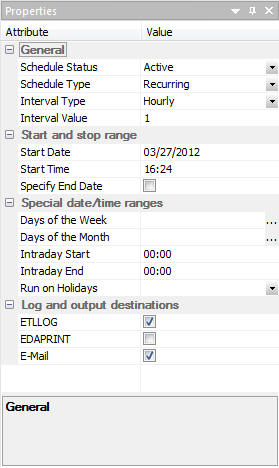
Reference: Schedule Attribute Pane
The Schedule attribute
pane shown in the following image is available from the process flow
workspace by double-clicking the Schedule object.
The
Schedule attribute pane contains the following fields and options:
-
Schedule Status
-
Determines whether the schedule is active or inactive.
-
Schedule Type
-
Determines whether a process flow will execute once, on a
recurring basis, on several specific days, or when the server starts.
-
Interval Type
-
Specifies the interval in which a process flow will be executed.
For example, if you select Month as your Interval Type, and select
2 as your Interval Number, the flow will execute every two months.
This option is only available if the schedule type is set to Recurring.
-
Interval Value
-
Specifies the frequency at which a process flow will be executed.
For example, if you select Week as your Interval Type, and select
2 as your Interval Value, the flow will execute every two weeks.
This option is only available if the schedule type is set to Recurring.
-
Start Date
-
Specifies the start date for the execution of the process flow.
-
Start Time
-
Specifies the start time for the execution of the process flow.
-
Specify End Date
-
Allows you to specify an end date and time for the execution
of the process flow. This is optional.
-
End Date
-
Specifies the end date for the execution of the process flow.
This option is available if Specify End Date is selected.
-
End Time
-
Specifies the end time for the execution of the process flow.
This option is available if Specify End Date is selected.
-
Days of the Week
-
Specifies the day of the week on which the process flow will
be executed. Depending on the selection made in the Interval section,
this may be dimmed.
-
Days of the Month
-
Specifies the day of the month on which the process flow
will be executed. Depending on the selection made in the Interval
section, this may be dimmed.
-
Intraday Start
-
Specifies the beginning of the daily time span of the process flow.
-
Intraday End
-
Specifies the end of the daily time span of the process flow.
-
Run on Holidays
-
Specifies the option to execute the process flow on desired
holidays.
The following options are available:
-
Run. Run on
regular scheduled days and on desired holidays.
-
Skip. Excludes
run on desired holidays.
-
Only. Only
run on desired holidays.
-
Log and output Destinations
-
This option controls where the log information from the flow
should be sent when the flow is initiated with Submit from the DMC,
from the Scheduler, or from CMRUN or CMASAP.
The following
options are available:
-
ETLLOG. The
log is sent to the DataMigrator log.
-
EDAPRINT. The
log is sent to the Server log.
-
E-Mail. The
log is sent as an attachment to an e-mail message if specified in
Flow Properties.
Multiple options can be selected. The
default value for this option is ETLLOG and E-Mail.
Note: If
the flow is set to Run the log, information will go to the console log
regardless.
x
Reference: Specifying Holiday File
You
can specify a list of dates that are designated as holidays in your
company. These dates can be schedule to be excluded, only included,
or included to run with regular days in the process flow. To define
a list of holidays, you must create a holiday file using a standard
text editor and select the holiday file by issuing the SET command
with the HDAY parameter.
- In a text editor,
create a list of dates designated as holidays using the following
Rules of Creating Holiday File:
- Dates must be in
YYMD format.
- Dates must be in
ascending order.
- Each date must be
on its own line.
- You may include an
optional description of the holiday, separated from the date by
a space.
- Save the file into
home\etc directory:
In Windows and UNIX the file must be HDAYxxxx.ERR.
In
OS/390, the file must be a member of ERRORS named HDAYxxxx, where
xxxx is a string of text four characters long.
- From the navigation
pane, expand the Workspace folder, and then
the Configuration/Monitor folder. Expand
the Configuration Files folder, then the Server Profiles folder,
and right-click Server Profile. Select Edit and
enter:
SET HDAY = xxxx
where:
xxxx is
the part of the name of the holiday file after HDAY. This string
must be four characters long.
- Save the new Server
Profile.
- Test that holiday
is correctly set up by creating a sample hdayfile synonym.
FILENAME=HDAYFILE, SUFFIX=FIX     ,
 DATASET=C:\ibi\srv77\home\etc\hday2010.err, $
  SEGMENT=HDAYFILE, SEGTYPE=S0, $
    FIELDNAME=HDAY_DATE, ALIAS=hddate, USAGE=YYMD, $
    FIELDNAME=HDAY_DESC, ALIAS=hddesc, USAGE=A66, ACTUAL=A68, $
Note: DATASET
should be set to your appropriate directory path.
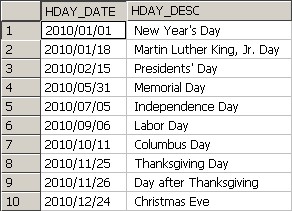
- Run Sample Data for
hdayfile synonym. An example of the sample data is shown in the
following image.