The first step in building a data flow is to create an empty
flow. You will then be able to add objects to this flow and set
up mappings and relationships.
x
Procedure: How to Create a Data Flow
-
Right-click
the application directory where you want the new data flow.
-
Select New and
then Flow.
or
Click the New
 button
on the toolbar.
button
on the toolbar.
An empty
data flow appears in the data flow workspace. The Data Flow tab opens
by default, with an SQL object in the center of the workspace.
xAdding and Deleting Objects in Your Data Flow
You can add or delete objects in the data flow workspace.
Objects on the left of the SQL object are sources and objects on
the right are targets.
Note: When adding objects, there is no limit to the area
they can take up. If the number and arrangement of objects exceeds
the viewable area of the workspace, a scroll bar will appear.
x
Procedure: How to Add Objects to Your Data Flow
x
Procedure: How to Search for Existing Synonyms to Use as Sources or Targets
The
Select Synonym dialog box has a search feature that allows you to
find synonyms by searching their names and descriptions.
-
Right-click
in the Data Flow tab and select Add Source or Add
Target, Existing.
The Select Synonym dialog box opens.
-
Click
the Find button at the top right.
The Find dialog box opens.
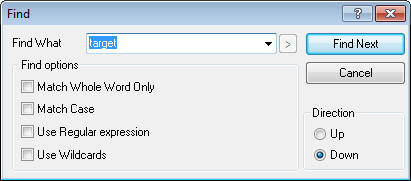
-
Type a string in the Find
What field and click the Find Next button.
You can refine your search with match whole word only and match
case. You can also search in either direction.
The first synonym name or description containing the string
is highlighted in the Select Synonym dialog box.
-
Click
the Find Next button to find the next match.
Note: After
closing the Find dialog box, you can still search for the next match
using F3. Shift + F3 will find the next match searching upward.
x
Reference: Select Synonym Dialog Box
The Select Synonym
dialog box is available by right-clicking in the Data Flow tab and selecting Add
Source or Add Target and then Existing.
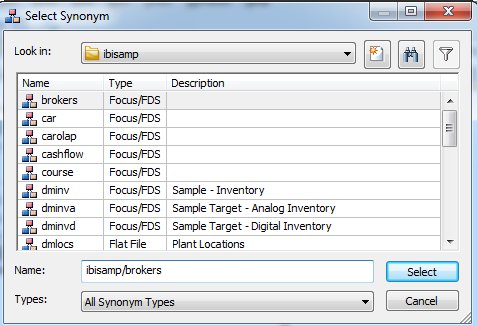
The
Select Synonym dialog box has five default columns, but this can
be customized. The following fields and options available:
-
Look in
-
Is the name of the application directory where the synonyms
are located. Select the server name to see all synonyms in all directories.
-
Name
-
Is the name of the synonym.
-
Type
-
Is the type of synonym.
-
Description
-
Is the description of the synonym.
The
following two columns are available if you are adding a source to
a Join object that already has a synonym selected:
-
Join Conditions
-
The join conditions that could be used to join the already
selected synonym to a new synonym.
-
Join Type
-
Displays how the join conditions were found. This could be
by:
-
Matching Key Names. Identically
named fields were found in both synonyms.
-
Matching Primary Keys. The
already selected synonym has a foreign key relationship to a primary
key in the new table.
-
Matching Foreign Keys. The
new table has a foreign key relationship to a primary key in the
already selected table.
Note: Clicking
any of the column headings will sort the list on that field. A column
sorted ascending will display an up arrow, while a column sorted
descending will display a down arrow.
-
New Synonym
-
Allows you to create a new synonym.
-
 Find
Find
-
Allows you to search the application directories for a particular
synonym.
-
 Filter
-
This button is enabled when you already have one table connected
to a Join condition and you right click a Join object and select Add and then Source.
When
selected, only tables in the selected application directory or server
with columns that match key columns are displayed.
When unselected,
all tables in the selected application directory or server are displayed.
-
Select button
-
Adds the highlighted synonym to the workspace.
-
Name text box
-
Allows you to search for a synonym by its name.
-
Types drop-down menu
-
Allows you to sort the synonyms by their type.
-
Title Bar
-
Right-click a column header in the title bar to open the
context menu with the following options:
-
Sort Ascending/Descending. Sorts
the list of synonyms on the selected column.
-
Find. Opens
the search dialog.
-
Tree View/List View. Switches
views of the synonyms.
-
Best Fit. Optimizes
the column widths for best viewing.
-
Customize. Allows
selecting the columns that are displayed,
x
Procedure: How to Delete Objects From Your Data Flow
Right-click
the object you want to remove and select Delete.
xConnecting and Disconnecting Objects in Your Data Flow
The connections between objects in the data flow workspace
allow information to flow between them.
The DMC default User Preferences automatically connects objects.
- Objects dragged
onto the left (source) side of the workspace are connected to the
SQL object, or if more than one data source is dragged onto the
workspace, to each other through a join object.
- Objects dragged
to the right (target) side are connected to the SQL object.
Note: The Options section in the Tools menu provides access
to the DMC User Preferences. If the Add Join Object if
needed setting on the Data Flow Designer page
is checked, source objects are automatically connected to a join
object if more than one is dragged onto the workspace. For details,
see How to Automatically Add Join Objects.
x
Procedure: How to Connect Objects
When
objects are deleted, you may need to recreate the connections between
some of the remaining objects.
-
Right-click
an object, hold the mouse button down, and drag to the object you
want connected.
-
Release
the mouse button.
An arrow
will appear indicating the connection.
You may also need to
create connections if the DMC default settings have been changed.
x
Procedure: How to Disconnect Objects
Right-click
the arrow connecting two objects, and select Delete.
or
Right-click
an object, hold the mouse button down, and drag an arrow to a different object.
x
Data flows are saved on the DataMigrator server. The
first time you save a data flow, you will select an application
directory and assign a name to it. After that, you can save it with
the same name or assign a new one.
The following restrictions apply to flow names:
- Names can contain
only letters, numbers and underscores.
- Uppercase letters
are converted to lowercase when the flow is saved.
- Names can be up to
64 characters long, except on z/OS with PDS deployment, where names
are limited to 8 characters.
x
Procedure: How to Save a Data Flow
-
Click the Save
 button,
or select File and then Save from
the main menu.
button,
or select File and then Save from
the main menu.
Note: A flow can only be saved once changes have
been made to it. If no changes have been made, the button and Save
option in the main menu will both be inactive (grey).
If
this is the first time a flow is being saved, the Save As dialog
box will open. See How to Save a Data Flow with a New Name.
-
Check the
console window for a message indicating that the flow was saved
successfully.
x
Procedure: How to Save a Data Flow with a New Name
-
Click the Save As
 button,
or select File and then Save As from
the main menu.
button,
or select File and then Save As from
the main menu.
The Save As dialog box opens.
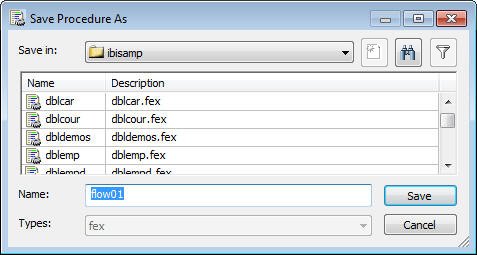
-
Select the
application directory where you want to save the flow from the Save
in: drop-down menu.
-
Enter the
name you wish to use for the flow in the Name field.
Click Save.
-
Check the
console window for a message indicating that the flow was saved
successfully.