Gathering Diagnostic Information for Customer Support Services
Diagnostic Service Accelerator (DSA) automates the gathering,
packaging, and shipping (using FTP) of trace files and other diagnostic
information for Customer Support Services using the edastart -savediag
facility. A prompt mode is available for ease-of-use, as well as
archiving and FTP posting capabilities. Automatic triggers are available
for customer e-mail confirmation. DSA also triggers the logging
of the upload to the support case and flags the case as requiring
attention, thereby accelerating diagnostics services by automating
and closing the communication gap between customer and customer services.
In one step a customer can run a repro, then describe, archive
(for example, as a ZIP file), and ship (using FTP) all the required
information to Information Builders Customer Support Services.
Automatic triggers are available for customer email confirmation.
DSA also triggers the logging of the upload to the support case
and flags the case as requiring attention, thereby accelerating
diagnostics services by automating and closing the communication
gap between customer and customer services.
Note the following platform-specific
information:
-
On Windows, users must have a command line version
of ZIP installed and on the system path for the archive and send
feature to work properly.
-
On OpenVMS, this feature optionally uses ZIP if it is
installed and a symbol is declared. (Any commercial or open source
version of ZIP may used.) Otherwise, the -savediag process uses
BACKUP to create the archive.
-
All other platforms use system supplied tools such as
tar and pax, and require no additional steps to use the feature.
-
On IBM i (formerly known as i5/OS), z/OS, Open/VMS, batch/command
files–CMD/CL, JCL, and DCL files, respectively–are available for
users who prefer to use this method to control tracing and save
diagnostics.
On Windows, the Start menu has equivalent
options under the Diagnostics folder.
The
files and their equivalent edastart commands are:
|
File
|
Command
|
|---|
|
ITRCON
|
edastart -traceon
|
|
ITRCOFF
|
edastart -traceon
|
|
ISAVEDIA
|
edastart -savediag
|
The physical execution of these batch files varies by platform.
For information about location and use of supplied batch/command
files, see the chapter for your platform in the Server Installation manual.
Note:
- The diagnostic process suggests a local location in which
to save your files. However, you can supply a custom location if
you prefer, as long as you avoid reserved system locations
including the following: EDAHOME; APPROOT; EDAPRFU; SCAROOT; EDACONF
bin; EDACONF etc; EDACONF edatemp; EDACONF dfm_dir; EDACONF img_dir;
EDACONF catalog; EDACONF web; EDACONF user; any location that is
a direct parent in the paths listed above; an ID's HOME; the root
of a device (that is, \ or /); c:\windows; c:\Program Files; c:\Documents
and Settings; /usr and /usr/bin.
- In the case of PDS deployment on z/OS, tracing and the edastart
-savediag function must be done using the ISAVEDIA JCL method
described in the z/OS PDS section of the Server Installation manual
(where the diagnostic files go directly to the JES log output of
the server) rather than the method described in the remainder of
this section.
x
Procedure: How to Create a Savediag From the Web Console
To
run a Savediag, you must be a Server Admin or have administrator
privileges.
-
From the Workspace menu,
select Configuration/Monitor.
-
From the navigation pane, open the Logs and Traces folder.
-
Right-click Workspace Logs and
select Savediag.
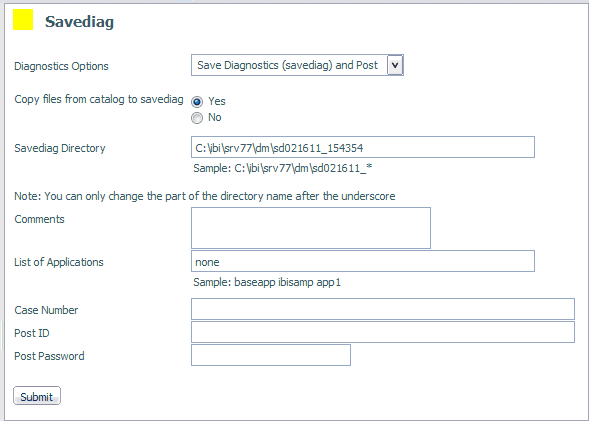
The Savediag page opens, as shown in the following image.

-
Select from the Diagnostic Options drop-down menu.
The options are:
-
Save Diagnostics (savediag) and Post.
This is the default.
-
Save Diagnostics (savediag).
-
Post existing diagnostics.
-
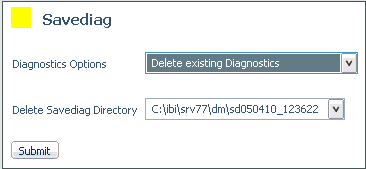
Delete existing diagnostics.
The
available fields will vary, depending on the Diagnostic Option selected.
-
Choose whether to save files from the catalog by selecting
the corresponding radio button.
-
For Save options, you can change the part of the Savediag Directory field
that follows the underscore, which is the time.
-
For Post options, you can enter information in the Comments field.
-
For Save options, enter applications in the List
of Applications field.
-
For Post options, enter the case number you received
from Customer Support Services in the Case Number field.
-
For Post options, enter the information you received
from Customer Support Services in the Post ID and Post Password fields.
This information in required to access the Customer Support Services
FTP site.
-
Click Submit.
If
you selected a Post option, your information is posted on the Customer Support
Services FTP site. If not, the information is saved to the Savediag
Directory folder.
Note: If you choose the Delete
existing Diagnostics option, select a folder from the Delete
Savediag Directory drop-down menu and click Submit.

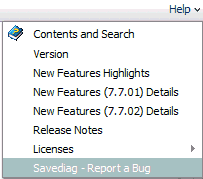
Note: The Help menu
also includes an option to create a Savediag, as shown in the following
image.

x
Procedure: How to Create a Savediag From the Help Menu
The Savediag option is also available
from the Help menu.
-
Click the Help menu and
select Savediag - Report a Bug from the drop-down
menu, as shown in the following image.

The Savediag page
opens.
Note: To run a Savediag, you must be a Server
Admin or have administrator privileges.
For
more information, see How to Create a Savediag From the Web Console
x
Procedure: How to Report Server Related Problems From the Command Line
In order to provide Information Builders
Customer Support Services with a proper reproduction of your problem,
follow these steps:
Note: The
use of edastart in this procedure assumes that the directory for the
edastart script has been added to the system search path for your
platform (or that another method for locating and using edastart
has been used). If this is not the case, you must preface edastart
with its path when you enter it here.
-
Turn traces on with the command edastart -traceon.
Initially starting the server with traces is strongly recommended.
-
Reproduce the problem while traces are on.
-
If the application abends, write the core dump information
to the edaprint.log file using one of the following techniques:
- To create the log from the Web Console menu bar, select Workspace,
Diagnostics, Server Log, then click WRITE IBISNAP Information To Current
Log.
- To create the log manually, issue the edastart -ibisnap command.
-
Use the edastart -savediag command to gather and send
files to the support FTP site as an archive (using the archive method
required on your platform). The edastart -savediag command includes
options for saving and FTPing, saving locally, and FTPing a prior
local save. The system prompts as follows:
Select an option (type Q to quit for most prompts):
   1. Save diagnostic to a directory and FTP post
   2. Save diagnostic to a directory
   3. FTP post prior diagnostic from a directory
Enter a selection (Default=1) : 1
For
related information, see Files Gathered by the edastart -savediag Command.
Note: Typically, users save and
post in one operation (the default), however, you may wish to consider
the following reasons for saving and posting as separate steps:
- If you have multiple repro variations, you may wish to confirm
them all first, then ship them to Customer Support Services.
- If you wish to repro multiple separate problems, the two-part
option enables you to save each one separately, then ship.
- If the server cannot be shut down (and edastart -cleardir cannot
be used), the two part option may enable you to delete unneeded
items before shipping.
- For security/privacy reasons, items need to be reviewed and
possibly cleansed before shipping.
x
Procedure: How to Report edastart -t, -x, or -f Problems Outside the Server Environment
If
a problem occurs on the Server environment, attempting to reproduce
it in a free-standing environment may facilitate troubleshooting.
If you wish to try this strategy, follow these steps.
-
Create a repro application directory (preferably
called repro or repro_case#).
-
Place the required files (*.fex, *.mas, and so on) that
are not already in APP PATH in the repro application directory.
-
Physically switch to the repro application directory
so that traces and other files go to this known location.
-
Run the desired request with the command:
edastart -traceon {-t|-x|-f}where:
- -t, -x, -f
Are three separate trace modes.
-
If the server edatemp directory is not needed to reproduce
the problem, shut the server down and issue the edastart -cleardir
command so that edatemp is not captured during -savediag processing.
Note: If the server must be kept running 24x7, skip
this shutdown step and proceed to step 6.
-
Issue the edastart -savediag command, specifying the
repro application directory (and any other needed directories) in
order to gather and send files to the support FTP site as an archive
(using the archive method required on your platform). The edastart
-savediag command includes options for saving locally, saving and
FTPing, and FTPing a prior local save. Choose:
1. Save diagnostic in a new directory and post
2. Save diagnostic in a new directory
3. Post diagnostic from an existing directory

Enter a selection (Default=1) :   2
For related information,
see Files Gathered by the edastart -savediag Command.
-
Restart the server to resume normal operation.
In
the case of an abend (core dump), Information Builders may ask that debuggables
be installed (as described in the software installation manual)
and that the repro/savediag steps be repeated with IBI_DBGLIB=ON
to gather more detailed information. Do not install debuggables
or perform these steps unless requested by Information Builders.
x
Reference: Files Gathered by the edastart -savediag Command
- Server log ($EDACONF/edaprint.log)
- Traces and other contents from the $EDACONF/edatemp/... directory,
including the following:
|
File
|
Description
|
|---|
|
edachkup.trc
|
Daemon check up facility trace
|
|
edapdfm.trc
|
Deferred Listener trace
|
|
edaplog.trc
|
EDAPRINT log daemon trace
|
|
fds.trc
|
FDS trace
|
|
jscom*.trc
|
Java traces
|
|
edapth.trc
|
Main workspace manager trace
|
|
edaphtp.trc
|
HTTP communication traces (listener)
|
|
ht000nnn.trc
|
HTTP communication traces (threads)
|
|
edaptcp.trc
|
TCP/IP communication traces (listener)
|
|
ip000nnn.trc
|
TCP/IP communication traces (threads)
|
|
lu000nnn.trc
|
SNA communication traces
|
|
ts000nnn.trc
|
Agent traces
|
- Server configuration ($EDACONF/bin/edaserve.cfg)
- Profiles from $EDACONF/etc/edasprof.prf and ibi/profiles/*
- Complete content of application directories, as specified during
-savediag processing.
Example: Sample edastart -savediag Processing With Variations
The
following sample includes annotations that indicate what is happening
as the process runs.
$ bin/edastart -savediag
Note: A
log of environment information is displayed.
.
.
.
Select an option (type Q to quit for most prompts):
     1. Save diagnostic to a directory and FTP post
     2. Save diagnostic to a directory
     3. FTP post prior diagnostic from a directory
Enter a selection (Default=1) : 1
Enter directory path for diagnostic information
(Default=/u1/prod/iadmin/ibi/srv71/ffs/sd122905_110820)
Please supply location or <Enter>:
/u1/prod/iadmin/ibi/srv71/ffs/myrepro

Enter space separated non mapped application names to save in
the diagnostic or ALL for all non mapped application names
Default= baseapp):   repro

12/29/2005 11:08:49

12/29/2005 11:08:49 Creating savedir =
/u1/prod/iadmin/ibi/srv71/ffs/myrepro
Note:
- Repro is the application directory for the saved application;
myrepro is the directory in which the information generated by -savediag
will be saved.
- A log of file copies is displayed. Note that some copy errors
are normal since the process is trying to catch files (like those
used for NLS set up), which users may or may not have.
12/29/2005 11:08:50 Diagnostic Information has been saved in
/u1/prod/iadmin/ibi/srv71/ffs/myrepro
Note:
- If you selected Option 2, Save diagnostic to a directory, -
savediag processing stops here.
- If you selected Option 3, FTP post prior diagnostic from a directory,
-savediag processing provides the next prompt.
Enter existing directory path with diagnostic information
to post (Default=/u1/prod/iadmin/ibi/srv71/ffs/sd122905_111616)
Please supply location or <Enter>:  /u1/prod/iadmin/ibi/srv71/ffs/myrepro
Note: It
then continues as option 1 would have.
Please enter Hottrack Case number to post (8 digits or more):  999999999

Please enter user id on cssftp.ibi.com (Default=incmgr):

Please enter comments for the Hottrack Case 999999999.

Enter as many lines as needed, blank line indicates end of comments.

My reproduction for error

12/29/2005 11:09:37 Creating myrepro.tar to post savediag information

Please supply confirmation to proceed with posting (Y/N/Q Default=Y):  Y
Note:
- An FTP log of posting activities is displayed.
- As a final step, an HTTP message is sent silently to Customer
Support Services. This triggers a confirmation email to the customer
and alerts Customer Support Services systems that a –savediag has arrived.


