To migrate a Version 4 application:
-
You
must have the Version 4 .cta and .gfa files before you start the
migration process. Place the Version 4 .cta and .gfa files for your
application in the Application Root (APPROOT) directory, \ibi\apps.
If the .gfa file for your application is missing, you can usually successfully create a new one in WebFOCUS Maintain Version 4 Release 3.5 or higher by clicking the .cta file and entering the Maintain Development Environment (MDE). Then click Tools, Utilities, and Create .GFA file.
-
Start
the Project Migrator by clicking Start, Information
Builders, WebFOCUS 77 Developer Studio, WebFOCUS
Developer Studio Utilities, and then Project
Migration Tool.
A list of the Version 4 .gfa files in the Application Root (APPROOT) directory appears in the Project Migrator window.
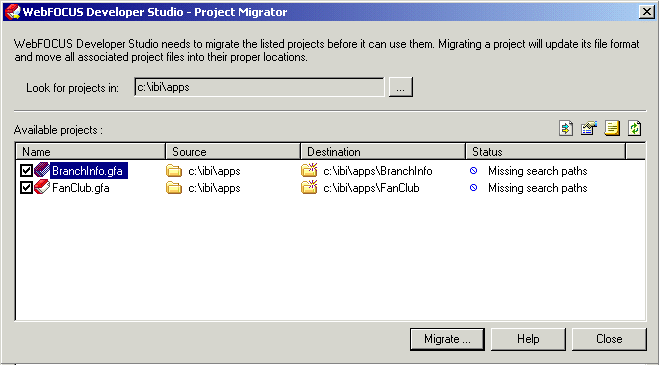
If your .cta and .gfa files already reside in the Application Root directory, you are automatically prompted to run the Project Migrator even if you are starting Developer Studio for the first time and you have not yet migrated an application.
-
If necessary,
browse for .cta and .gfa files in locations other than the Application
Root directory by clicking the Browse
 button
next to the Look for projects in field.
button
next to the Look for projects in field.
-
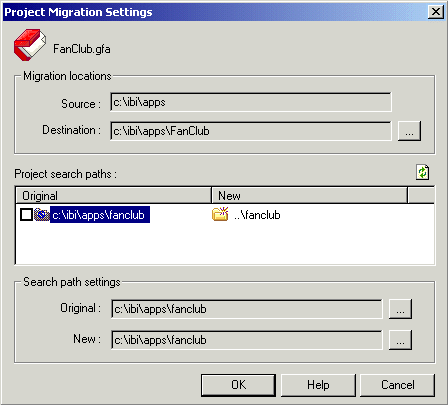
Specify
any different sources, destination directories, and search path settings
by double-clicking the .gfa file name in the Available projects
pane. The Project Migration Settings dialog box opens.
-
Click
the Browse button next to the Destination path
to open the Browse for Folder dialog box. Choose an existing folder
or create a new one by clicking the New Folder button.
Note: Depending on your type of operating system, you may not see the New Folder button.
- Click OK to save your selections and return to the Project Migration Settings dialog box.
- Click OK to return to the main Project Migrator window showing available projects.
-
In the Available projects pane, deselect
the check boxes for any projects you do not want to migrate at this
time and click the Migrate button or Migrate
checked item(s)
 on the
toolbar to migrate the selected items.
on the
toolbar to migrate the selected items.
- If your Version 4 application contains local copies of Web resources or WebFOCUS application files, the files are placed in your Version 7 Developer Studio project.
- If your Version 4 application contains linked application files, such as procedures (without forms) or data sources, copies of these files are also automatically placed in your Version 7 project. You can decide later whether or not to deploy these files.
- If your Version 4 application contains links to procedure files that contain forms, those forms are not available to the .cta file that references them only as linked (for example, proc1 linked on EDASERVE) and they will not be migrated to the new version. Be sure to migrate using the original .cta file that was used to design the forms.
- If your Version
4 application contains linked Web resource files, such as images,
a dialog box with the following options opens:

- Select Use cached version to put local copies of these files in your project directory. In most cases, this means you will write the files out to your Web server when you deploy them remotely.
- Select Always use cached version and don't show this message to avoid repeated prompts when you cache individual linked files.
or
- Provide a full HTTP address for the file in the location entry area. To use this option, first deselect the Use cached version check box. You can keep the original location, or you can change it by typing in a new HTTP address and path including the file name. Click the OK button to continue.