Creating a Direct Load Flow
A Direct Load flow is a simplified flow that can be used for
a single source. It loads data directly from the file into an existing
target, without the need to create an intermediate file, unless
Bulk Load from Disk File is used, which always creates an intermediate
file.
Note: The synonym that describes the source table for
a Direct Load Flow must contain a unique ALIAS that matches the
FIELD name for every column that is referenced.
A Direct Load flow can load from hierarchical data sources such
as VSAM. For example, a file with multiple record types can be used
as a source with fields from each record type loaded into a separate
table.
A Direct Load flow has no SQL object, so no aggregation (group
by), filtering (where conditions), or SQL calculations can be performed.
Source transformations and DEFINE columns in the source synonym
cannot be used.
Target transformations, functions, variables, validates, target
properties, and record logging can be used. The procedures for using
these capabilities, as well as for running the flow, are the same
for Direct Load flows as for more typical data flows. For information,
see the appropriate topics earlier in this chapter.
While other types of data flows discard records with format errors,
when a direct load flow runs, any records rejected due to format
errors are counted, and the number of rejected rows appears in the
log. Optionally, the rejected records can be written to a log file.
For information, see How to Set the Data Flow Record Logging Options
x
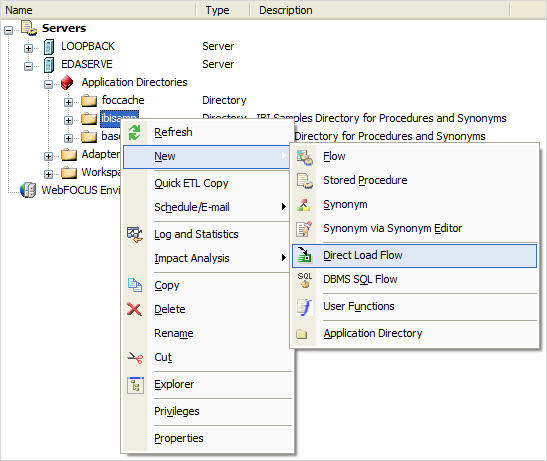
Procedure: How to Create a Direct Load Flow
-
Right-click
the application directory where you want the new data flow.
-
Select New and
then Direct Load Flow.
An
empty flow appears in the data flow workspace. The Direct Load tab
opens by default.
Note: An SQL Object does not appear
in the center of the workspace.
-
Drag
a flat file data source into the workspace to the left of the center line.
-
Drag
a data target into the workspace to the right of the center line.
You can also right-click in the workspace to the right of the center
line and select Add Target and then Existing.
-
Optionally,
you can set up target transformations. For information, see Mapping Transformations.
-
Click
the Save button or select Save from
the File menu.
-
Enter
a name for the flow in the Name field and click OK.
You can also select a Server and Application Directory from the
drop-down menus.
-
Run
the flow.