Procedure: How to Verify an Installation or Upgrade Without Data
After logging in to PMF as an administrator, the next step is to create a new scorecard.
- In the Author tab, click Scorecards in the left pane.
- Click the Wizard button.
The New Scorecard Wizard appears, as shown in the following image.
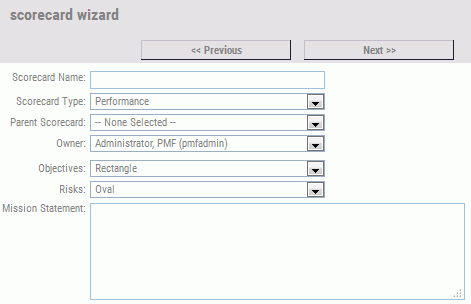
Complete the fields in the form, as described in the following table. For this example, name the new scorecard, Our First Scorecard.
Field
Description
Scorecard Name
Type a name for your new scorecard. The maximum number of characters is 50.
Scorecard Type
Select Performance or Risk.
Parent Scorecard
If the scorecard should be cascaded from a parent, select the desired parent scorecard. All scorecards that you have access to are shown in the drop-down list.
Owner
Select the user ID of the owner of the scorecard. By default, your owner ID is used.
Shared Scorecard(check box)
Select this check box to indicate that the scorecard can be shared, which makes it visible to all users. This option is not required if you use Scorecard-based Functional Access.
Objectives
Select the shape to use for Objectives in the Strategy Map.
Risks
Select the shape to use for Risks in the Strategy Map.
Mission Statement
Optionally, type text to describe the fundamental purpose of the new scorecard. This information is displayed in the Strategy Map and in some views.
- Click Next.
The next page, used to add perspectives, is displayed in the New Scorecard Wizard.
Note: You can click Previous at any time before the Finish step to go back and make changes.
- Select the Use default Perspectives check box or type a value in each of the four Perspective fields.
- Click Next.
The next page, used to add objectives, is displayed in the New Scorecard Wizard, as shown in the following image.
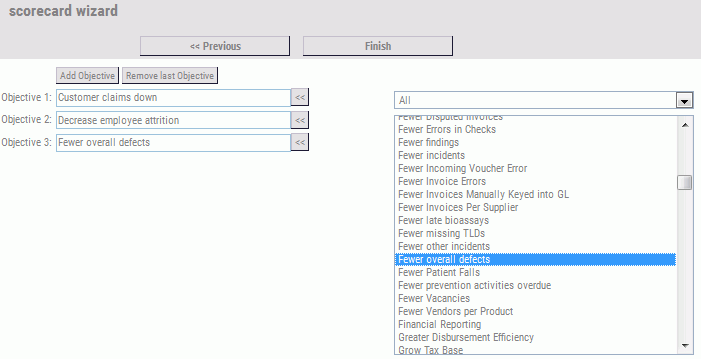
- For each
new objective that you want to add, select an objective category
from the drop-down list (to the right of Objective 1), and double-click
the desired item in the objective selection box, which is located
below the objective category drop-down list.
You can also do any of the following:
- Replace an objective that was already selected. Highlight an item in the objective selection box and click the left-pointing arrow to the right of the existing objective.
- Manually add an objective name. Click the Add Objective button and type the name of the desired objective in the blank objective field. Note that when you do this, you will have to also manually type a name for the associated measure.
- Remove the last objective. Click the Remove last Objective button.
- Select the Create
standard metrics check box to set up new standard measures
for each objective as defined in the PMF standard metrics repository.
When Create standard metrics is not selected, the Scorecard Wizard creates objectives without creating new standard measures and bypasses the step, which means you will have to manually link each objective to an existing measure or a new measure that you will create.
- Click Next to
review all of the corresponding measures for the objectives you
selected on the previous page.If the Create standard metrics check box was not selected, you will bypass this step.
- If you have
no further changes, click Finish, otherwise,
click Previous.
When you click Finish, a summary page is displayed for the new scorecard you just created. You can click Go to card to view the new scorecard or click Another new to create another new scorecard.
- After creating the scorecard, click on the Strategy tab to view the Strategy Map area.
- From the Card drop-down menu located on the top left, verify that Our First Scorecard is listed as an option. If it is, it was successfully created and the installation was successful.
- To delete
the scorecard, right-click the folder in the scorecard tree that represents
the scorecard and select Edit.
The Edit Scorecard form opens.
- Click Delete.
A dialog box will open asking you to confirm the deletion. Click OK.