A provider is a centrally configured resource that supplies
services to run time components in the server. For example, a keystore
provider centralizes the definition of one security keystore, including
its type, file location, and password. Each configured provider
has a name. Using that name the services of the provider can be
referenced in other parts of the server.
One provider can refer to another provider. The SSL provider,
as an example, requires a keystore and a trust store. Each of these
is a keystore of some type, so instead of configuring all of the
details of the keystore, the configuration simply asks for the name
of the keystore provider(s) in charge of the keystore and trust
store.
Often, several providers can supply the same service, although
in different ways. For example, in a secure system a certificate
can be stored in a keystore or in an LDAP directory. A Certificate
Revocation List (CRL) can be stored in a file system directory or
in an LDAP directory. Simply specifying the name of the provider
to be used to access the certificate or the CRL is all that is needed
when configuring for a need. This simplifies server configuration.
A provider describes a resource available at run time, while
the users of the provider are configured in the design time experience;
a deployed usage is tied to the run time physical implementation
only by its name. For example, a configuration requiring a certificate
store can be deployed on servers having completely different storage
for its certificates.
Please note that the term providers is used on several levels.
While the providers available in iWay Service Manager offer services
to other iWay components, providers can also refer to software that
is installed into the Java Virtual Machine (JVM) that provides services
to application programs. These JVM providers must also be configured.
As with all server-level modifications, you must completely stop
and then start your iSM instance for these changes to take affect.
x
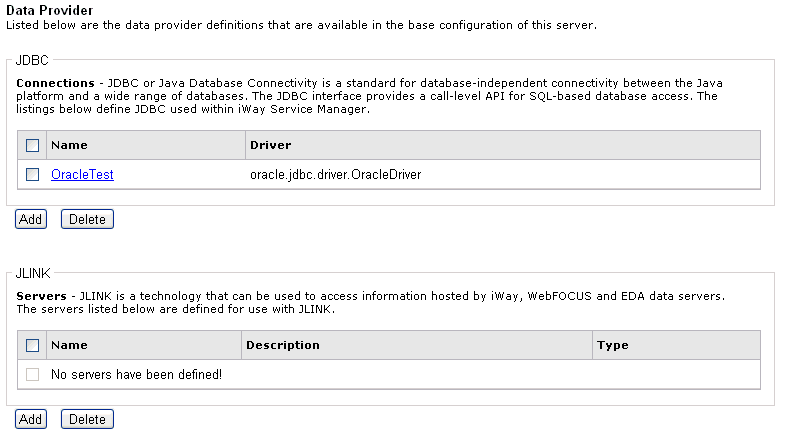
The Data Provider option enables you to define and configure
data servers and connections. The data provider properties include:
- JDBC connections
- JLINK to access
iWay, WebFOCUS, and EDA data servers
x
Procedure: How to Add a JDBC Connection
To
add a JDBC connection:
-
In the
left console pane of the Server menu, select Data Provider.
-
Beneath
the JDBC section, click Add.
The JDBC Data Provider Definition pane displays.
-
Provide
the appropriate values for your JDBC connection as listed and defined
in the following table.
|
Parameter
|
Description
|
|---|
|
JDBC Connection Pool Properties
|
|
Name *
|
Enter the name of the JDBC data provider
to add.
|
|
Driver Class
|
The JDBC driver class is the name of the
class that contains the code for this JDBC Driver. You can select
a predefined database from the drop-down list or enter your own.
The
following are sample values for the driver:
com.microsoft.jdbc.sqlserver.SQLServerDriver
COM.ibm.db2.jdbc.app.DB2Driver
com.informix.jdbc.IfxDriver
sun.jdbc.odbc.JdbcOdbcDriver
oracle.jdbc.driver.OracleDriver
com.sybase.jdbc2.jdbc.SybDriver
The required .jar
files for the JDBC driver must be installed and registered in the Service
Manager classpath. You can use the Path Settings option on the console
to add Java classes and libraries. |
|
Connection URL
|
The JDBC connection URL to use when creating
a connection to the target database. The URL generally includes
the server name or IP address, the port or service, the data source
name, and a driver specific prefix. You can select a predefined
database from the drop-down list or enter your own.
The following
are sample values for the URL:
jdbc:microsoft:sqlserver://server:1433;DatabaseName=DB
jdbc:db2:database
jdbc:informix-sqli://HOST:PORT/DB:INFORMIXSERVER=SERVER_NAME
jdbc:odbc:DBjdbc:oracle:thin:@HOST:PORT:SIDjdbc:sybase:Tds:HOST:PORT
For
more information, see the JDBC documentation for the specific data source. |
|
User
|
User name with respect to the JDBC URL and
driver. SREG names can be used.
|
|
Password
|
Password with respect to the JDBC URL and
driver. SREG names can be used.
|
|
Connection Pool Properties
|
|
Initial Pool Size *
|
Number of connections to place in the pool
at startup.
|
|
Maximum Number of Idle Connections *
|
Maximum number of idle connections to retain
in the pool. A value of zero (0) means no limit except what is enforced
by the maximum number of connections in the pool.
This value
can be reset using the jdbc command, allowing this to be changed,
often on a schedule, to respond to changing database conditions.
|
|
Maximum Number of Connections *
|
Maximum number of connections in the pool.
A value of zero (0) means no limit.
This value can be reset
using the jdbc command, allowing this to be changed, often
on a schedule, to respond to changing database conditions.
|
|
Login Timeout
|
Time in seconds to wait for a pooled connection
before throwing an exception. A value of zero (0) means to wait
forever.
|
|
Behavior When Exhausted
|
What to do when the pool reaches the maximum
number of connections. Block means wait for a connection to become
available for the period defined by the login timeout parameter.
Fail means throw an exception immediately.
|
|
Validation SQL
|
SQL statement that can be executed to validate
the health of a pooled connection. The statement should return a
result set of at least one row.
|
|
Validate on Borrow
|
If set to true, the
validation SQL statement will be executed on a pooled connection
before returning the connection to the caller.
|
|
Validate on Return
|
If set to true, the
validation SQL statement will be executed on a pooled connection
before replacing the connection in the pool.
|
-
Click Test to
check for proper connections.
If a connection cannot be made, an error message displays
describing the problem. Typically, the driver has not been installed
or the classpath has not been set.
-
Click Add to
return to the Data Provider pane.
x
Procedure: How to Add a JLINK Data Source
Since
drivers are stopped, they do not need to be added. However, if you
need to add a JLINK data source:
-
In the
left console pane of the Server menu, select Data Provider.
-
Beneath
the JLINK section, click Add.
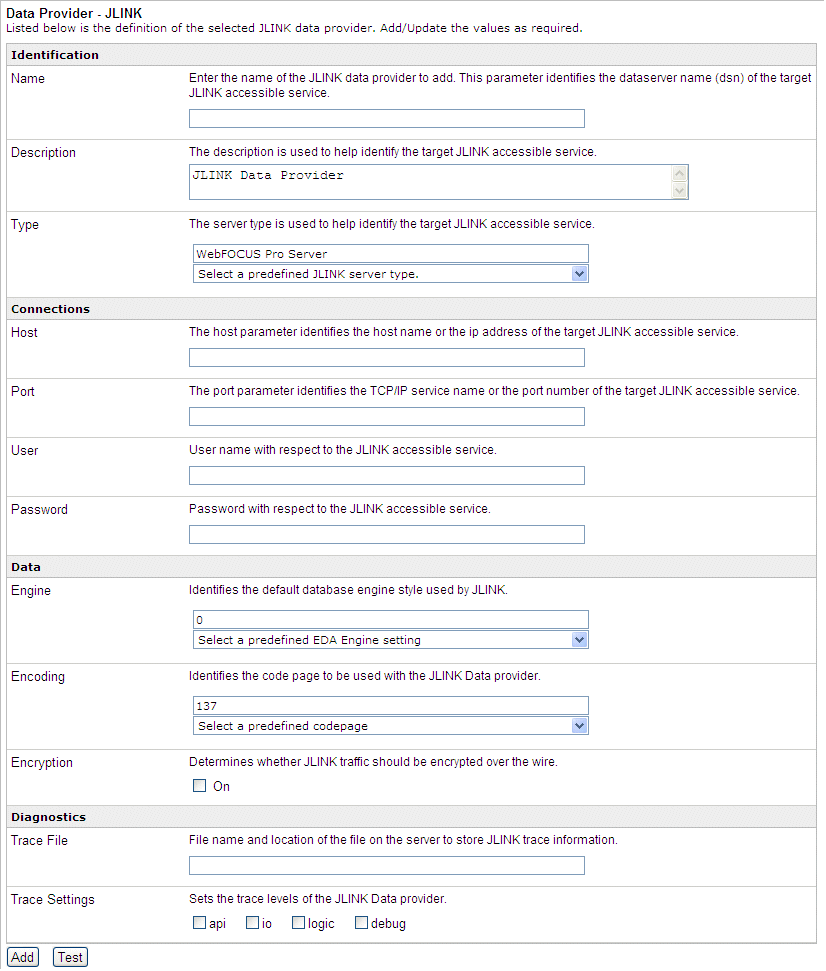
The Data Provider - JLINK pane displays, as shown in the
following image.
-
In the
Name field, type the name of a new server. In this example, type NEWSERV.
-
In the
Description field, type a brief description for the new server.
The default is JLINK Data Provider.
-
From
the Type drop-down list, select a JLINK server type.
The default is WebFOCUS Pro Server.
-
Type
the required values for Host and Port.
-
Type
the required values for User and Password.
-
From
the Engine drop-down list, select a database engine.
The default is 0 (EDA).
-
From
the Encoding drop-down list, select a codepage.
The default value is 137 (U.S. English).
-
To encrypt
data that is transported over the wire (optional), select the Encryption check
box.
-
In the
Trace File field, type the path and name of the file for the trace output.
-
To set
trace levels, select any number of the check boxes listed (optional).
-
Click Add.
x
Configuring Idle Connection Eviction
This feature allows you to specify the amount of time
a connection can remain idle in the connection pool. Similar to
a feature of Apache DBCP, the idle connection eviction thread runs
at regular intervals, with the following options:
-
Eviction Interval. Time between runs of the idle
connection eviction thread, in seconds. A negative value means the
eviction thread will never run.
-
Idle Connection Timeout. The minimum amount of time a
connection can remain idle in the pool before the eviction thread
disposes of it. When the eviction thread runs and finds that a connection
has been idle for at least this interval, the connection will be
removed from the pool and closed. Note that a connection can remain in
the pool longer than the timeout, depending on the scheduling of
the eviction interval.
-
Maximum Number of Tests Per Run. This is a performance
tuning option. Since the eviction thread must lock the pool when
it runs, this option allows you to specify how many connections
can be tested in each run, thus limiting the duration of the lock.
If the eviction interval is short, or the number of connections
in the pool is large, performance may improve with fewer connections
tested per run. Enter 0 to test all connections.
-
Validate Idle Connections. If true, the eviction thread
executes the validation SQL statement on connections that have not
reached the idle connection timeout. If the statement does not execute
successfully, the connection will be dropped from the pool.
x
iWay Service Manager can quickly and easily expose iWay
Business Services as web services through the iWay Business Services
Provider (iBSP).
iWay Business Services Provider is installed with an embedded
HSQL repository, which is the default data store for information
that is generated during design time and then published into a deployed
run-time environment. HSQL is an open source Java based SQL relational
database engine and includes a JDBC driver.
iBSP uses defined services providers to integrate with available
data repositories. If a repository is not defined, the default HSQL
repository is assumed by iWay Service Manager.
A repository migration facility is also included, which provides
portability for your existing metadata and iWay Business Services.
For example, you can migrate your data between development, testing,
and production environments across multiple systems. For more information,
see Migrating Repositories.
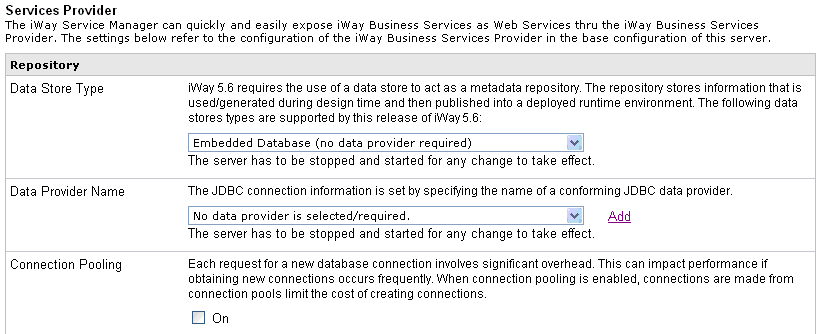
The settings in the Services Provider pane refer to the configuration
of the iWay Business Services Provider in the base configuration
of the server.
x
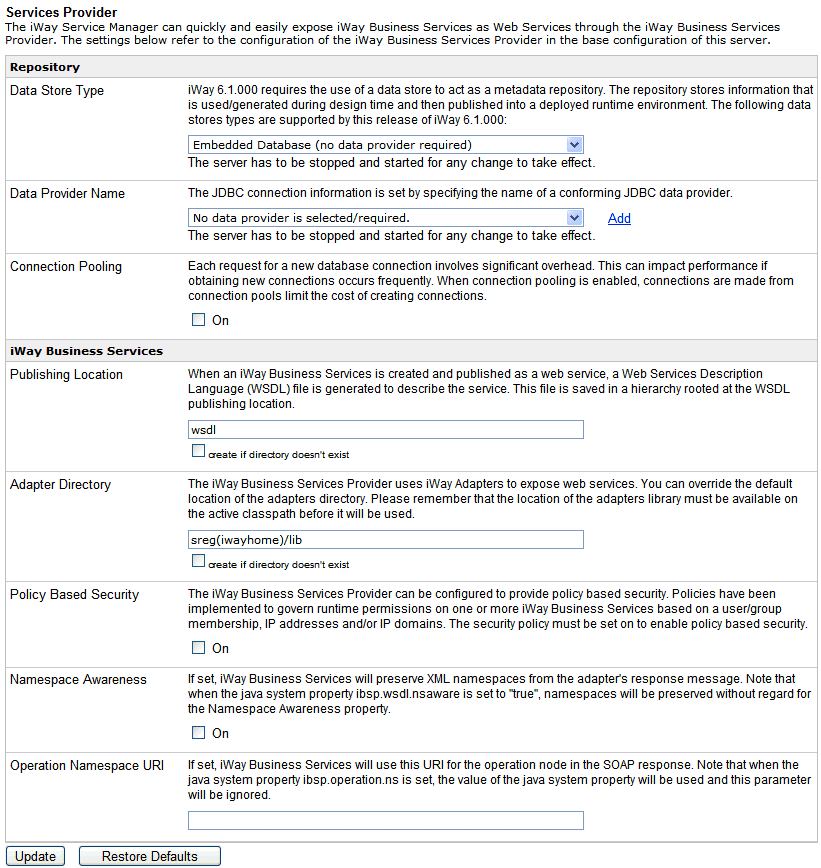
Procedure: How to Configure Services Provider Settings
The
Services Provider pane enables you to define properties required
to support iWay business services as web services.
To configure
for a web service:
-
In the
left console pane of the Server menu, select Services
Provider.
The Services Provider pane opens, as shown in the following
image.
-
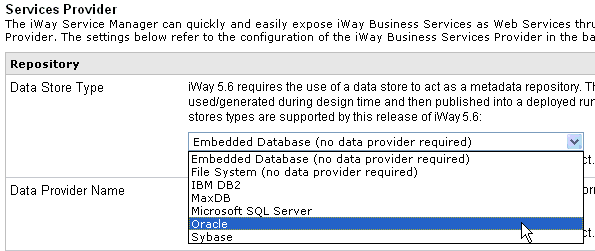
From
the Data Store Type drop-down list, select a repository you want to
configure.
The following are available:
- Embedded Database
(no data provider required)
- File System
(no data provider required)
- IBM DB2
- MaxDB
- Microsoft SQL
Server
- Oracle
- Sybase
You
must configure the tables before using the repository. For more
information on configuring repository tables, see the iWay
Installation and Configuration Guide.
Note: iWay
Service Manager is installed with an embedded HSQL repository, which
is the default data store for information that is generated during design
time and then published into a deployed runtime environment.
For
more information on the properties on this window, see the table
in Services Provider Settings.
-
From
the Data Provider Name drop-down list, select an available data provider.
For more information on how to add a data provider, see How to Add a Data Provider.
-
Type
new values or modify existing values.
-
Click Update.
x
Reference: Services Provider Settings
The
following table lists and describes the Services Provider settings.
|
Property
|
Type/Value
|
Description
|
|---|
|
Repository
|
|
Data Store Type
|
Choice
|
Acts as a metadata repository.
The default value is Embedded Database. Select a database from the
drop-down list: File System (not supported for production use),
IBM DB2, MaxDB, Microsoft SQL Server, Oracle, and Sybase.
|
|
Data Provider Name
|
String
|
JDBC driver defined in the
Data Provider pane. Select from the drop-down list, or click Add
to define a new JDBC connection.
|
|
Connection Pooling
|
Boolean
|
When selected, turns on connection
pooling for the JDBC driver.
|
|
iWay Business Services
|
|
Publishing Location
|
Directory
|
Directory where the WSDL files
produced by the iWay Business Services Provider (iBSP) are stored.
If the directory does not exist, select the check box to create
the named directory.
|
|
Adapter Library
|
Directory
|
Directory where the iWay adapter
JAR files are located. If the directory does not exist, select
the check box to create the named directory.
|
|
Policy Based Security
|
Boolean
|
When selected, enforces iBSP
security policy. For more information, see the iWay Business
Services Provider User's Guide.
|
|
Namespace Awareness
|
Boolean
|
If set, iWay Business Services
preserve XML namespaces from the adapter's response message in the SOAP
response message.
Note: When the Java system property ibsp.wsdl.nsaware is
set to true, namespaces are preserved without regard for the
Namespace Awareness property.
|
|
Operation Namespace URI
|
String
|
If set, iWay Business Services use this
specified URI for the operation node in the SOAP response message.
Note: When
the Java system property ibsp.operation.ns is set,
the value of this Java system property is used and the Operation Namespace
URI property is ignored.
|
Additional Notes on the Operation Namespace URI Property
In
this example, an iWSE SOAP response from a web service method named PFIVP_1 would
have the following format:
<SOAP-ENV:Envelope xmlns:SOAP-
ENV="http://schemas.xmlsoap.org/soap/envelope/">
     <SOAP-ENV:Body>
        <PFIVP_1Response cid="9952CD68D2AFAC3FCD1ED00A645237D4"
         xmlns="urn:iwaysoftware:ibse:jul2003:PFIVP_1:response">
              <d>
                  <d1/>
                  <d2/>
              </d>
        </PFIVP_1Response>
     </SOAP-ENV:Body>
</SOAP-ENV:Envelope>
Note that the child of
the SOAP Body element is named PFIVP_1Response and
it declares a default namespace of urn:iwaysoftware:ibse:jul2003:PFIVP_1:response. This
element is the parent of the actual output from the adapter. The
element name and the namespace URI are constructed using the name
of the service method. In a use case scenario, you may not want
the response from an iWSE service to reference iWay Software, as
the default namespace URI does. You can use the Operation Namespace
URI parameter to override the default behavior by supplying your
own namespace URI.
x
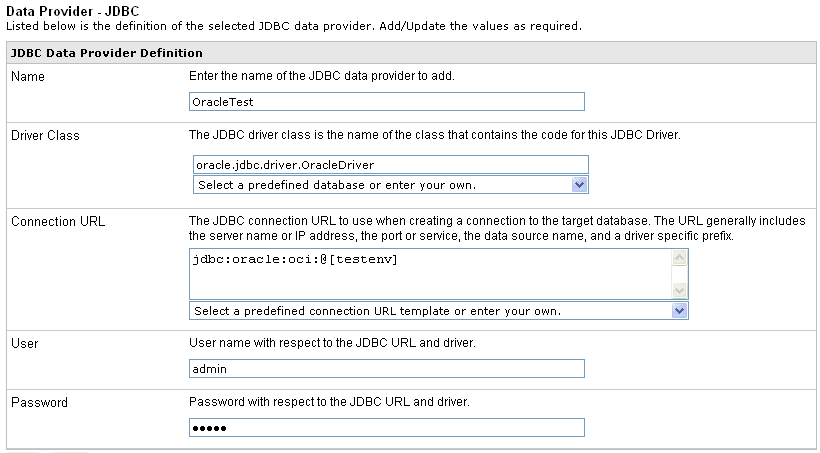
Procedure: How to Add a Data Provider
To
add a data provider:
-
Click Add in
the Data Provider Name section.
The Data Provider - JDBC pane opens.
-
Enter
a name for the JDBC data provider.
-
From
the Driver Class drop-down list, select the JDBC class for the data provider.
You can also manually enter the name.
-
From
the Connection URL drop-down list, select the connection URL to use
when creating a connection to the target database.
You can also manually enter the URL.
-
Enter
the user ID to access the repository database.
-
Enter
the password to access the repository database.
-
Click Test.
You should receive a response that says:
The JDBC data provider test completed successfully.
If
you receive an error, troubleshoot accordingly. Ensure the driver
is in the iWay7\lib directory. For more information, see the iWay
Installation and Configuration Guide.
-
Click Update if
the test is successful.
You connection appears on the Data Provider pane. If you
need to change its parameters, you can click the name of the connection.
If
you need to define both the target and source repositories, repeat
this procedure to define another repository.
x
You can migrate repositories using the iWay Service
Manager Administration Console. These repositories can be for iWay
Service Manager, the older iWay Adapter Manager, Servlet iBSP, or
iWay Connector for JCA. The structure of the repository has not
changed.
Some of the things you can migrate include:
- Migrate the
data in the default iWay SM HSQL database to another database repository.
- Migrate an
older iWay Adapter Manager repository into the default iWay SM HSQL database.
- Migrate a Servlet
iBSP or iWay Connector for JCA database repository.
Note: Monitoring tables are not migrated.
In this section:
-
Source repository
refers to the older existing repository you wish to migrate.
-
Target repository
refers to the new repository you wish to use.
x
The following steps are required to migrate a repository:
- Ensure you
have created the new repository tables. For more information, see the iWay
Installation and Configuration Guide.
- Ensure the
JDBC driver for your target and source repositories are in the iWay7\lib directory.
For more information, see the iWay Installation and Configuration Guide.
- Define the
source and target repositories as Data Providers using the iWay
Service Manager Administration Console as explained in How to Add a Data Provider.
- Start the migration
as explained in How to Migrate a Repository.
x
Procedure: How to Migrate a Repository
To
migrate a repository:
-
Click Services
Provider in the left pane.
The currently selected Data Store Type and Data Provider
Name determine the source repository.
-
Set
the source repository by selecting the Data Store Type and Data
Provider Name, and clicking Update.
The Data Provider Name is the name you used when you defined
the source repository.
-
Set
the target repository by selecting a repository you want to migrate, for
example, Oracle, from the Data Store Type drop-down list.

-
From
the Data Provider Name drop-down list, select the name of the data
provider (for example, OracleTest).
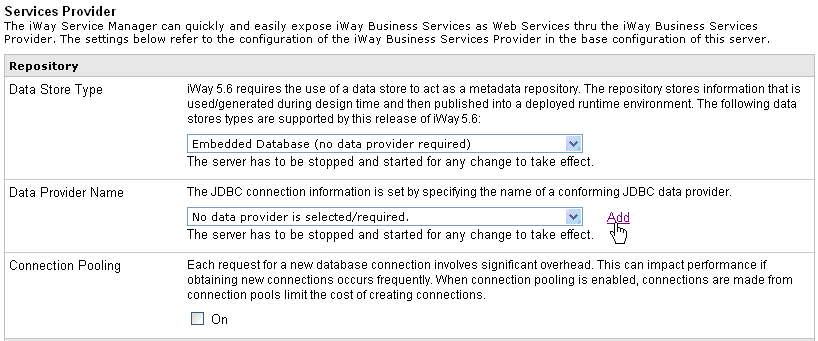
The Repository section in the Services Provider pane refreshes,
as shown in the following image.
Notice
the Migrate link next to the Data Store Type
drop-down list.
-
Click Migrate.
The Services Provider - Data Store Migration pane opens.
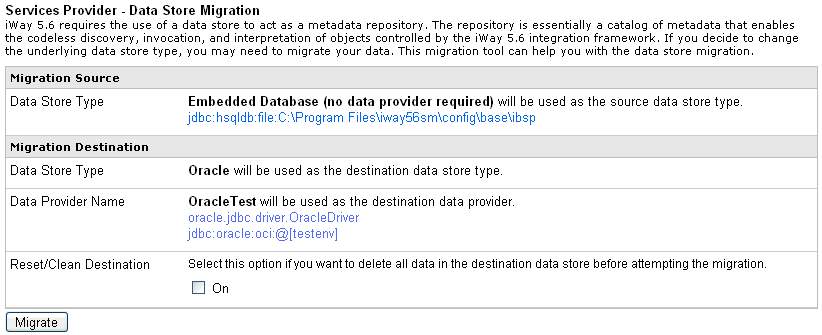
The
table that is provided is divided into two sections:
- Migration Source
- Displays the current repository that is being used.
- Migration Destination
- Displays the destination repository to which you are migrating.
-
Review
and verify all the information to make sure it is correct.
Note: To perform a clean migration, you can select
the On check box in the Reset/Clean Destination
area to delete all data that is currently in the destination repository
before proceeding.
-
Click Migrate.
Information about the migration process appears. Ensure
there are no critical errors.
After the migration completes,
iWay Business Services Provider is still set to use the source repository.
You must set it to use the destination repository instead.
-
Click Services
Provider on the left.
-
Select
the type of repository you wish to use from the Data Store Type drop-down
list.
-
Select
the connection you just defined from the Data Provider Name drop-down
list.
-
Restart
iWay Service Manager for your changes to take effect.
x
Directory providers offer access to hierarchical maps
of information. A directory might be a point in a file system or
a registry of information, such as Microsoft's Active Directory.
The directory providers offer access to information in a directory
for some purpose. For example, an LDAP provider offers generalized
access to a directory that responds to the LDAP protocol, while
other providers offer directory access for more specific purposes.
For clarity, purpose-specific directory providers appear on the
iWay Service Manager Administration Console under their purpose.
In Java and iWay Service Manager, LDAP and Microsoft Active Directory
are defined and handled in exactly the same method, through the
use of the Directory Provider. Any differences are handled automatically
within Provider definitions.
x
A directory is a set of information with similar attributes
organized in a logical and hierarchical manner. The protocol accesses
LDAP directories, regardless of the form of the directory itself.
LDAP sees the directory in a standard manner.
- A directory
is a tree of directory entries.
- An entry
consists of a set of attributes.
- An attribute
has a name (an attribute type or attribute description) and one
or more values. The attributes are defined in a schema.
- Each entry
has a unique identifier, its Distinguished Name (DN). This consists
of its Relative Distinguished Name (RDN) constructed from some attribute(s)
in the entry, followed by the DN of the parent entry. Think of the
DN as a full filename and the RDN as a relative filename in a folder.
A DN may change over the lifetime of the entry, for instance,
when entries are moved within a tree. To reliably and unambiguously
identify entries, a unique key (called a UUID) may be provided in
the set of the entry's operational attributes.
iWay provides a simple access function to supply the value of
a single LDAP attribute for use as a configuration parameter. The
following function accesses the information in the directory:
_LDAP( filter, attribute, context [,providername])
For example: _LDAP("cn=John Doe",mail,'dc=example') might return
the mailing address for John.
LDAP providers may also be used to hold certificates for security operations.
x
LDAP Directory Provider as a Certificate Store Provider
An LDAP system can also be used to hold certificates
for security operations. A configured directory provider pointing
to an LDAP system can be used in the configuration of the components
that support a certificate store, such as AS2. A certificate store,
also called a certstore, is a database of public key certificates
and certificate revocation lists. An LDAP server used as a CertStore
must support anonymous access.
The structure within the LDAP must follow the RFC2587 specifications
to store the certificate information. The directory provider configuration
screen provides a test facility. This simply verifies that the specified
LDAP URL can be used to access the directory. It does not validate
security or other attributes of the directory.
x
Procedure: How to Define a Directory Provider
To
define a directory provider:
-
In the left console pane of the Server menu, select Directory
Provider.
The Directory Provider pane opens.
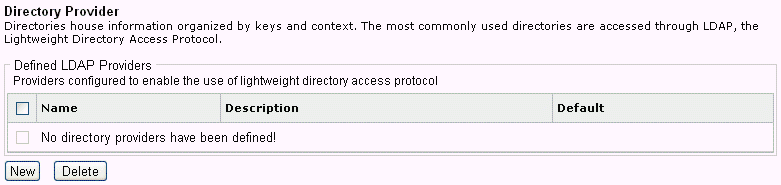
-
Click New in the Defined LDAP Providers section.
The Directory Providers: LDAP pane opens.
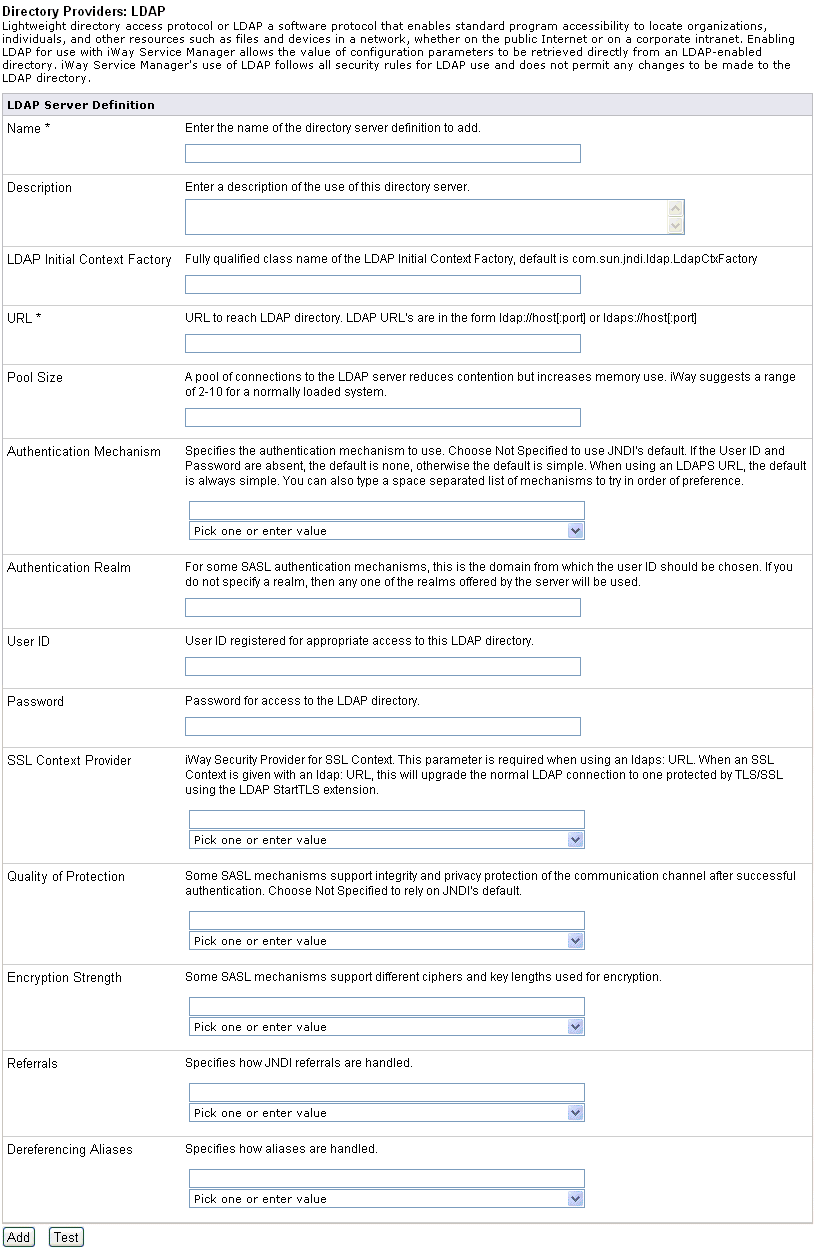
-
Provide
the appropriate values for your LDAP connection parameters as listed
and defined in the following table.
|
Parameter
|
Description
|
|---|
|
Name *
|
Enter the name of the directory server definition
to add.
|
|
Description
|
Enter a description of the use of this directory server.
|
|
LDAP Initial Context Factory
|
Fully qualified class name of the LDAP Initial
Context Factory, default is com.sun.jndi.ldap.LdapCtxFactory.
|
|
URL *
|
URL to reach LDAP directory. LDAP URLs are
in the form: ldap://host[:port]
or ldaps://host[:port]
|
|
Pool Size
|
A pool of connections to the LDAP server
reduces contention but increases memory use. iWay suggests a range
of 2-10 for a normally loaded system.
|
|
Authentication Mechanism
|
Specifies the authentication mechanism to
use. Select Not Specified to use the JNDI default. If the User
ID and Password are absent, the default is none, otherwise
the default is simple. When using an LDAPS URL, the default
is always simple. You can also type a space separated list of
mechanisms to try in order of preference.
|
|
Authentication Realm
|
For some SASL authentication mechanisms,
this is the domain from which the user ID should be chosen. If you do
not specify a realm, then any one of the realms offered by the server
will be used.
|
|
User ID
|
User ID registered for appropriate access
to this LDAP directory.
|
|
Password
|
Password for access to the LDAP directory.
|
|
SSL Context Provider
|
iWay Security Provider for SSL Context.
This parameter is required when using an ldaps: URL. When an SSL
Context is given with an ldap: URL, this will upgrade the normal
LDAP connection to one protected by TLS/SSL using the LDAP StartTLS
extension.
|
|
Quality of Protection
|
Some SASL mechanisms support integrity and
privacy protection of the communication channel after successful authentication.
Choose Not Specified to rely on the JNDI default.
|
|
Encryption Strength
|
Some SASL mechanisms support different ciphers and
key lengths used for encryption.
|
|
Referrals
|
Specifies how JNDI referrals
are handled.
|
|
Dereferencing Aliases
|
Specifies how aliases are handled.
|
|
JCE Provider for CertStore
|
JCE Provider used to create the CertStore
when the LDAP provider is used as a CertStore provider
|
-
Click Test to
test the connection to the LDAP provider.
-
Click Add when you are finished.
You are returned to the main Directory Provider pane and
the new LDAP directory provider that was defined is added to the
list.
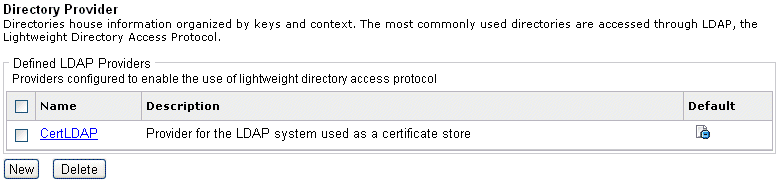
Note: The
LDAP provider is set as the default provider, if it is the first
one that is created. When the default provider is removed, the first
remaining provider is automatically set as the default.
-
To define multiple directory providers, repeat this procedure.
A defined directory provider can be used as a named provider
during the configuration of supporting components, such as AS2.
x
A cryptographic system requires a mechanism for the
storage and use of cryptographic information. For more information
on iSM security and security providers, see the iWay Service
Manager Security Guide.
A keystore is a collection of keys and certificates. There are
two types of keystore entries:
-
Key Entry. This
type of keystore entry stores sensitive cryptographic key information
in a protected format. Typically this is a secret key or a private
key with a certificate chain.
-
Trusted Certificate Entry. This
type of keystore entry contains a single public key certificate
belonging to another entity. It is called trusted because the keystore
owner trusts that the certificates belongs to the subject (owner)
of the certificate.
Entries in a keystore are referred to by their "alias", which
is a simple unique string.
A truststore is a keystore used to hold the certificate of trusted
Certificate Authorities.
A system may need to use a variety of keystores for different
purposes. iWay Service Manager identifies named keystore providers,
each of which represents one keystore and the appropriate access
credentials and algorithms needed to access the information belonging
to that keystore. The keystore provider is identified by name to
other components of the system that require access to the security
information, such as AS2 or HTTP inlets.
x
A keystore is a database of key material. Key
material is used for a variety of purposes, including authentication
and data integrity. There are various types of keystores available,
including "PKCS12" and Sun's "JKS." Some keystores can contain both
encryption keys and security certificates. Formally, however, a
keystore holds the private key for one or more PKI key pairs.
A truststore is a database of key material. It holds the
public certificates of trusted partners for message exchange. Although
it is possible to share a single file with the keystore, more formally
a truststore and a keystore are separate entities.
A certificate store, also called a certstore,
is a database of public key certificates and Certificate Revocation
Lists. The CRL is required to stop the use of a certificate when
it would otherwise be considered valid. A CRL is not needed to tell
you a certificate is bad once its expiration date is reached. In
fact, CRLs are usually cleaned of expired CRLs after one complete
CRL revision period has elapsed. This means the expired CRL will
continue to appear in at most one CRL after it expired.
If certificate revocation is turned on, you will need one CRL
for each CA in the certificate chain you want to verify. If a CRL
is missing, there is no way to know whether certificates issued
by that Certificate Authority are still valid. Therefore, all certificates
issued by this CA will be considered revoked. A CRL that contains
no certificates is acceptable. It belongs to a Certificate Authority
that did not revoke any certificates.
x
Directory CertStore Providers
CertStore providers define the directories from which
certificates and CRLs can be loaded. A configured Directory Certstore
provider can be used as a named provider in the components that
support CRL checking for messages.
x
The following section describes LDAP certstore providers.
x
Adding Debug Information for Certstore
If you encounter issues running the LDAP Certstore provider,
you may wish to enable additional debugging. You can add the system
property -Djava.security.debug=certpath to trace
what the Sun CertStores and CertPathBuilder are doing. This will
show you more information regarding the way certificates are being
loaded and used.
x
The Sun PKIX CertPathBuilder takes the RFC2587 literally
and demands that certificates in the reverse field of the crossCertificatePair
be a CA. In particular, it demands that a BasicConstraints extension
be present with maxPathLen greater or equal to 0. The End Entity
certificates are stored in the crossCertificatePair. The Basic Constraints for
an End Entity specifies that this certificate is not a CA and therefore
the maxPathLen is -1. This breaks the Sun PKIX CertPathBuilder.
As the result, if you send incomplete certificate chains to our
AS2 listener, make sure you also set the PKIX JCE Provider to BC to
make it work properly.
x
Procedure: How to Define a CertStore Directory Provider
To
define a CertStore directory provider:
-
In the left
console pane of the Server menu, select Security Provider.
The Security Provider pane opens.
-
Click New in
the Directory CertStore section.
The Directory CertStore Definition pane opens.
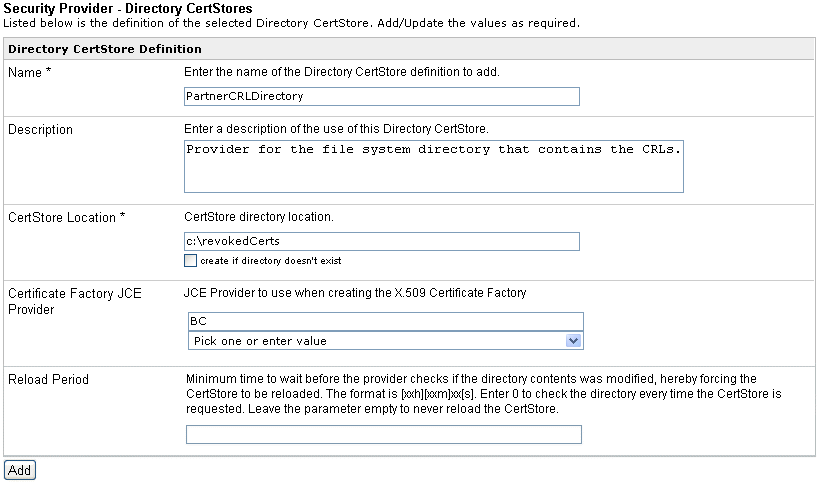
-
Provide
the appropriate values for your Directory CertStore provider parameters
as listed and defined in the following table.
|
Parameter
|
Description
|
|---|
|
Name *
|
Enter the name of the Directory CertStore
definition to add.
|
|
Description
|
Enter a description of the use of this Directory CertStore.
|
|
CertStore Location *
|
CertStore directory location.
|
|
Certificate Factory JCE Provider
|
JCE Provider to use when creating the X.509 Certificate
Factory.
|
|
Reload Period
|
Minimum time to wait before the provider
checks if the directory contents was modified, hereby forcing the CertStore
to be reloaded. The format is [xxh][xxm]xx[s]. Enter 0 to check
the directory every time the CertStore is requested. Leave the parameter
empty to never reload the CertStore.
|
-
Click Add when
you are finished.
You are returned to the main Security Provider pane and
the new Directory CertStore provider that was defined is added to
the list.
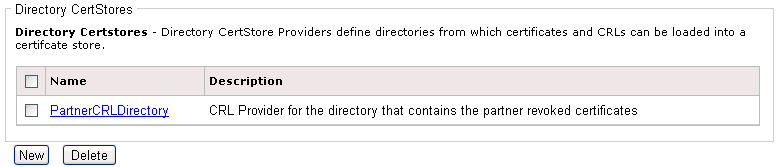
-
To define
multiple Directory CertStore providers, repeat this procedure.
This allows you to configure multiple CertStore directory
providers where each can have a different configuration.
A
defined CertStore directory provider can be used as a named provider
when configuring components, such as AS2 that support certificate validation.
x
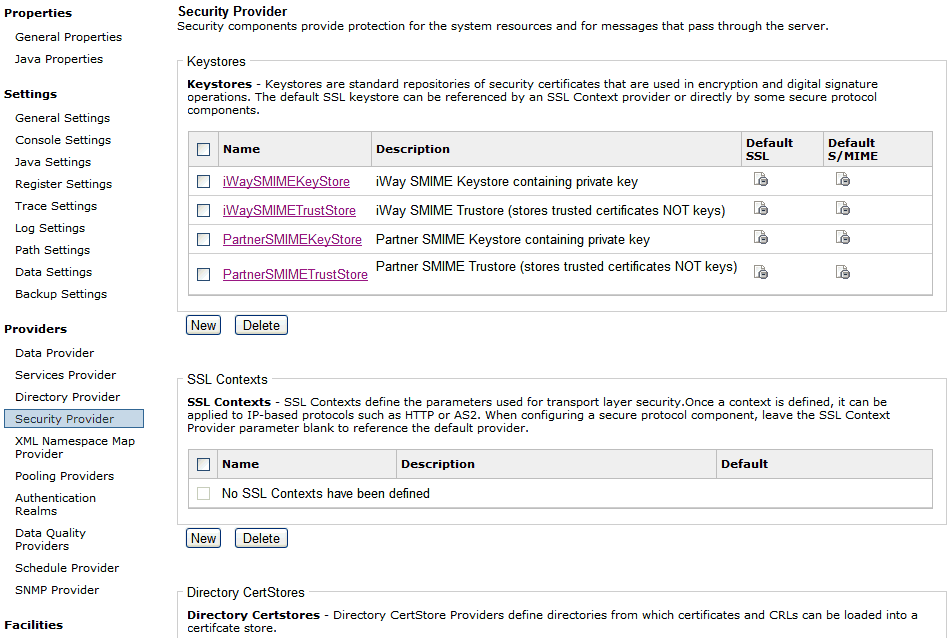
Keystores are standard repositories of security certificates
that are used in encryption and operations involving digital signatures.
iWay Security Provider configuration supports the creation of multiple
keystores that can be used as named providers in the corresponding
components, such as AS2 and HTTP. This allows the system to contain
multiple types of keystores which may contain different credentials,
algorithms and other configurations.
x
Procedure: How to Define a Keystore Provider
To
define a keystore provider using the iWay Service Manager Administration
Console:
-
In the left console pane of the Server menu, select Security
Provider.
The Security Provider pane opens.
-
Click New in the Keystores section.
The
Keystore Definition pane opens.
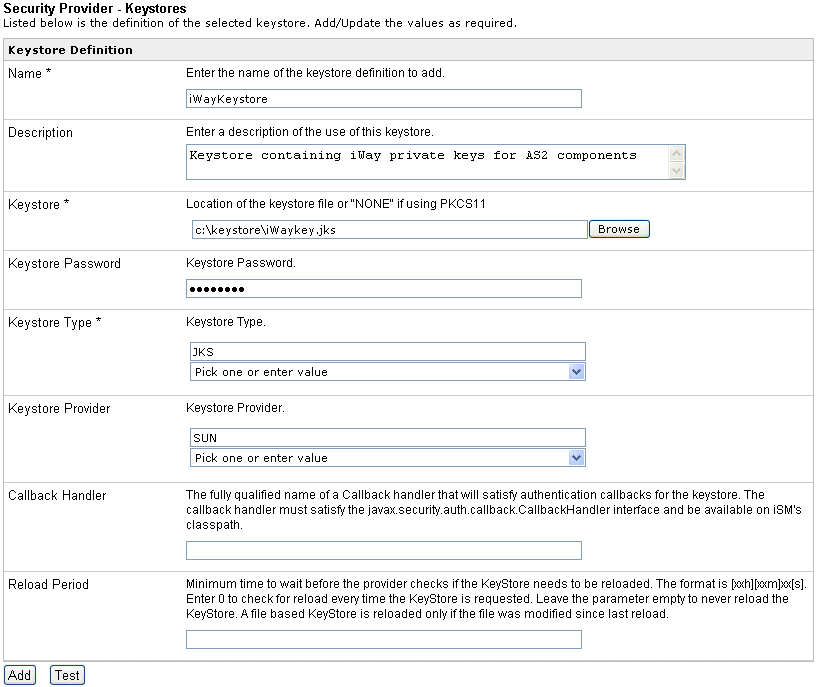
-
Enter the parameters for the keystore and make sure to select
the appropriate values from the Keystore Type and the Keystore Provider
drop-down lists that will correspond to your keystore configuration.
-
In the Callback Handler field, optionally enter the fully qualified
name of a callback handler that will satisfy authentication callbacks
for the keystore.
The callback handler must satisfy the javax.security.auth.callback.CallbackHandler interface
and be available in the classpath for iWay Service Manager.
It
is recommended that developers make use of the Test button to verify
that the property values are tested against the Keystore before
completing the definition. When there are no failures encountered
during testing, then continue from this point.
-
Click Add.
You are returned to the main Security Provider pane and
the new keystore that was defined is added to the list.
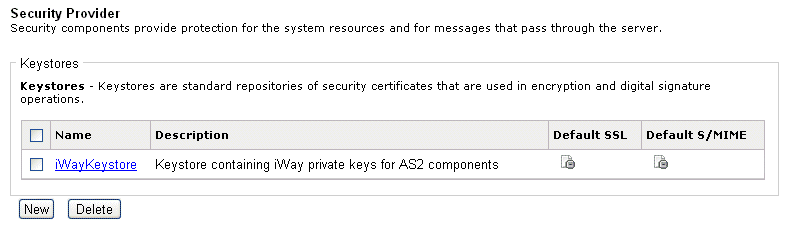
Note: The
keystore provider is set as the default SSL provider and default S/MIME
provider if it is the first one that is created. When an SSL or
S/MIME default provider is removed, the first remaining keystore
provider is automatically set as the default.
-
To define multiple keystore providers, repeat this procedure.
A defined keystore provider can be used as a named provider
when configuring other iWay components (for example, listeners,
services, emitters, and so on).
x
Transport Layer Security (TLS) and its predecessor,
Secure Sockets Layer (SSL), are cryptographic protocols that provide
security and data integrity for communications over TCP/IP networks,
such as the Internet. These protocols allows client/server applications
to communicate across a network in a manner designed to prevent
eavesdropping, tampering, and message forgery. TLS and SSL encrypt
the segments of network connections at the Transport Layer end-to-end.
In cases in which iSM requires SSL or TLS support, the appropriate
component requests the name of an SSL Context Provider.
In the typical usage, authentication is unilateral; only the
server is authenticated to the end point. That means that the client
is aware and sure of the identity of the server but not vice versa.
These protocols also support bilateral authentication, in which
both the client and the server exchange certificates and are aware
of the others identity. This is common in business interactions.
Identification is accomplished by the exchange of signed certifications
containing the URL, name and address of the end point that sends
the certificate. The certificates are in turn signed by a trusted
Certificate Authority.
Once defined, an SSL Context Provider can be associated with
one or more components (server, such as nHTTP or client, such as
an nHTTP emit agent) using SSL or TLS. This is done be naming the
provider in the component's configuration. The SSL Context Provider,
in turn, relies on keystore and trust store providers that have
been previously configured. The provider manages the connections
and handshakes between end points, and attempts to optimize connection
reuse where possible and consistent with communications security.
If you are configuring an SSL Context Provider to be used for
server side, you will need a Keystore Provider as the source of
your public certificate which will be recognized by the client.
If you configure your SSL Context Provider to require client authentication,
you will need a Truststore Provider as the source of the trusted
client certificates.
If you are configuring an SSL Context Provider to be used on
the client side, you will need a Keystore Provider as the source
of your public certificate, and a TrustStore Provider, as the source
of the certificates for the servers to be trusted.
An SSL Context Provider requires that both be configured, even
though both may not be required. We cannot tell for what the Provider
will be utilized. However if your application does not require
a value in either Keystore, or Truststore, the contents are not
used. The format of Keystore and Truststore must be correct.
TLS protocol version 2 is supported. Basic SSL is no longer considered
to be sufficiently secure, and many of its shortcomings have been
addressed with TLS. The SSL level setting represents the minimum
acceptable security algorithm. iWay Software strongly recommends
that TLS be considered as the minimum acceptable level. For secure transactions,
specification of TLS version 2 is recommended, provided that both
sides of the transaction have this algorithm available. iSM will
negotiate for the highest level available when connections are established.
Note: You must have Java version 1.7 configured on your
system to use TLS protocol version 2.
x
Procedure: How to Define an SSL Context Provider
To
define an SSL context provider using the iWay Service Manager Administration
Console:
-
In the left console pane of the Server menu, select Security
Provider.
The Security Provider pane opens.
-
Click New in the SSL Contexts section.
The SSL Context Provider pane opens.
-
Enter the appropriate values for the SSL context provider parameters.
For more information, see Parameters for SSL Context Providers.
-
Click Add when you are finished.
You are returned to the main Security Provider pane and
the new SSL context provider that was defined is added to the list.
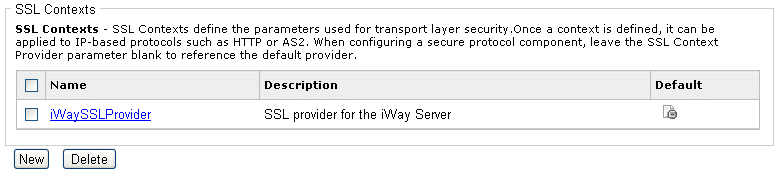
Note: The
SSL context provider is set as the default provider, if it is the first
one that is created. When the default provider is removed, the first
remaining provider is automatically set as the default.
-
To define multiple SSL context providers, repeat this procedure.
A defined SSL context provider can be used as a named provider
when configuring IP-based components, such as AS2 and HTTP.
Note: To
activate any new security providers that have been configured, you
must restart iWay Service Manager.
x
Reference: Parameters for SSL Context Providers
The
following table lists and describes all of the available parameters
for SSL context providers.
|
Property
|
Description
|
|---|
|
Name
|
The name of the SSL Context definition to
add.
|
|
Description
|
A brief description of the use of this SSL
Context.
|
|
Keystore Provider
|
Configured Security Provider for the keystore
you wish to use for this SSL context. Choose default to
use the default SSL Keystore Provider. Keystores hold private keys.
|
|
Truststore Provider
|
Configured Security Provider for the truststore
you wish to use for this SSL context. Choose default to
use the default SSL Keystore Provider. Truststores hold the certificate
of Trusted CAs used to verify peer certificates.
|
|
Security Protocol
|
Specify the version of security protocol
that should be used. During SSL handshake, a negotiation selects
the protocol to be used from the best mutually supported. This field
sets the minimum acceptable security protocol. If the handshake
cannot select a mutually supported protocol, the connection fails.
The options are: SSL, SSLv2, SSLv3, TLS, TLSv1, and TLSv2.
Note: You
must have Java version 1.7 configured on your system to use TLS
protocol version 2.
|
|
JCE SSL Context Provider
|
JCE Provider for the SSL Context.
|
|
Server Key Alias
|
Alias for the key to be used to identify
secure servers using this SSL context. If not supplied, the key
will be selected using JSSE default behavior.
|
|
Client Key Alias
|
Alias for the key to be used to identify
secure clients using this SSL context. If not supplied, the key
will be selected using JSSE default behavior.
|
|
Session Cache Size
|
The maximum number of SSL sessions that
will be retained in the session cache. Sessions in the cache can
be reconnected with less overhead than those not cached.
|
|
Session Timeout
|
Maximum length of time (in seconds) that
an SSL session can remain in the cache.
|
|
Enable Certificate Revocation
|
Enable CRL checking of certificates during handshake.
|
|
OCSP Responder
|
Name of the OCSP Responder provider. This
verifies the status of certificates online instead of relying on
Certificate Revocation Lists (CRLs).
|
|
JCE PKIX Trust Manager Provider
|
JCE provider to construct PKIX Trust Manager.
Choose 'Not Specified' for default.
|
|
JCE Signature Provider
|
JCE provider used to verify digital certificate
signatures during handshake.
|
|
PKIX Certificate Store
|
Certificate store from which certificate
revocation lists are loaded.
|
|
Enabled Cipher Suites
|
If supplied, only cipher suites on this
list will be enabled for SSL sockets or SSL engines created using
this provider. The user must take care that enabled cipher suites
are supported by other components specified. Enter as comma-delimited
list or use FILE() function. If left blank, all available cipher
suites will be enabled and be available during SSL negotiation.
|
|
Hostname Verification
|
If true, client SSL connections using this
provider will attempt to verify that the server certificate matches
its host name.
|
|
Client Authentication
|
If true, servers using this provider will
use SSL client authentication, that is, the server must receive
and authenticate a certificate from the client as part of the SSL handshake.
|
x
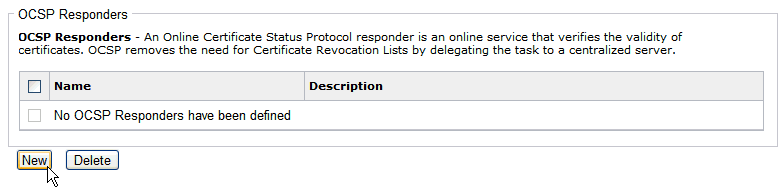
The Online Certificate Status Protocol (OCSP) is an
Internet protocol used to obtain the revocation status of an X.509
digital certificate. It is formalized in RFC 2560.
OCSP was created as an alternative to Certificate Revocation
Lists (CRLs), specifically addressing certain problems associated
with using CRLs in a Public Key Infrastructure (PKI).The request
and response nature of these messages lead to OCSP servers being termed
OCSP responders. iSM can communicate with an OCSP responder to obtain
the revocation status of a certificate, avoiding the need to manage
certificates locally in many cases.
To create an OCSP Responder Provider, navigate to the OCSP Responders
section in the Security Provider pane and click New, as shown in
the following image.
The following table lists the OCSP Responder Provider properties.
|
Property
|
Description
|
|---|
|
Name *
|
The name of the OCSP Responder definition
to add.
|
|
Description
|
A brief description of the use of this OCSP
Responder.
|
|
Responder URL *
|
Location of the OCSP responder. For example:
http://ocsp.example.net:80 |
|
Certificate Subject Name
|
Subject name of the certificate for the
OCSP responder. For example, CN=OCSP Responder and O=XYZ Corp.
|
|
Certificate Issuer Name
|
Issuer name of the certificate for the OCSP
responder. For example, CN=Enterprise CA and O=XYZ Corp. This property
is required if a value for the Certificate Subject Name parameter
is not specified.
|
|
Certificate Serial Number
|
Serial number of the OCSP responder's certificate.
For example 1234567890123456789. This property is required if a value
for the Certificate Subject Name parameter is not specified.
|
|
Certificate Store *
|
Certificate store where the responder certificate
can be retrieved.
|
|
HTTP Client Provider *
|
HTTP client provider that manages outgoing
connections to the responder.
|
x
XML Digital Signature JCE Providers
The XML digital signature agents use the services of
the XML digital signature JCE provider. This provider is a standard
part of JDK 1.7 and requires no special installation instructions
when running with JDK 1.7.
If you are using JDK 1.5, you must add the javax.xml.crypto.jar
file to your class path. iWay Software produced this file by compiling
(with JDK 1.5) the subset of JDK 1.6 sources that deal with XML
digital signatures. You must also declare the provider in jre/lib/security/java.security
using a line with the following form:
security.provider.N=org.jcp.xml.dsig.internal.dom.XMLDSigRI
where:
- N
Is the highest provider number already present plus one.
x
XML Namespace Map Providers
The XML namespace map provider is used to map XML namespace prefixes
to the XML namespace URIs. It is also possible to declare multiple
XML namespace map providers. Each provider can have any number of
namespace declarations. The agents that need to know namespace prefixes
have a parameter where you can enter a provider name to declare
the namespaces. This can be used to allow namespace prefixes in
XPATH expressions like /soapenv:Envelope/soapenv:Header/wsse:Security,
or it can be used in reverse to choose which prefix to use when
generating new XML content.
The following table lists a sample set of XML namespaces that
can be declared with typical prefixes:
|
Namespace Prefix
|
Namespace URI
|
|---|
ds |
http://www.w3.org/2000/09/xmldsig# |
ec |
http://www.w3.org/2001/10/xml-exc-c14n# |
saml |
urn:oasis:names:tc:SAML:1.0:assertion |
soapenv |
http://schemas.xmlsoap.org/soap/envelope/ |
wsa |
http://schemas.xmlsoap.org/ws/2004/08/addressing |
wsse |
http://docs.oasis-open.org/wss/2004/01/oasis-20040
1-wss-wssecurity-secext-1.0.xsd |
wsu |
http://docs.oasis-open.org/wss/2004/01/oasis-20040
1-wss-wssecurity-utility-1.0.xsd |
xsd |
http://www.w3.org/2001/XMLSchema |
xsi |
http://www.w3.org/2001/XMLSchema-instance |
You can access the XML Namespace Map Provider window in the iWay
Service Manager Administration Console to construct an XML namespace
map.
In this example, two XML namespace maps have been added and a
third one is in the process of being defined. When you are finished,
click Add Provider to make the XML namespace
map available.
Once the map is complete, the following XPATH function will locate
the y element in a document where the wsa namespace defined in the
map matches the namespace URI for that element in the actual document:
xpath('/x/wsa:y', samplemap)Note: It is not required for the namespace prefix in the
map to match the actual namespace prefix used in the target document.
x
Pooling providers allow HTTP connections to be shared
among iWay Service Manager (iSM) components. An instance of the
Pooling provider represents a pool of connections. Connections in
this pool can share proxy settings, local interface bindings, and,
for HTTPS, a single SSL socket factory. Currently, the provider
is used by the nHTTP and nAS2 emitters, as well as by the nAS2 MDN
subsystem for sending asynchronous MDN messages through HTTP.
x
Procedure: How to Define Pooling Providers
To
define a Pooling provider:
-
In the left console pane of the Server menu, select Pooling
Providers.
The Pooling Providers pane opens, as shown in the following
image.
-
Click New in the Defined HttpClient
Providers section.
The HttpClient Provider pane opens, which contains settings
for the Pooling provider, as shown in the following image.
-
Enter the appropriate values for the Pooling provider parameters.
-
Click Add when you are finished.
You are returned to the main Pooling Providers pane and
the new provider that was defined is added to the list.
-
To define multiple Pooling providers, repeat this procedure.
x
Reference: Pooling Provider Parameters
The
following table lists and describes all of the available parameters
for the Pooling provider.
|
Parameter
|
Description
|
|---|
|
Name
|
Name for the Pooling provider.
|
|
Description
|
Brief description of the use of this Pooling
provider.
|
|
Maximum Connections Per Host
|
Defines the maximum number of simultaneous connections
allowed per host. When this threshold is reached, new connections
will not be accepted until current connections are closed and the
total number of connections is below the limit. Leave this field
blank (default) or set a value of zero to have no maximum limit
of connections.
|
|
Maximum Total Number of Connections
|
Defines the maximum number of simultaneous connections
that are allowed overall. When this threshold is reached, new connections
will not be accepted until current connections are closed and the
total number of connections is below the limit. Leave this field
blank (default) or set a value of zero to have no maximum limit
of connections.
|
|
Connection Timeout
|
Maximum length of time (in milliseconds)
that a request will block while waiting for a connection to become
available from the pool. A value of zero (0) means there is no timeout.
|
|
Set TCP No Delay
|
If set to true, Nagle's Algorithm
on the client socket is disabled. This will result in faster line
turnaround at the expense of an increased number of packets.
|
|
Reuse Socket Address
|
Allow sockets to be bound to the local addresses
of sockets that already closed, but are still in a TIME_WAIT state. In
applications that make large numbers of short-lived connections,
this can reduce or eliminate address in use and related errors
when no more ephemeral ports are available to be bound. When using
this option, you should specify the any local address wildcard
(0.0.0.0 in case of IPv4 or :: for IPv6) as the value of the IP
Interface Host parameter below.
For more detailed information
and a discussion on the interactions between the Reuse Socket Address
and IP Interface Host parameters, see the following website
http://stackoverflow.com/questions/14388706/socket-options-so-reuseaddr-and-so-reuseport-how-do-they-differ-do-they-mean-t
Note: The
effects of setting this option can be complex and should be handled
with care.
|
|
Linger-On-Close Timeout
|
This option disables or enables immediate
return from a close() function of a TCP Socket. Enabling this option
with a non-zero integer timeout means that a close() function will block
pending the transmission and acknowledgment of all data written
to the peer, at which point the socket is closed gracefully. Upon
reaching the linger timeout, the socket is closed forcefully, with
a TCP RST. Enabling the option with a timeout of zero does a forceful
close immediately. Note that this may have the effect of leaving
sockets on the server side in a wait state. Enter -1 or leave blank
for the proper default.
Note: The effects of setting
this option can be complex and should be handled with care.
|
|
Redirect Strategy
|
Determines how an HTTP redirect response
is handled. The default is to follow redirects according to the
RFC. The off strategy does not redirect any request.
|
|
Proxy
|
If set to true, emit through a proxy
server.
|
|
Proxy User ID
|
User ID for the proxy challenges.
|
|
Proxy Password
|
Password to access the proxy server.
|
|
Proxy Domain
|
Domain for NTLM proxy authentication.
|
|
Proxy Host
|
Host where the proxy can be accessed.
|
|
Proxy Port
|
Port where the proxy can be accessed.
|
|
Authentication Preference
|
If several schemes are returned in the WWW-Authenticate header,
this parameter defines which schemes take precedence over others.
The value is a comma-separated list of authentication scheme names
with the most preferred scheme listed first. The default is negotiate,NTLM,Digest,Basic
where negotiate means SPNEGO. Kerberos requires the negotiate scheme
and HttpClient version 4.1 or higher.
|
|
Kerberos Login Entry
|
The Application Login Entry in the JAAS
login configuration file that will be used to login to Kerberos.
This login entry should configure a Kerberos login module (Krb5LoginModule).
|
|
SSL Context Provider
|
Named iWay Security provider for SSL Context.
Defaults to the value assigned to the SSL Context Provider.
|
|
IP Interface Host
|
Local IP Interface from which the outgoing
IP socket originates.
|
|
Idle Timeout
|
Time in seconds that an unused
connection can remain in the pool. If set to 0, connections will
remain in the pool indefinitely.
|
|
Cookie Specification
|
The cookie management specification
determines the rules for parsing, validating, and formatting cookies.
By default, best-match is selected from the drop-down list,
which is the recommended policy. HttpClient version 4.1 or higher
is required.
|
|
Persistent Cookie Store
|
If set to true, cookies are preserved
between server reboots. By default, false is selected.
|
x
By default, the Pooling provider handles cookies automatically.
The provider looks for cookies in the responses it receives and
then stores them in a cookie store. When a new request is made,
the provider looks in the cookie store and the cookies that match
are resubmitted to the originating server. Each Pooling provider
manages its own independent cookie stores.
Cookie management is configured with parameters on the Pooling
provider. The Cookie Specification parameter determines the rules
for parsing, validating, and formatting cookies. The specifications
that are available for this parameter are listed and described in the
following table.
|
Cookie Specification
|
Description
|
|---|
|
best-match
|
Selects a cookie policy based on the format
of cookies sent with the HTTP response.
|
|
rfc2109
|
Cookie Version 0.
|
|
rfc2965
|
Cookie Version 0 and Cookie2 Version 1.
|
|
compatibility
|
Closely mimics (mis)behavior of common web
browsers.
|
|
netscape
|
Conforms to the original draft specification
published by Netscape Communications. Should be avoided unless strictly necessary
for legacy code.
|
|
ignoreCookies
|
Cookie management is disabled.
|
The recommended Cookie Specification is best-match because
it can handle cookie versions 0, 1, and 2.
To disable automatic cookie management, select ignoreCookies.
Cookies will continue to appear in the request header namespace,
but they will not be automatically resent to the originating host.
This option might be necessary for legacy iWay applications that
handled cookies manually.
The cookie store is managed in memory. By default, the cookies
are lost when the server halts. To preserve the contents of the
cookie store, set the Persistent Cookie Store parameter to true.
When persistence is enabled, the cookie store is saved to disk every
time it changes. The next time the server reboots, it will reload
the cookies from the file. The persistent cookie store files are
specific to a server configuration and do not interfere with other
configurations.
The provider periodically discards cookies that have expired.
This avoids a memory leak and limits the growth of the file on disk.
Expired cookies are also discarded when reloading a cookie store
after a restart.
The HTTP Nonblocking Emit Service (com.ibi.agents.XDNHttpEmitAgent)
is used to send HTTP requests. The HTTP Client Provider parameter
for this agent determines which provider will send the request.
This indirectly selects the cookie store and therefore the cookies
that will be resubmitted to the destination server.
When two HTTP Nonblocking Emit Services must keep their cookies
independent, they can use two different Pooling providers. To avoid
the proliferation of Pooling providers, it is also possible to name
a specific cookie store using the Cookie Store Name parameter for the
service. The name could be any identifier chosen by the application.
The Pooling provider keeps each named cookie store independent.
Just like the default cookie store, a named cookie store is created
and managed automatically. If the Pooling provider has the Persistent
Cookie Store parameter to true, then all named cookie stores
are also persistent.
The application might need to create many named cookie stores
where each one is needed only for a very short time. This can cause
an apparent memory leak, especially if the cookie expiration times
are far in the future. The application can control the lifetime
of a cookie store by explicitly deleting it with the help of the
XDCookieStoreAgent. Set the Action parameter to Delete Cookie
Store and specify values for the HTTP Client Provider and Cookie
Store Name parameters. This will destroy the cookie store and delete
the persistent file if applicable. Leave the Cookie Store Name parameter
empty to delete the default cookie store. Unlike named cookie stores,
the default cookie store is emptied but never destroyed.
x
iWay Service Manager supports pervasive use of authorization
realms. Authorization Realms are used to associate Users with Roles
and to control user access to resources. Realms are established
by logon activities. For example, an HTTP authentication and authorization
will establish a realm for the handling of the arriving traffic.
The server supports establishment of named realms, each of which
can be associated with a login-type operation by its name. The realm
associates a user name with the associated credentials to authenticate
the user, and to associate that user with named realm tokens.
Available realm types include:
-
Properties Realm, which
authorizes through a standard properties file. This realm is very
simple to manage and is usually associated with demonstration systems
or testing.
The properties file holds <username>=<password>
(in clear) and <username>.role<n>=rolename
For
example, if sheila is a user with password amanda,
and two roles, her file entries could be:
sheila=amanda
sheila.role0=superuser
sheila.role1=admin
-
LDAP Realm, which
authorizes through an LDAP directory. The LDAP is accessed through
a previously defined LDAP Provider.
-
JDBC Realm, which
authorizes through a relational database. The database is accessed
through a context provider, which can be a previously defined Data
Provider.
-
Console Realm, which
authorizes through the identities defined for console user access.
-
JAAS Realm, which
authorizes through a standard Java Authentication and Authorization
Service (JAAS). JAAS is an abstraction layer between the server
and disparate underlying authentication and authorization mechanisms.
Many commercial systems implement the JAAS interface; all documentation
for use and setup are obtained through the various commercial packages
that implement JAAS.
The authorization name and credential, along with the roles associated
with that user under that credential, define a principal which is
the standard name for this identity. The current principal, including
the name and credential (usually a password) and the associated roles
can be examined through the iWay Functional Language (iFL) expressions.
For example, a process flow can take appropriate branches depending
upon whether or not the principal supports a specific role.
x
iWay Data Quality Server (DQS) is an essential tool
for complex data quality management. iWay DQS is designed not only
to evaluate, monitor, and manage data quality in different information
systems, but also to prevent incorrect data from entering these systems
in the first place. iWay DQS is bundled with a specific set of business
rules and localized dictionaries.
iWay Data Quality Server (DQS) is integrated with iWay Service
Manager (iSM) through the Data Quality provider. There are two Data
Quality providers that can be configured:
-
Data Quality Runtime provider
This provider represents
the DQS runtime, which maintains execution threads for DQS plans
invoked by DQS plan services in iSM.
The Data Quality Runtime
provider, introduced in iWay release 7.0, uses one provider for
a DQS implementation, and is the preferred provider. New process
flow services using this provider take advantage of the pooling
capabilities of the provider and offer new services, such as dynamic
plan selection, dynamic row construction, and multiple-row input
and output.
-
Data Quality provider (deprecated)
This provider is
used to reference a DQS plan and to manage a pool of execution threads
if required. This provider is also bound to a single DQS plan and
does not support advanced services, such as n-row results.
All iSM components invoke DQS using a defined Data Quality provider.
In addition, you can configure one or more providers, each representing
a specific DQS plan.
For more information about using iWay DQS, see the iWay
Data Quality Server Getting Started documentation and iWay
Data Quality Server User's Guide.
x
Procedure: How to Define Data Quality Runtime Providers
To
define a Data Quality Runtime providers:
-
In the left console pane of the Server menu, select Data
Quality Providers.
The Data Quality Providers pane opens, as shown in the
following image.
-
In the Data Quality Runtime Providers area, click New.
The Configuration pane opens, which contains parameters
and settings for the Data Quality Runtime provider, as shown in
the following image.
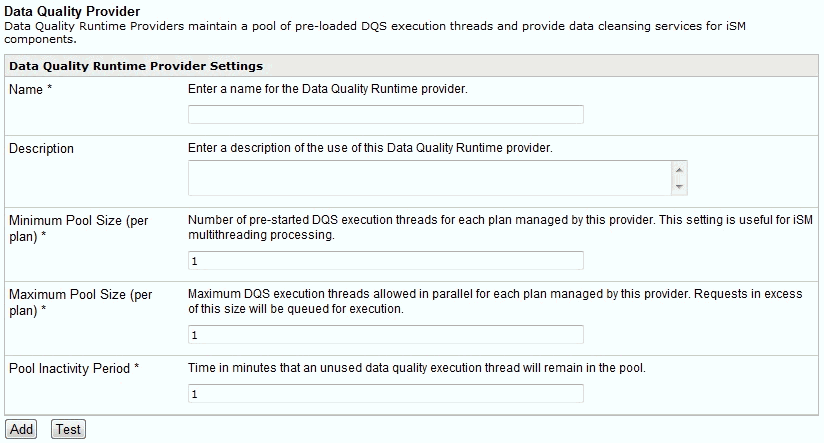
-
Enter the appropriate values for the Data Quality Runtime
provider parameters.
-
Click Add when you are finished.
You are returned to the Data Quality Providers pane, where
the new Data Quality Runtime provider that was defined is added
to the list.
-
To define multiple Data Quality Runtime provider, repeat
this procedure.
x
Reference: Data Quality Runtime Providers Parameters
The
following table lists and describes all of the available parameters
and settings for the Data Quality Runtime provider.
|
Parameter
|
Description
|
|---|
|
Name *
|
Enter a name for the Data Quality Runtime
provider.
|
|
Description
|
Enter a brief description for this Data
Quality Runtime provider.
|
|
Minimum Pool Size (per plan) *
|
Number of pre-started DQS execution threads
for each plan managed by this provider. This setting is useful for
iSM multithreading processing.
|
|
Maximum Pool Size (per plan) *
|
Maximum DQS execution threads allowed in
parallel for each plan managed by this provider. Requests in excess
of this size will be queued for execution.
|
|
Pool Inactivity Period *
|
Time in minutes that an unused data quality
execution thread will remain in the pool.
|
x
Procedure: How to Define Data Quality Providers (Deprecated)
To
define a Data Quality provider (deprecated):
-
In the left console pane of the Server menu, select Data
Quality Providers.
The Data Quality Providers pane opens, as shown in the
following image.
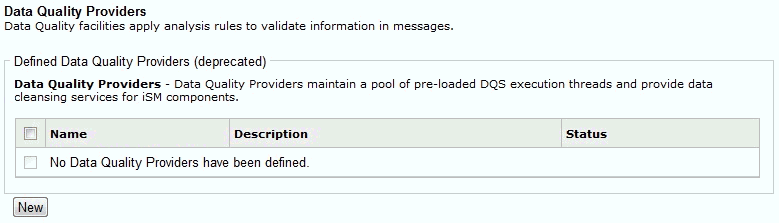
-
In the Data Quality Providers (deprecated) area, click New.
The Configuration pane opens, which contains parameters
and settings for the Data Quality provider (deprecated), as shown
in the following image.
-
Enter the appropriate values for the Data Quality provider
(deprecated) parameters.
-
Click Add when you are finished.
You are returned to the Data Quality Providers pane, where
the new Data Quality provider (deprecated) that was defined is added
to the list.
-
To define multiple Data Quality providers (deprecated),
repeat this procedure.
x
Reference: Data Quality Providers (Deprecated) Parameters
The
following table lists and describes all of the available parameters
and settings for the Data Quality provider (deprecated).
|
Parameter
|
Description
|
|---|
|
Data Quality Provider Settings
|
|
Name *
|
Enter a name for the Data Quality provider (deprecated).
|
|
Description
|
Enter a brief description for this Data
Quality provider (deprecated).
|
|
DQS Plan File *
|
Location of the DQS plan file containing
the logic of the data quality operation.
|
|
Runtime Config File
|
Location of iWay DQS runtime configuration
file (optional). This file is used to define DQS runtime variables,
such as JDBC data sources or folder shortcuts used in the plan.
|
|
Pooling Configuration
|
|
Minimum Pool Size *
|
Number of pre-started DQS execution threads
for this plan. This setting is useful for iSM multithreading processing.
|
|
Maximum Pool Size *
|
Maximum DQS execution threads allowed in
parallel for this plan. Requests in excess of this size will be
queued for execution.
|
|
Pool Inactivity Period *
|
Time in minutes that an unused data quality
execution thread will remain in the pool.
|
x
This section describes how to configure Secure Shell
(SSH) providers with iWay Service Manager (iSM).
x
Procedure: How to Define Secure Shell Providers
To
define a Secure Shell (SSH) provider:
-
In the left console pane of the Server menu, select Secure
Shell Provider.
The Defined SSH Providers pane opens, as shown in the following image.
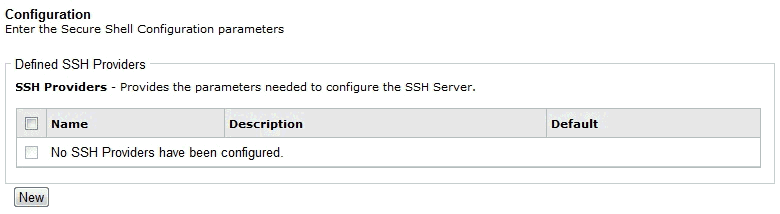
-
Click New.
The Configuration pane opens, which contains parameters
and settings for the Secure Shell provider, as shown in the following
image.
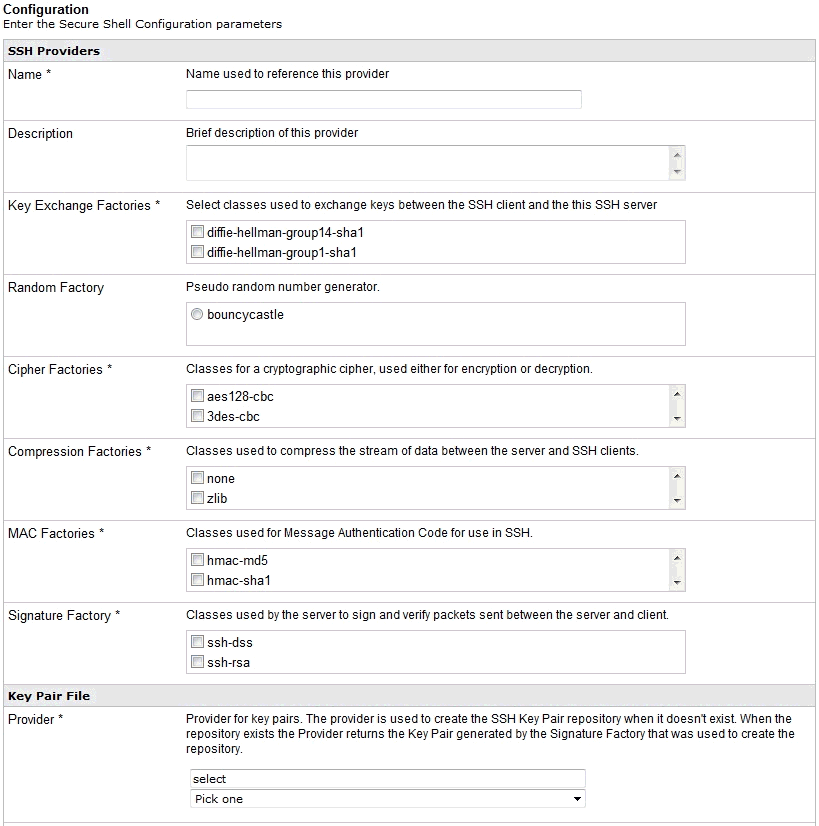
-
Enter the appropriate values for the Secure Shell provider parameters.
-
Click Add when you are finished.
You are returned to the Defined SSH Providers pane, where
the new Secure Shell provider that was defined is added to the list.
-
To define multiple Secure Shell providers, repeat this procedure.
x
Reference: Secure Shell Provider Parameters
The
following table lists and describes all of the available parameters
and settings for the Secure Shell (SSH) provider.
|
Parameter
|
Description
|
|---|
|
SSH Providers
|
|
Name
|
Name used to reference the Secure Shell
(SSH) provider.
|
|
Description
|
Brief description of the Secure Shell (SSH)
provider.
|
|
Key Exchange Factories
|
Select one of the following classes that
will be used to exchange keys between the SSH client and the SSH server:
- diffie-hellman-group14-sha1
- diffie-hellman-group1-sha1
|
|
Random Factory
|
Pseudo random number generator (bouncycastle).
|
|
Cipher Factories
|
Select one of the following classes for
a cryptographic cipher, used either for encryption or decryption:
- aes128-cbc
- 3des-cbc
- blowfish-cbc
- none
|
|
Compression Factories
|
Select one of the following classes that
will be used to compress the stream of data between the server and
SSH clients:
- none
- zlib
- zlib@openssh.com
|
|
MAC Factories
|
Select one of the following classes that
will be used for Message Authentication Code (MAC) for use in SSH:
- hmac-md5
- hmac-sha1
- hmac-md5-96
- hmac-sha1-96
|
|
Signature Factory
|
Select one of the following classes that
will be used by the server to sign and verify packets sent between
the server and client.
|
|
Key Pair File
|
|
Provider
|
Provider for key pairs. The provider is
used to create the SSH Key Pair repository when it doesn't exist.
When the repository exists the Provider returns the Key Pair generated
by the Signature Factory that was used to create the repository.
- com.ibi.sftp.common.keyprovider.XDSecureHostKeyProvider
- org.apache.sshd.server.keyprovider.PEMGeneratorHostKeyProvider
- org.apache.sshd.server.keyprovider.SimpleGeneratorHostKeyProvider
|
|
Key Pair File Signature
|
Select one of the following options that
will be used by the SFTP Server to sign the Key Pair File that is
generated if the Key Pair File does not exist:
|
|
Key Pair File Path
|
Fully qualified path to the Key Pair File.
If the path points to a file that does not exist, then the provider
will create a Key Pair file at this location using the Key Pair
File Signature that was selected.
|
|
Key Pair File Password
|
Password for the SSH Key Pair file.
|
|
Authentication
|
|
Password Authenticator
|
Select one of the following classes that
will be used by the server to authenticate the password of the SSH
client:
- Test Password Authenticator
- File Based Password Authenticator
- JDBC Based Password Authenticator
- No Password Authentication
|
|
Public Key Authenticator
|
Select one of the following classes that
will be used to authenticate the public keys of the SSH client.
- Test Authenticator
- Publickey Authenticator
- No Public Key Authentication
|
|
User Repository
|
|
Repository Type
|
Determines how the user repository is stored.
The repository can be stored either as an XML file or as a JDBC database.
This repository defines the users permitted to exchange messages
with this server along with their mailbox and security characteristics.
|
|
Security File
|
The location of the security file. This
field is required either when the Repository Type parameter is set
to XML.
|
|
JDBC Provider Name
|
The name of the JDBC Data Provider.
|
|
Basic
|
|
Reuse Address
|
If set to true, when
the connection is closed, immediately make the address available,
bypassing defaults of TCP.
|
|
Connections Backlog
|
Number of connections allowed
to queue before a failure. The default is 50 connections.
|
|
SSH Property Label
|
|
SSH property description
|
Specify a property/value pair.
|
x
This section describes how to configure Schedule providers
with iWay Service Manager (iSM). Schedule providers allow administrators
to create a task and schedule it for execution by iSM.
x
Procedure: How to Configure a Schedule Provider
To
configure a Schedule provider:
-
In the left console pane of the Server menu, select Schedule
Provider.
The Schedule pane opens, as shown in the following image.
-
Click New.
The Schedule Configuration pane opens, which contains parameters
and settings for the Schedule provider, as shown in the following
image.
-
Enter the appropriate values for the Schedule provider parameters.
-
Click Add when you are finished.
You are returned to the main Schedule pane, where the new
Schedule provider that was defined is added to the list.
-
To define multiple Schedule providers, repeat this procedure.
x
Reference: Schedule Provider Parameters
The
following table lists and describes all of the available parameters
for the Schedule provider.
|
Parameter
|
Description
|
|---|
|
Name
|
Enter a name to identify this Schedule provider.
The name will display in the logs when the scheduler starts the process.
|
|
Description
|
Enter a brief description for the use of
this Schedule provider.
|
|
Alternate User
|
If the task requires a different user authentication,
then enter the user with the correct authentication.
|
|
Password
|
Enter the password for the alternate user.
|
|
Active
|
If set, this scheduled item is active.
|
|
Skip Holidays
|
If checked, iSM will use either the Calendar
provider specified for the Calendar Provider parameter or the Calendar provider
that is marked as the default provider.
|
|
Calendar Provider
|
Select the defined Calendar provider from
the drop-down list that contains the holiday definitions to apply
to this schedule. The Calendar provider can be selected from a list
of providers configured on this iSM configuration or a Calendar provider
from a different configuration can be manually entered.
If
left blank and the Skip Holidays check box is selected, then the
Calendar provider that was selected as the default will be used.
|
|
Minutes
|
Select minutes within the hour to run the
task (minutes not checked will be skipped). For example, to schedule
a task to run every minute of the hour, check all of the minutes;
to schedule a task to run every 15 minutes click 0, 15, 30 and 45
minute check boxes.
|
|
Hours
|
Select hours within the day to run the task
(hours not checked will be skipped). For example, to schedule a
task to run every hour of the day, check all of the hours in both
the AM and PM row.
|
|
Month
|
Select the month within the year to run
the task (months not checked will be skipped). For example, to schedule
a task to run every month check all the months. To schedule a task to
only run in January, check the Jan check box.
|
|
Weekday
|
Select day of week to run (days not checked
and not implied by Day of Month will be skipped). Weekday and Day
of Month are cumulative. For example, every Wednesday AND the 15th
of the month.
|
|
Day of Month
|
Select day within the month to run the task
(days not checked and not implied by Weekday will be skipped). Day
of Week and Day of Month are cumulative. For example, every Wednesday
AND the 15th of the month.
|
|
Command
|
iSM command to be scheduled for execution.
For more information on a specific command, see the iWay Service
Manager Command Reference Guide.
|
|
Duration Timer
|
The length of time that the task will run
prior to the Dependent Command. The format of duration [in seconds]
is in the following format:
[xxh][xxm]xx[s] For
example, 04h30m45, which creates a duration of 4 hours, 30 minutes,
and 45 seconds. |
|
Dependent Command
|
Command to be executed after the Duration
Timer of the task has expired.
The command can be directed
to any configuration / iWay Integration Application (iIA) by including
it in a remote command.
|
x
The Calendar provider allows you to define 18 months
(starting with the current month) of Holiday/Skip dates, which when
used with the Schedule provider, allows you to fine tune the scheduler
execution.
Once configured, the Calendar provider can be:
- Exported to a centralized file system.
- Imported from a centralized file system and used within this
iWay Service Manager (iSM) instance.
- Imported from a centralized Service Manager and used within
this iSM instance.
- Accessed from a centralized iSM.
This allows the Calendar provider to be shared in real time by
any iSM that has access to it.
Note: The Calendar Provider must be updated every
18 months. Otherwise, once expired, any Schedule providers that
use this calendar will execute their tasks as if no Calendar provider
was present.
x
Configuring the Calendar Provider
This section describes all of the steps (including reference
information) that are required to configure the Calendar provider.
x
Procedure: How to Configure a Calendar Provider
To
configure a Calendar provider:
-
In the left console pane of the Server menu, select Calendar
Provider, as shown in the following image.
The Holiday Calendar
pane opens, as shown in the following image.

-
Click New.
The Calendar Settings configuration pane opens, which contains parameters
and settings for the Calendar provider, as shown in the following image.

-
Enter the appropriate values for the Calendar provider parameters.
For more information, see Calendar Provider Parameters.
-
Scroll down and click Add when
you are finished.
You are returned to the main Holiday Calendar pane, where
the new Calendar provider that was configured is now added to the
list. For example:
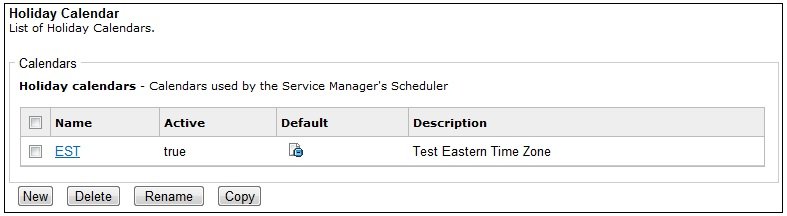
Note: A default
Calendar provider may be selected from this list. Click the icon
that is in the Default column. Only one default Calendar provider
is recognized for each iSM instance.
-
To define multiple Calendar providers, repeat this procedure.
x
Reference: Calendar Provider Parameters
The
following table lists and describes all of the available parameters
for the Calendar provider.
|
Parameter
|
Description
|
|---|
|
Name
|
Enter a name for the Calendar provider.
The name must not contain embedded blanks.
|
|
Description
|
Enter a brief description for the Calendar
provider. This description will be displayed on the Holiday Calendar
pane where available Calendar providers are listed.
|
|
Time Zone
|
Select a specific time zone to use for the
Calendar provider from the drop-down list. This allows the scheduler
to take into account what time zone relative to the iSM that the schedule's
skipping should be applied.
This is useful when the iSM is
running in one time zone and controlling schedules that run based
on a different time zone's values.
|
|
Active
|
The Calendar provider may be configured
and used by a Schedule provider. However, if the Calendar provider
is not marked as active, then the Schedule provider will not use
that Calendar provider. To activate the Calendar provider, click
the the Active check box. If selected, then this Calendar provider is
active.
|
|
Calendar
|
Allows you to select the specific days over
the next 18 months to skip. If the check box above a date is selected,
then that date is skipped by the Schedule provider, which is configured
to use this Calendar provider.
|
x
Using the Convenience Buttons
In addition the being able to select specific dates,
there are three convenience buttons that will either check specific
dates, or uncheck (clear) the dates in the calendar:
- Skip US Holidays
- Skip Weekends
- Clear calendar

The convenience buttons allow you to quickly configure the schedule
for the next 18 months.
x
If you want to set the Calendar provider to skip holidays,
the following United States holidays are recognized per year:
- New Year's Day
- Martin Luther King, Jr. Day
- President's Day
- Memorial Day
- Independence Day
- Labor Day
- Columbus Day
- Thanksgiving Day
- Christmas Day
To set those holidays into the current 18 month calendar, click Skip
US Holidays.
The following confirmation dialog box is displayed:

To set the holidays on the calendar, click OK.
Clicking Cancel returns you to the Calendar
Settings configuration pane without setting any dates.
The following image shows the resulting calendar after the Skip
US Holidays button is selected and confirmed:

x
The Calendar provider considers a weekend to be Saturday
and Sunday. To set each weekend for the 18 month period is a time
consuming task. The Skip Weekends button performs this action with
a single click.
To skip all weekends in the current 18 month calendar, click Skip Weekends.
The following confirmation dialog box is displayed:

To skip all weekends on the calendar, click OK.
Clicking Cancel returns you to the Calendar
Settings configuration pane without skipping any weekends.
The following image shows the resulting calendar after the Skip
Weekends button is selected and confirmed:

x
To start over again with a clean calendar and deselect
all date check boxes, click Clear calendar.
The following confirmation dialog box is displayed:
To clear all of the dates set on the calendar, click OK.
Clicking Cancel returns you to the Calendar
Settings configuration pane without resetting any dates.
x
Using the Function Buttons
The function buttons interface with the current configuration
of iSM.
|
Function Button
|
Description
|
|---|
|
Add
|
Displayed only when adding new Calendar
providers.
When you are satisfied with the calendar settings
clicking Add commits the calendar settings and writes the calendar
data to the iSM configuration.
|
|
Update
|
The Update button is displayed in conjunction
with the Reload button when the Calendar provider already exists
within the iSM configuration. Like the Add button, when you are
satisfied with the calendar settings, clicking Update commits the
calendar settings and writes the calendar data to the iSM configuration.
|
|
Reload
|
At any time during an update of the Calendar
provider, if you want to discard your changes the current Calendar
provider may be reloaded from iSM by clicking Reload. All changes
to the Calendar provider are discarded and a fresh copy (as of the
last Add or Update action) is reloaded from the iSM configuration.
|
x
SNMP (Simple Network Management Protocol) is a standard
Internet protocol to monitor attached devices for conditions or
situations that warrant attention. Within a managed network, iWay
Service Manager (iSM) is treated as a device to be monitored.
Under SNMP, the two key components are a manager that aggregates,
evaluates, and displays information from agents, which represent
the managed devices. Typically an iSM user will already have a manager
installed for network control. The manager is an external, non-iWay
component to which iSM reports. Managers range from simple freeware
versions that are downloadable from the web to sophisticated management
systems from major vendors.
SNMP exposes management data from the agent in the form of described
variables on the managed systems devices. These variables can then
be queried (and sometimes set) by the manager.
The SNMP standard does not define which information (variables)
a managed device should offer. SNMP uses an extensible design, where
the available information is defined by management information bases
(MIBs). MIBs describe the structure of the management data of a
device subsystem.
When exposing information using SNMP, iSM assumes the role of
a managed device. The SNMP provider acts as the SNMP agent. A provided
MIB details the information that iSM exposes, including:
- server start and
end
- listener start and
end
- listener execution
statistics including messages processed and their execution time
- special registers
(SREGs)
You may have a requirement to monitor iSM along with Java and
operating system values. The Java Virtual Machine (JVM) and most
operating systems offer MIBs that can also be loaded into your manager.
You can then combine these to provide a more complete report of
server activity and resource use.
The SNMP remote function calls (RFCs) describe three protocol
standards, which are known as V1, V2c, and V3. Managers can choose
to implement one or more of these standards. The iSM SNMP provider
supports all three standards.
The SNMP facilities are automatically installed during the iSM
installation. The MIBs for iSM are located in the following directory:
<iwayhome>/etc/mibs
The MIBs are copied to the manager software (and usually compiled)
as required by that software. The MIBS for Java and the operating
system, can be found according to their own software installation.
For example, the Java MIB provides access to Java execution information,
such as threads, memory use, and semaphores (monitors).
x
Configuring the SNMP Provider
The iSM SNMP agent is exposed as a provider. There can
be one or more providers defined in a configuration, although more
than one is only required if there are independent managers controlling
different aspects of the server.
To complete the configuration, you will need to know the configuration
of the manager. For example, the manager will be configured to interact
with the agent on a specific port (usually 161). If you have multiple
configurations on the same installation host, you will need to separate
these by having different addresses. For performance reasons, iSM
uses separate providers on each configuration rather than having
a single provider poll other configurations.
You will also be requested to specify which protocol(s) are used
by your manager. Select the set that is supported by the manager.
The provider can accept simultaneous requests from multiple managers,
and some managers are capable of sending multiple requests to their
agents in parallel. If this is the case, you can specify the number
of expected parallel requests by setting the number of execution
threads.
x
Procedure: How to Configure the SNMP Provider
To
configure the SNMP provider:
-
In the left
console pane of the Server menu, select SNMP Provider.
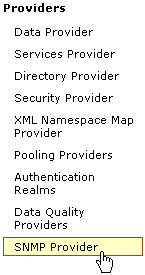
The
SNMP Provider pane opens.
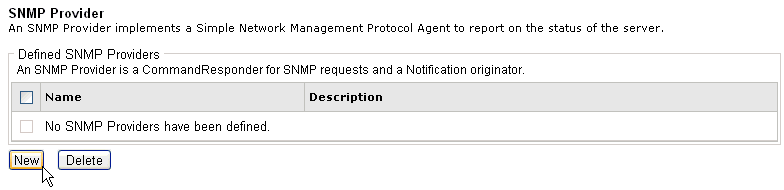
-
Click New in
the Defined SNMP Providers section.
The SNMP Provider Definition pane opens.
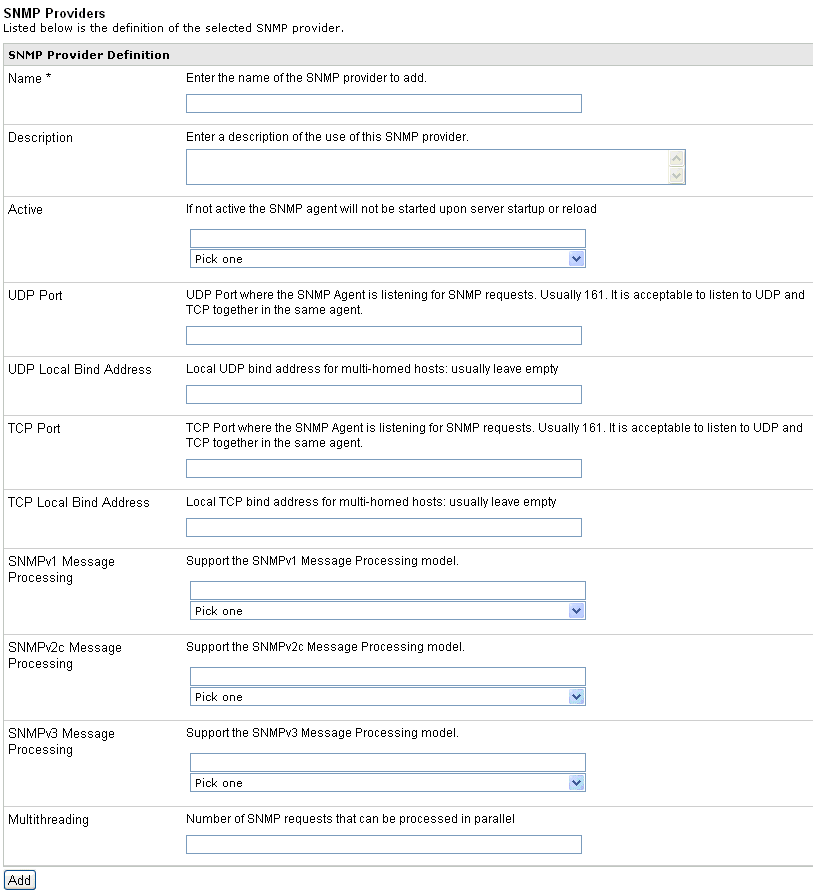
-
Provide
the appropriate values for your SNMP provider parameters as listed
and defined in the following table.
|
Parameter
|
Description
|
|---|
|
Name *
|
Enter the name of the SNMP provider to add.
|
|
Description
|
Enter a brief description of the of the
SNMP provider.
|
|
Active
|
If set to false, the SNMP agent will
not be started during iSM server startup or restart.
|
|
UDP Port
|
The UDP port where the SNMP agent is listening
for SNMP requests. Usually 161. It is acceptable to listen to UDP
and TCP together in the same agent.
|
|
UDP Local Bind Address
|
The local UDP bind address for multi-homed
hosts. This parameter value is usually left blank.
|
|
TCP Port
|
The TCP port where the SNMP agent is listening
for SNMP requests. Usually 161. It is acceptable to listen to UDP
and TCP together in the same agent.
|
|
TCP Local Bind Address
|
The local TCP bind address for multi-homed
hosts. This parameter value is usually left blank.
|
|
SNMPv1 Message Processing
|
Select true to support the SNMPv1
message processing model.
|
|
SNMPv2c Message Processing
|
Select true to support the SNMPv2c
message processing model.
|
|
SNMPv3 Message Processing
|
Select true to support the SNMPv3
message processing model.
|
|
Multithreading
|
The number of SNMP requests that can be
processed in parallel.
|
-
Click Add when
you are finished.
You are returned to the main SNMP Provider pane and the
new SNMP provider that was defined is added to the list.
-
To define
multiple SNMP providers, repeat this procedure.