Configuring and Verifying iWay Service Manager
iWay Service Manager is a highly scalable enterprise
service bus. It contains fully-integrated service design-time workbench
and web services creation and deployment capabilities, and it provides
a hosting environment for adapters.
This section explains how to start and stop iWay Service Manager,
configure and create additional instances of Service Manager, configure
the Java memory size, and verify the iWay Business Services Provider
(iBSP).
At this time, you are ready to start iWay Service Manager and
access the iWay Service Manager Administration Console.
x
Starting and Stopping iWay Service Manager on Windows Platforms
If you are not on a Windows system, proceed to Starting and Stopping iWay Service Manager on Non-Windows Platforms.
The following procedure explains how to start and stop iWay Service
Manager on Windows platforms. If you copied third-party files for
your adapters into the iWay \lib directory, you should restart it
at this time. If it is not started, start it as explained in the following
section.
x
Procedure: How to Start and Stop Service Manager on Windows Platforms
By default,
Service Manager runs as a Windows Service and there are two ways
to start and stop it.
- Use the Windows
start menu to select Programs, iWay 7.0 Service Manager,
base, and Start Service Manager - base or Stop
Service Manager - base.
or
- Open the Services
window (Control Panel, Administrative Tools, and then Services),
right-click iWay Service Manager -base, and
select Start, Restart, or Stop.
Note: By
default, Service Manager starts with Windows. To prevent it from starting
with Windows, open the Services window, right-click iWay
Service Manager -base, choose Properties,
and change the Startup type to Manual.
Windows
users can proceed to Configuring Service Manager.
x
Starting and Stopping iWay Service Manager on Non-Windows Platforms
For non-Windows systems, you can run Service Manager
as a service (daemon) or as a user task.
Windows users can proceed to Configuring Service Manager.
x
Procedure: How to Start Service Manager on Non-Windows Platforms as a User Task
To start
Service Manager as a user task:
-
Navigate
to the directory where iWay 7.0.7 SM is installed, for example:
/home/userID/iway7
-
Type
the following:
./iway7.sh base
When
you start Service Manager, you specify which configuration to use.
The base configuration is available by default and includes SOAP
and HTTP listeners. You can run more than one instance of Service
Manager by defining multiple configurations using the iWay Service
Manager Administration Console.
When iWay has started, you
receive the following prompt:
Enter command:>
x
Procedure: How to Stop Service Manager on Non-Windows Platforms as a User Task
To stop
Service Manager when it runs as a user task:
-
Go to
the Service Manager prompt:
Enter command:>
-
At the
Service Manager prompt, enter the following to stop listeners:
stop
-
When
listeners have stopped, enter the following:
quit
x
Procedure: How to Start Service Manager on Non-Windows Platforms as a Service
To start
Service Manager as a service (daemon):
-
Navigate
to the iway7/bin directory, for example:
/home/userID/iway7/bin
-
Edit
the following file.
Note: This step is only required the first time
you start Service Manager.
-
Open the following file in a text editor:
startservice.sh
-
Edit the IWAY7 line to specify where iWay is installed. Be
sure to include the final trailing slash, for example:
IWAY7=/home/userID/iway7/
-
Edit the IWAYUSER line so that it specifies the user ID that
you want Service Manager to run under, for example:
IWAYUSER=userID
This
user ID requires full permissions to the iway7 directory structure.
For security reasons, it is not recommended to run iWay Service
Manager as root.
-
Save and exit the file.
-
Execute
the startup service file, for example:
./startservice.sh
If
you are not logged on as root, you are prompted for the password
of the user ID under which Service Manager runs.
Password:
-
Enter
the password for this user ID.
The base configuration of Service Manager is started in
the background and includes SOAP and HTTP listeners. A serviceOut.txt
file appears in the iway7 directory and contains log information.
x
Procedure: How to Stop Service Manager on Non-Windows Platforms as a Service
To stop
Service Manager running as a service (daemon):
-
Navigate
to the iway7/bin directory, for example:
/home/userID/iway7/bin
-
Edit
the shutdown file.
Note: This step is only required the first time
you stop Service Manager.
-
Open the following file in a text editor:
stopservice.sh
-
Edit the IWAY7 line to specify where iWay is installed. Be
sure to include the final trailing slash, for example:
IWAY7=/home/userID/iway7/
-
Edit the IWAYUSER line so that it specifies the user ID you
are using to run Service Manager, for example:
IWAYUSER=userID
-
Save and exit the file.
-
Execute
the shutdown file, for example:
./stopservice.sh
If
you are not logged on as root, you are prompted for the password
of the user ID under which Service Manager runs.
Password:
-
Enter
the password for this user ID.
Note: If you receive an error, ensure the user ID
is defined in the shutdown file.
x
Procedure: How to Start Service Manager as a Batch Process on z/OS
On
z/OS systems, you can start Service Manager as a batch process using
JCL.
-
Use the following sample JCL as a model to start Service Manager
in batch:
//EDABGBPX JOB (SMITH),'JAVA BPXBATCH',CLASS=A,MSGLEVEL=(1,1),
//   MSGCLASS=X,REGION=0M,NOTIFY=EDABG,USER=EDABG1,PASSWORD=XXXXXXX
//********************************************************************
//* RUN JAVA UNDER A UNIX SYSTEM SERVICE SHELL
//********************************************************************
//STEP2 EXEC PGM=BPXBATSL,
// PARM='PGM /bin/sh /u/edabg1/iway7/iway7.sh base -c'
//STDOUT DD SYSOUT=*
//STDERR DD SYSOUT=*
//STDENV DD *
JAVA_HOME=/usr/lpp/java/J1.6
PATH=/usr/lpp/java/J1.6/bin
//
-
Substitute the appropriate job card and HFS locations on your
system accordingly.
x
Procedure: How to Stop Service Manager as a Batch Process on z/OS
On
z/OS systems, you can stop Service Manager as a batch process using
JCL.
-
Use the following sample JCL as a model to stop Service Manager
in batch:
//EDABGBPS JOB (SMITH),'JAVA BPXBATCH',CLASS=A,MSGLEVEL=(1,1),
//   MSGCLASS=X,REGION=0M,NOTIFY=EDABG,USER=EDABG1,PASSWORD=XXXXXXX
//********************************************************************
//* RUN JAVA UNDER A UNIX SYSTEM SERVICE SHELL
//********************************************************************
//STEP2 EXEC PGM=BPXBATSL,
// PARM='PGM /bin/sh /u/edabg1/iway7/bin/iway7sd.sh'
//STDOUT DD SYSOUT=*
//STDERR DD SYSOUT=*
//STDENV DD *
PATH="/usr/local/diff/bin:.:/usr/lpp/java/J1.6/bin:/bin::/usr/local/bin /usr/local/subin:/usr/sbin"1.6/bin'
LIBPATH=/lib:/usr/lib:/usr/lpp/java/J1.6/bin:.
JAVA_HOME=/usr/lpp/java/J1.6
//
-
Substitute the appropriate job card and HFS locations on your
system accordingly.
x
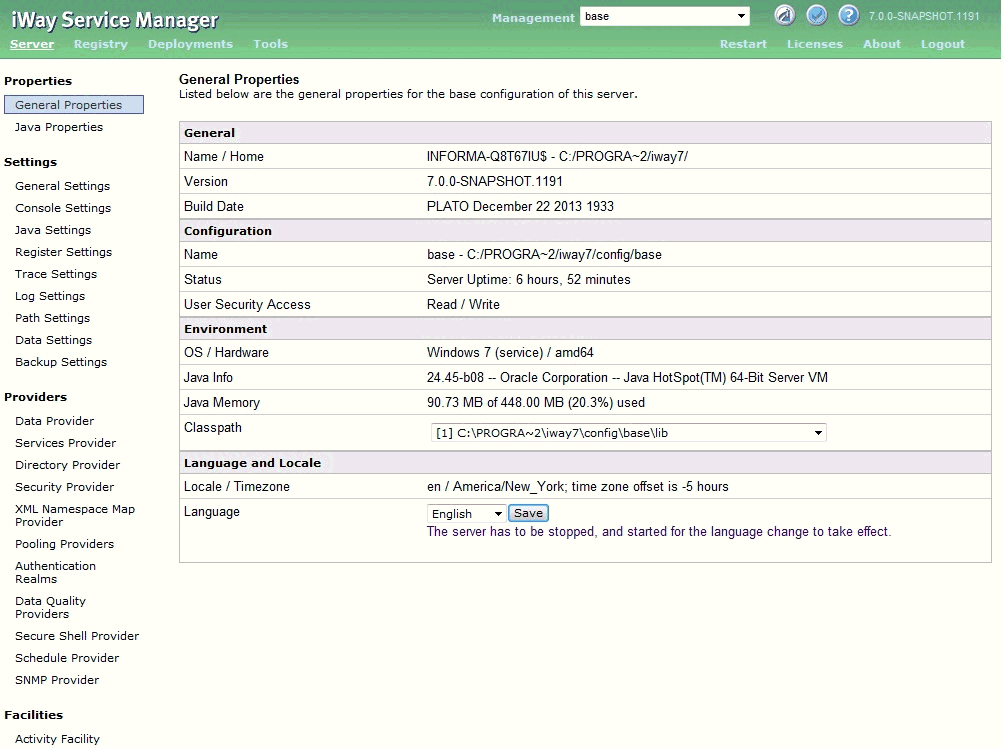
Configuring Service Manager
The installation program automatically installs and
configures Service Manager. The initial base configuration sets
up SOAP and HTTP listeners. You can modify the base configuration,
set up additional listeners, or create a new configuration using
a web-based configuration tool called the iWay Service Manager Administration Console.
x
Procedure: How to Configure and Secure Service Manager
To access
the iWay Service Manager Administration Console:
-
Open
the following page in your web browser:
http://hostname:9999
where:
- hostname
Is the host name where you installed iWay.
If
you changed the default port, substitute accordingly.
-
Log on
when prompted. When first installed, the user ID and password are
the following:
|
User Name
|
admin |
|
Password
|
admin |
The iWay Service Manager Administration Console
opens.
Full information on
using this console is in the iWay Service Manager User's Guide.
For
security purposes, you should change the default passwords used
to access the console as follows.
-
At the
top of the console, click Managed Servers.
The Server Management page opens.
The bottom of
the page shows a list of existing users. By default, there are two user
IDs:
- admin
-
For administration.
- iway
-
For general usage.
-
In the Name column,
click iway to change the user password.
-
Type
a new password in the Password field, confirm
the password, and click Finish.
-
In the Name column,
click admin to change the user password.
-
Type
a new password in the Password field, confirm
the password, and click Finish.
You are prompted to log on with the new password.
-
Log on
with the new password and click OK.
x
Getting Started With iWay
After iWay starts, review the iWay Welcome pages. These
pages are part of the iWay Console and accessible at:
http://hostname:9999/ism/welcome
where:
- hostname
Is the host name where you installed iWay. If you change
the default port, substitute it accordingly.
These pages provide an excellent way to become familiar with
iWay functionality and features.
x
Additional Configurations
You can create a new configuration if you wish to run
more than one instance of iWay Service Manager. Most iWay documentation
assumes you are using the default base configuration. If you create
a new configuration, substitute accordingly when reading iWay documentation.
It is recommended that you create at least one application configuration,
particularly in production and test environments, since the base
configuration is used by iWay Service Manager for console and GUI
tool communications.
x
Procedure: How to Create an Additional Configuration
-
If it
is not already open, access the iWay Service Manager Administration
Console and log on as an administrator.
-
On top
of the console, click Managed Servers.
The Server Management page opens.
-
Under
the Configurations area, click Add.
A form appears to define the new configuration.
-
Complete
the form as explained in the following table:
|
Field Name
|
Value
|
|---|
|
Name
|
Enter a name for the configuration. A directory
with this name will be created under iway7\config, for example:
C:\Program Files\iway7\config\myconf This
name is case-sensitive, even on Windows platforms. |
|
Description
|
Optionally enter a description for this
configuration.
|
|
Based On
|
Select a configuration or use a template
for the new configuration. You can use one of the two defaults:
- The raw configuration
contains no listeners and provides a blank template for defining additional
configurations.
- The base configuration
includes the default SOAP listener. If you use the base configuration
as your template, you will need to later change the SOAP port of
the new configuration so it does not conflict between instances.
Note: If
you have added additional listeners to the base configuration, those
listeners will also be part of the new configuration.
|
|
Port
|
Enter a port number that the new configuration
will use for its console processing.
|
|
Bind Address
|
Optionally enter an address for multihomed
hosts.
|
|
Secure
|
Optionally click the On check
box to enable SSL.
|
-
After
completing the form, click Finish.
The new configuration is created. A directory for the configuration
is added to the file system under the config directory. On Windows
platforms, this is:
C:\Program Files\iway7\config
x
Procedure: How to Run Additional Configurations on Windows Platforms
If you
are not using Windows, proceed to How to Run Additional Configurations on Non-Windows Platforms.
On
Windows platforms, to create and run a new Windows service for the configuration:
-
Open
a command prompt and navigate to the iway7\bin directory:
C:\Program Files\iway7\bin
-
Enter
the following to create the service.
iwsrv config_name -s install
where:
- config_name
Is the name of the new configuration. This is case-sensitive,
even on Windows platforms.
The following
is displayed:
iWay Service Manager - config_name Service
Installed Successfully.
For details on iWay Service
Manager, see the iWay Service Manager User's Guide.
-
Open the Control Panel, double-click Administrative Tools,
and select Services.
-
Start
and stop the configuration from the Services window. The service appears
as:
iWay Service Manager - config_name
If
you want to remove the service, ensure the service is stopped and
then enter the following in a command prompt at the iway7\bin directory:
iwsrv config_name -s remove
-
Proceed
to How to Configure an Additional Configuration.
x
Procedure: How to Run Additional Configurations on Non-Windows Platforms
On other
platforms, you can run the new configuration as a service (daemon)
or as a user task.
- To run as a
user task, navigate to the directory where you installed iWay and enter
the following:
iway7.sh config_name
where:
- config_name
Is the name of the new configuration.
- To run as a
service, you must copy, edit, and then execute the default startup
and stop files in the iway7/bin directory:
startservice.sh
stopservice.sh
Copy
and rename these files and then edit them to replace base with
the name of your configuration. Also be sure to change the log file
names serviceOut.txt and serviceShutdown.txt so they
are unique to this configuration. After copying and editing the
startup file, execute it. The exact names of these files may vary
depending on your platform.
x
Procedure: How to Configure an Additional Configuration
-
After
the configuration has started, return to the iWay Service Manager
Administration Console home page for the default configuration:
http://hostname:9999
Note: Although
each configuration has a iWay Service Manager Administration Console
port, the console port for an additional configuration is not normally
used. If you do use the iWay Service Manager Administration Console
port for an additional configuration, you still need to select that
configuration from the Managed Servers drop-down
list.
-
In the Managed
Servers drop-down list, select your configuration.
-
Use the
iWay Service Manager Administration Console to configure the new
configuration.
-
If you
used the base configuration as a template, change the SOAP port so
it does not conflict with the default base configuration. Then restart
the configuration.
x
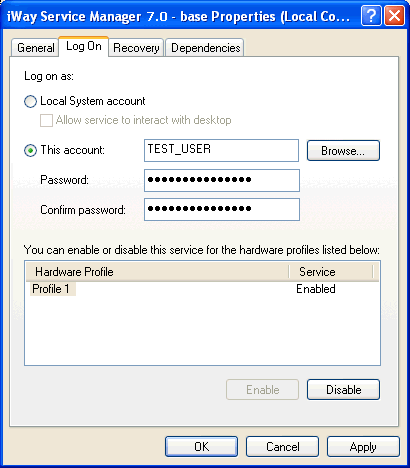
Configuring a Unique ID for an iWay Service
You can configure iWay Service Manager to run as a Windows
service (iWay service). By default, the iWay service runs as the Local
System ID.

However, the Local System ID does not
allow you to set user level environment variables (for example,
_JAVA_OPTIONS).
As a best practice, a unique, dedicated ID (account) should be
created to run the iSM service. This allows you to customize the
iSM service environment.
x
Configuring the Java Memory Size Settings
Although most users can skip ahead to Verifying Service Manager iBSP, it is a good idea to review this information,
should you need to troubleshoot.
Setting some Java VM (JVM) options can improve performance or
correct problems with Service Manager. The most common settings
involve the size of the Java heap and stack, which determine memory
availability for Java programs and the JVM. Errors can occur if
not enough memory is available, and the heap size impacts performance,
since it determines how often garbage collection occurs.
If you run into performance problems or receive out of memory
exceptions, you can adjust these sizes. The following are the most
common JVM options related to memory settings. Replace the ### with
the size you wish to set:
- -Xmx###M
-
Sets the maximum Java heap size.
- -Xms###M
-
Sets the initial Java heap size.
- -Xss###M
-
Sets the Java thread stack size.
The size is normally set in Megabytes, for example:
- -Xms512M
-
Optimum sizes vary depending on your total memory, the needs
of your application, how many other processes require memory, the
type of Java VM, and other considerations.
Where to set these and other JVM options, depends on your operating
system:
- On Windows platforms,
set JVM options using the iWay Service Manager Administration Console.
On the home page, under Settings, click Java Settings,
specify your JVM options in the Startup Options box,
and click Update. Then stop and start Service
Manager. An example of these options is:
-Xmx1024M -Xms512M
- On non-Windows
platforms, you must manually modify the script you use to start Service
Manager:
- If you run Service
Manager as a service (daemon), edit the script you use to start
the service (for example, startservice.sh) and add JVM options to
the line that calls the java command, for example:
su $IWAYUSER -c "java -Xmx1024M -Xms512M $REMDBG -cp $CLASSPATH -DIWAY7=$IWAY7
com.ibi.service.edaqmSilentService -config $IWAYCONFIG >> $IWAY7/serviceOut.txt &"
- If you run Service
Manager as a user task, edit the script you use to start
Service Manager (for example, iway7.sh) and add JVM options to the
line that calls the Java command, for example:
java –Xmx1024M –Xms512M $REMDBG -cp $CLASSPATH -DIWAY7=$IWAY7 edaqm -config $SCRI PT $2 $3 $4 $5 $6
Alternately,
the environment variable _JAVA_OPTIONS can be set accordingly for the
iWay user ID.
x
Verifying Service Manager iBSP
iWay Business Services Provider (iBSP) is a transformation
and integration engine for processing XML files and SOAP messages
for exchange with web service applications and other systems. iBSP
runs as a component of iWay Service Manager (iSM) and is configured
automatically. No steps are required for its initial setup.
When first installed, iSM is configured for iBSP and its default
SOAP listener is on port 9000. You can verify the installation by
accessing a sample web service.
Note: iWay Business Services Provider (iBSP) was formerly
known as iWay Business Services Engine (iBSE). Some references,
files, and prompts may still use the older name.
x
Procedure: How to Verify Service Manager iBSP
-
Ensure
Service Manager is started.
-
Go to
the following page in your browser:
http://hostname:9000
where:
- hostname
Is the host name where you installed iWay.
If
you changed the default port, substitute accordingly.
The
iBSP home page opens as shown below. Three hyperlinks are available
by default for the three default licenses, IVP, test, and production.
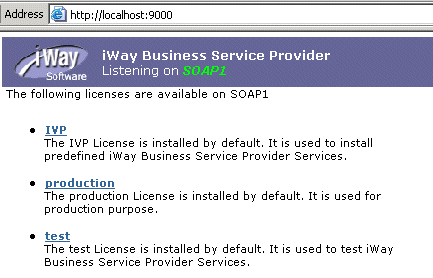
This
page allows you to test the sample web service installed with iWay
7.0.7 SM. When you create web services using iWay Explorer, you
can also test them from this page.
-
Click IVP.
-
Click iwayivp.
-
Click ivp.
-
Click Invoke.
An XML response that is similar to the following appears
in your browser:
<?xml version="1.0" encoding="UTF-8" ?>
<SOAP-ENV:Envelope xmlns:xsd="http://www.w3.org/2001/XMLSchema"
xmlns:SOAPENV="http://schemas.xmlsoap.org/soap/envelope/"
xmlns:xsi="http://www.w3.org/2001/XMLSchema-instance">
  <SOAP-ENV:Body>
  <ivpResponse xmlns="urn:iwaysoftware:iBSP:jul2003:ivp:response"
   cid="A0328ED84ABFA055C4F64B8039C991AA">
   <CurrentTime>2017-05-02T19:14:03Z</CurrentTime>
   <Version>IWAY 7.0.7 Service Manager</Version>
  </ivpResponse>
 </SOAP-ENV:Body>
</SOAP-ENV:Envelope>
x
iWay Integration Tools Transformer
iWay Integration Tools (iIT) Transformer (previously
known as iWay Transformer) is a GUI tool that is delivered as a
plugin with iIT. iIT Transformer is used to specify how records
and fields map to one another. It supports one-to-one, one-to-many,
or many-to-one mapping relationships. Documents created by iIT Transformer
are characterized as transformation templates and can be used throughout
iWay. After being created, the templates are stored as XML documents,
so they can be maintained and managed with or without iWay Transformer.
Data domain experts can use iIT Transformer to create sophisticated
transformation templates without programming assistance. Both transformations
for XML and non-XML, input and output document types can be created.
For more information, see the iIT Transformer User Guide.
x
iWay Integration Tools Designer
iWay Integration Tools (iIT) Designer (previously known
as iWay Designer) is a GUI tool that is delivered as a plugin with
iIT. iIT Designer is used to build workflows for use with iWay.
Workflows model business processes and control tasks in a correct sequence.
A workflow definition serves to control the sequence in which external
program modules are executed.
For more information, see the iIT Designer User Guide.