Configuring a Connection to CICS

How to:

To access CICS, you must configure a connection through the adapter, known as a target. After the connection is created, it is automatically saved. You must establish a connection to CICS every time you start iWay Explorer or after disconnecting from a target.


Top of page

x
Procedure: How to Configure a Connection to CICS

To configure a connection to CICS:

  1. In the left pane of iWay Explorer, expand the iWay Adapters node.
  2. Select the CICS node.
  3. In the right pane, move your pointer over Operations and select Define a new target.

    The Add a new CICS target dialog box opens in the right pane, as shown in the following image.
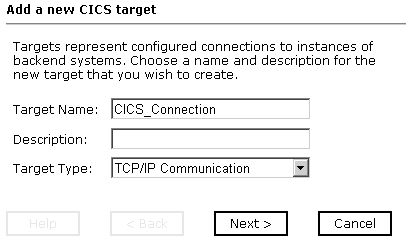
    1. In the Target Name field, type a name for the new target, for example, CICS_Connection.
    2. In the Description field, type a brief description (optional).
    3. From the Target Type drop-down list, select the type of target, for example, TCP/IP Communication.
  4. Click Next.

    The Set connection info pane opens for the selected target.

    Note: The CICS connection parameters are consistent with those found in your CICS system. For more information on parameter values that are specific to your CICS configuration, consult your CICS system administrator. This information should be the same for all transactions and messages in a single CICS system.

    1. If you selected TCP/IP as the type of target, proceed to How to Set Connection Parameters for TCP/IP.
    2. If you selected CRM Gateway as the type of target, proceed to How to Set Connection Parameters for CRM Gateway.
Top of page

x
Procedure: How to Set Connection Parameters for TCP/IP

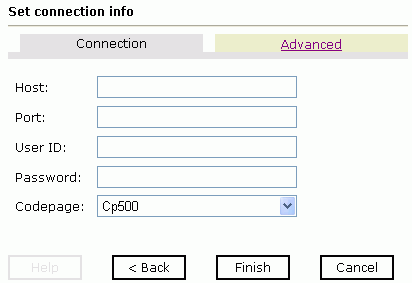
If you selected CICS via TCP/IP, the Set connection info pane opens, with the Connection tab active, as shown in the following image. The Connection tab contains five fields for entry and three active buttons (Back, Finish, and Cancel).

Note: TCP/IP access was introduced with CICS Transaction Server Version 2 Release 2. For more information, see Running the Adapter Using TCP/IP Communication.

  1. Type values for the connection parameters.

    The following table lists and describes the TCP/IP parameters.

    Parameter

    Description

    Host

    Host name, or IP address, for the computer where CICS is running.

    Port

    TCP port that CICS is listening on for ECI or DPL connections.

    User ID

    Valid user ID for CICS.

    The user ID and password fields correspond to the values provided on the CICS TCP/IP service resource definition, using the ECI option, as one of the following:

    If you specify the user ID and the password, then the CICS TCP/IP service resource definition must be set to ATTACHSEC(VERIFY).

    If you specify neither the user ID nor the password, then the CICS TCP/IP resource service definition must be set to ATTACHSEC(LOCAL).

    Password

    Valid password associated with the CICS user ID. For additional information, see the User ID parameter.

    Codepage

    Select the codepage from the drop-down menu. Cp500 is the default value.

  2. For advanced parameters, including parameters for executing Adabas/Natural Programs, see How to Set Advanced Parameters. Otherwise, click Finish.

    The newly created connection, CICS_Connection, appears as a node under the CICS service adapter. The configuration information is stored in the repository for the configuration you defined during installation.


Top of page

x
Procedure: How to Set Advanced Parameters
  1. Click the Advanced tab.
  2. Enter values for the Advanced parameters.

    The following table lists and defines the Advanced parameters.

    Parameter

    Description

    Connection Time Limit (ms)

    Amount of time in milliseconds that the adapter waits for a completed response from CICS. 10,000 milliseconds is the default value.

    Natural Nucleus

    Name of the Natural subsystem on which the Natural program you wish to invoke resides. For example, for Natural Version 3.14, the nucleus is N314re.

    Proxy Program

    CICS program that calls the Natural CICS Interface. The name of the proxy provided by iWay Software is AASNATC.

    Natural Logon Parameters

    String that represents the default logon parameters. It can be modified depending on installation requirements.

    The CICS/Natural Bridge enables Natural programs to be invoked by the adapter through CICS using the Software AG Natural CICS Interface.

    Note: The Software AG Natural CICS Interface requires a programmatic "logon" to the Natural System.

    CICS Mirror

    An alternative transaction ID to the CPMI (ECI) mirror Transaction ID. This ID must be defined to CICS and point to the CICS mirror program DFHMIRS.

    For additional information on executing Adabas/Natural programs, see Using Adabas/Natural Programs

  3. Click Finish.

    The newly created connection, CICS_Connection, appears as a node under the CICS service adapter. The configuration information is stored in the repository for the configuration you defined during installation.


Top of page

x
Procedure: How to Set Connection Parameters for CRM Gateway

To configure a CRM gateway connection to CICS:

  1. In the left pane of iWay Explorer, expand the iWay Adapters node.
  2. Select the CICS node.
  3. In the right pane, move your pointer over Operations and select Define a new target.

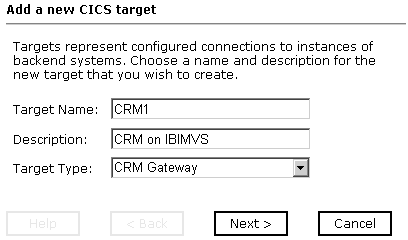
    The Add a new CICS target dialog box opens in the right pane, as shown in the following image, where you assign a name and description to the new target.

  4. In the Target Name field, type a name for the connection (for example, CRM1).
  5. In the Description field, type an optional description for the target name you just created (for example, CRM on IBIMVS).
  6. From the Target Type drop-down list, select CRM Gateway.
  7. Click Next.

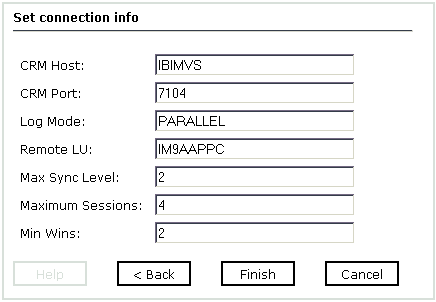
    The Set connection info dialog box opens, as shown in the following image.

  8. Enter the CRM gateway parameters to configure a new connection to CICS.

    The following table lists and describes the CRM gateway parameters:

    Parameter

    Description

    CRM Host

    Host name, or IP address, for the computer where the CRM gateway is running.

    CRM Port

    Port number on which the CRM gateway is listening.

    Log Mode

    Defines the characteristics of the APPC sessions that the CRM gateway establishes across a CRM Link.

    The characteristics of different logon modes are tailored to support different types of applications. For example long-running batch applications might use different logon modes than short-lived online applications. Logon modes can define different logical unit protocols, classes of service, packet sizes, and pacing algorithms.

    Use the same logon mode for the CRM gateway logical unit and the back-end application logical unit.

    Remote LU

    LU of CICS.

    Max Sync Level

    Enter 1 to obtain non-transactional connections. Enter 2 for transactional connections.

    Maximum Sessions

    The number of maximum sessions that are allowed in the allocated pool. This value determines the number of concurrent requests that can be active at any given time. The CRM and the back end system must configure their maximum sessions to the same value.

    Min Wins

    The CRM gateway and the back-end system are pre-allocated with a number of sessions for their use. This value is referred to as minimum winner sessions. The owner of these pre-allocated sessions has priority for its winner sessions; however, they may be reassigned depending on system load.

    The total of the minimum winner sessions for both sides must be less than or equal to the maximum session value. If the total is higher than the maximum session value, you will be unable to activate the link.

    For best results in determining minimum sessions, evaluate the number of sessions that are required for the CRM and for the back-end system to support concurrent requests.

    Note: The following restrictions apply when using CRM gateway connections with the iWay Transaction Adapter for CICS:

    • The referenced CRM gateway must be configured to identify itself as CRM1. This is specified in the JCL that launches the CRM gateway.
    • Each adapter CRM gateway connection Host and Port must be unique. As a result, it is not possible to have two adapter connections to the same CRM gateway instance.
  9. Click Finish.

    The newly created connection, CRM1, appears as a node under the CICS service adapter. The configuration information is stored in the repository for the configuration you defined during installation.


Top of page

x
Procedure: How to Connect to a Defined CICS Target

To connect to a defined CICS target:

  1. In the left pane, expand the iWay Adapters node.
  2. Expand the CICS node.
  3. Click the target name under the CICS node, for example, CICS_Connection.
  4. Move your pointer over Operations and select Connect.

    The Connect to CICS_Connection pane opens, populated with values you entered for the connection parameters.

  5. Verify your connection parameters. If required, provide the password.
  6. Click OK.

    The x icon disappears, indicating that the node is connected, as shown in the following image.


iWay Software