Configuring and Using iWay Integration Tools Suite

In this section:

This section describes how to configure and use iWay Integration Tools Suite (iIT).

Configuring Automatic Updates

iIT can notify you when a new version becomes available. To enable this feature, open the same preferences dialog shown in Setting the iWay Home Preferences, and select Install/Update and then Automatic Updates. Click the Automatically find new updates and notify me checkbox.

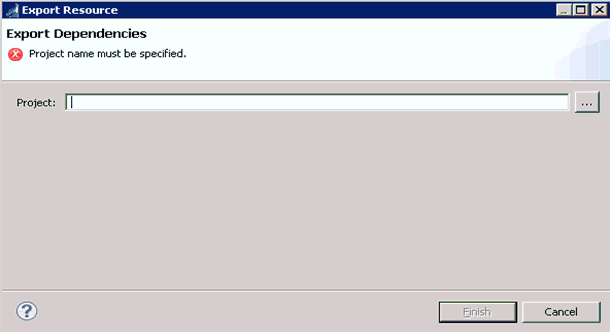
Creating an iWay Explorer Connection

How to:

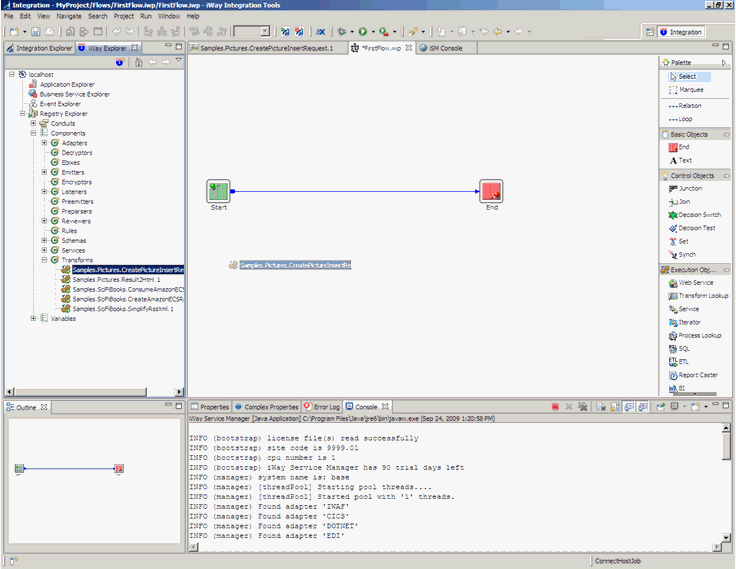
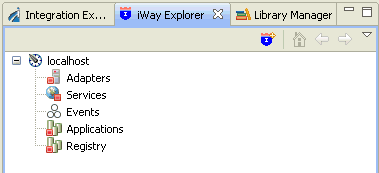
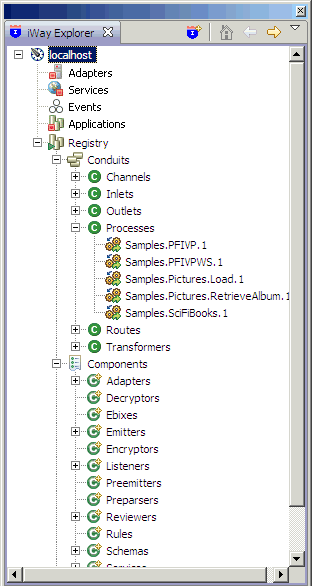
You can use the iWay Explorer, shown in the image below, to browse the metadata of an iSM server. It is recommended that you create a connection before beginning works so you can access the resources found in the registry of your server.

Procedure: How to Add an iWay Service Manager Connection

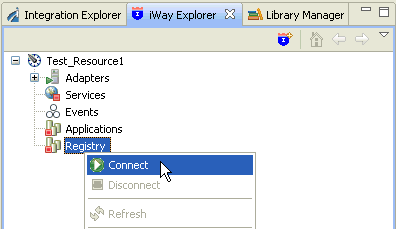
To add an iWay Service Manager connection to your iWay Explorer:

  1. Select the iWay Explorer tab and click the Launch iWay Resource Create Wizard iconin the iWay Explorer toolbar.
  2. Select iWay Configuration from the Resource Selection Dialog and click Next.
  3. Enter localhost as the Configuration Alias and click Next.

    Note: This is just a nickname for display, not the server connection information.

    You can verify if the Connection String, Soap, and Console ports are valid.

Creating an Integration Project

How to:

An integration project is used to hold all the resources you create for your iSM application.

Procedure: How to Create an Integration Project

To create a new integration project:

  1. Select File, choose New, and then Integration Project from the main menu.
    The New Integration Project wizard opens as shown in the following image.
  2. Enter a name for the project and click Finish.
    A new project with the name you selected will appear in the Integration Explorer window as shown in the following image.

    You will also see other folders that were created to hold different types of resources. These folders are just for convenience and it is optional to put resources in them.

Starting iWay Service Manager

How to:

For testing purposes, iWay Service Manager (iSM) can be run within iIT.

Note: iIT automatically detects your iSM installation and sets the iWay Home directory when iSM is run inside iIT.

Procedure: How to Run iWay Service Manager

To run iWay Service Manager (iSM):

  1. Click the Start Service Manager button.
    The following image shows iSM running in the Console view.

    The iWay Service Manager Administration Console opens in a new browser window, as shown in the following image.

Exporting a Resource from a Registry

How to:

You can use the Registry component in iWay Explorer to browse resources available in the registry of an iSM server.

Some resources, for example, Transforms, Process Flows, Adapter, Registry Sets, and Schemas can be exported to an Integration Project.

Procedure: How to Export a Resource

To export a resource:

  1. Connect to an iSM instance using the Registry component in the iWay Explorer view.
  2. Right-click on a resource that you would like to export to iIT and select Export.

    The Export Resource dialog box opens.

  3. Specify a target project in the Project field.

    If you have not created a project, click the Browse button and then the Create Project button.

    All dependencies of the resource will be exported with the parent by default. For example, if you have a process flow containing a transform, the transform will be exported to the default containing folder during the process flow export process.

  4. Select all of the nodes that need to be exported to the Integration Project and click Finish.

    After the process is complete, the selected resource can be found in the Integration Explorer under the target folder.

Creating a New Resource

How to:

Make sure you have created an Integration Project to contain your new resource. The following section describes how to create a new resource.

Procedure: How to Create a New Resource

To create a new resource:

  1. Click File then New and select the type of resource you would like to create.

    The list that appears is a quick list of iIT wizards. however, there are many more available and can be accessed by selecting other.

  2. Click the Browse button to select a project folder when the New wizard launches for your selected resource type as shown in the following image.
  3. Enter a name for your new resource in the Name field.
  4. Enter a description for your new resource in the Description field.

    After you select a project, the Target Server Version will be changed to the preference you set for the project. This can be changed here if necessary. In the case of a process flow, changing the target server version will cause the process flow to be compiled using the compiler from the selected version.

  5. Click Finish.

Publishing a Resource

How to:

The following section describes how to publish a Resource.

Procedure: How to Publish a Resource

To publish a resource to an iSM registry:

  1. Right-click a resource, select Integration Tools and then click Publish.

    The Publish Resource Wizard dialog box opens, as shown in the following image.

  2. Type the URL with the SOAP port in the Server URL field, or select a pre-configured URL from the drop-down list.

    The drop-down list provides all of the servers you have defined in iWay Explorer.

  3. Click Finish.

Test-running a Resource

In this section:

How to:

The following section describes how to test-run a resource.

Procedure: How to Test-run a Resource

To Test-run a resource:

  1. Select the process flow you wish to test and click the Run as... toolbar icon.

    The Run As dialog box appears as shown in the following image.

  2. Select Process Flow and click OK.

    The Edit Configuration dialog box opens.

    The Edit Configuration dialog is used to set options for the test run. A configuration is created and saved for each resource that you test run. These configurations can be viewed, modified, and cloned in the Run Configurations dialog accessed by clicking the arrow next to the Run As toolbar icon and selecting Run Configurations. After creating a run configuration for a resource, Eclipse will attempt to find and execute that configuration the next time you select the resource and click the Run As icon.

  3. Click the Browse... button to select an Input Document from your workspace or click the Import button to import an Input Document.
  4. Select or type in a server URL to execute the test run against.

    If you have servers configured in your iWay Explorer, they will show up in the drop-down list.

    You can choose to execute a test run against the Registry or against a Configuration. If you select Existing Configuration, the drop-down list will be populated with configurations available on the server you specified in the server URL.

  5. Click Run.

    If your process flow has a dependency, you will be asked if you wish to publish this dependency to the Registry. All dependencies must be available in order for the process flow to run successfully.

Viewing Test Results

The test results for a resource reside under the resource in a folder called Test Results. These results are maintained between runs so you can compare them.

The following image shows a transform and process flow with test results.

If you are notified of a test run failure, debugging information can be found in the results folder.

Using Registry Components

How to:

The Transform and Process Flow objects function differently for iWay Designer in iIT compared to the previous, standalone version of iWay designer. In the previous version, you could drag a Transform object onto a process flow and pick the transform to use from a drop-down list. This behavior has changed in iIT. You can now get additional resources to use on your process flow from the Registry Explorer.

Procedure: How to Obtain Additional Resources from the Registry Explorer

To obtain additional resources to use on your process flow from the Registry Explorer:

  1. Click the iWay Explorer tab and connect to a Registry Explorer by right-clicking on it and selecting Connect.
  2. Expand the tree for the type of resource you wish to add. For example, if you would like a transform, expand Components and then Transforms.
  3. Select the resource you want and drag it to an open process flow as shown in the following image.

    The Export dialog box opens as shown below.

  4. Click Yes.

    The transform will now reside in the transforms folder in your project and a corresponding transform object will exist on the process flow.


iWay Software