Installing and Starting iIT

In this section:

There are two methods of installing iIT. The first is to extract the zip file that contains iIT and the full Eclipse 3.7 development environment. The second is to install iIT into your own installation of Eclipse 3.7 using the update site mechanism. Using this mechanism is out of the scope of this document but more information can be found in the Eclipse help documentation by clicking on Help and then the Help Contents menu item.

To start iIT, double click the iit.exe file found under the eclipse folder where you extracted the zip. There are many launch properties found in the iit.ini file. These properties concern mainly memory and java usage and are explained in the Eclipse documentation.

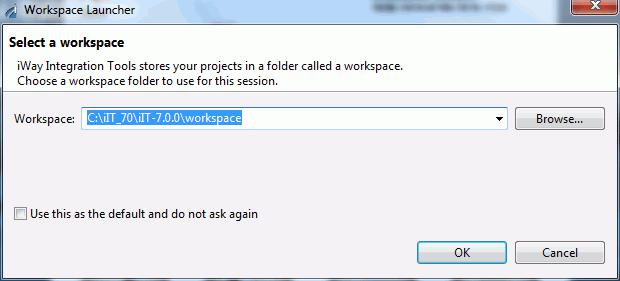
Setting the Workspace

After starting iIT you will be prompted by a dialog box, shown in the image below, asking you to set the workspace location. The workspace is the container for all of the projects you plan to create. It is recommended that you set the workspace location outside your eclipse directory so if you need to reinstall iIT you can reuse your workspace.

The Welcome Screen

The Welcome Screen, shown in the image below, contains useful information about Eclipse and iIT. Here you can browse tutorials, samples, and find out what is new in this version. To close the screen, click the Workbench icon on the right.

The Workbench

The Workbench, shown in the image below, is the name for the development environment which contains one or more Perspectives. A Perspective is a simple collection and layout of Views and Editors. Editors are usually found in the center of a perspective and are used for editing content. Views surround the editor and allow you to browse and modify the properties of resources.

Setting the iWay Home Preferences

Once the Workbench is open, it is recommended that you set the iWay Home preferences first. To do this, open the Workbench Preferences by selecting Preferences from the Window menu. Expand the iWay Integration Tools preference and then click on iWay Home Directory as shown in the image below. Select your iSM home directory using the Browse… button, and click OK. A dialog box will open asking if you wish to set you Default Target Server version to the version of iSM installed in the iSM home directory. Click Yes.

If you do not have iSM installed locally, you can set the target iSM version using the Default iSM Target Version preference.


iWay Software