- Start iWay Integration Tools (iIT).
-
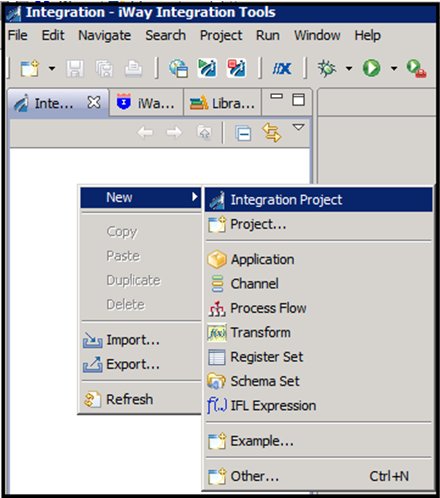
Right-click the Integration Explorer pane, click New,
and then select Integration Project from
the context menu, as shown in the following image.
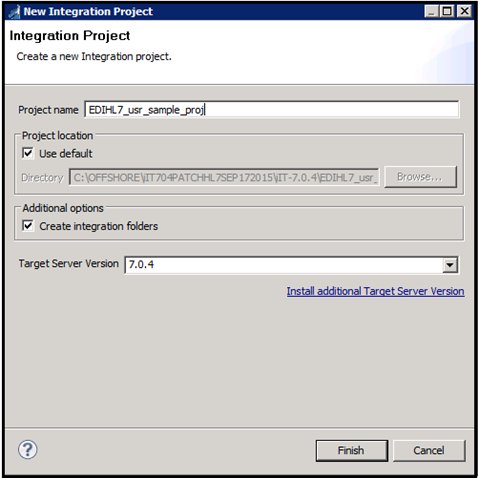
The New Integration Project dialog box opens, as shown in the following image.
-
Enter a name for the Integration Project (for example, EDIHL7_usr_sample_proj)
in the Project name field, and then click Finish.
A new Integration Project node called EDIHL7_usr_sample_proj is added to the Integration Explorer.
-
Expand the EDIHL7_usr_sample_proj Integration
Project node, right-click the Channels folder,
select New, and then click Channel from
the context menu, as shown in the following image.

-
Enter a name for the Channel (for example, XMLEDIHL7_OB_QS_pFlow_Ebix_Channel),
and then click Next, as shown in the following
image.

The Inbound/Outbound Protocols pane appears.
-
Click the Add button to add a
File Listener in the Inbound section, as shown in the following
image.
-
From the Types Filter list, select File and
then click Finish, as shown in the following
image.
-
Select the Have an Inlet created for each
inbound protocol check box to create an Inlet for the
channel, as shown in the following image.
-
Click the Add button in the Outbound
section to define an emitter.
The Define emitter type pane appears.
-
In the Types filter list, select Passthrough to define
the passthrough emitter, and then click Finish,
as shown in the following image.
Note: Passthrough does not emit data from the listener. Instead, it just passes the control here and does nothing.
-
Select the Have an outlet created for each
outbound protocol check box to create an outlet for
the channel, and then click Finish, as shown
in the following image.
The Channel Builder pane appears.
-
Under inlet: inlet.1, click listener:
listener.1 (File) and then expand the Main
(Missing 2 required fields) configuration parameter
on the right pane, as shown in the following image.
-
Enter a valid Input Path, Destination, and Removal Destination (optional)
path and then select hl7 in the Suffix Out
drop-down list, as shown in the following image.
-
Click the Save icon near the File
menu to save your edited listener configuration. You can also press
the shortcut key (Ctrl+S) to save your work if you are using a Windows
environment.
- Import the XMLToEDIHL7_Ebix_2_ Process Flow from the local drive or create the one in the EDIHL7_usr_sample_proj directory in the Flows folder.
-
Under the route: route.1(default) node, select process:
process.1 and click the process icon on the right panel to
reference the process flow into your channel, as shown in the following image.
-
Select a process flow from the integration project and
then click OK.
Note: Process flows should already be built and available in the iIT integration project. They can be found in the EDIHL7_usr_sample_proj directory inside the Flows folder.
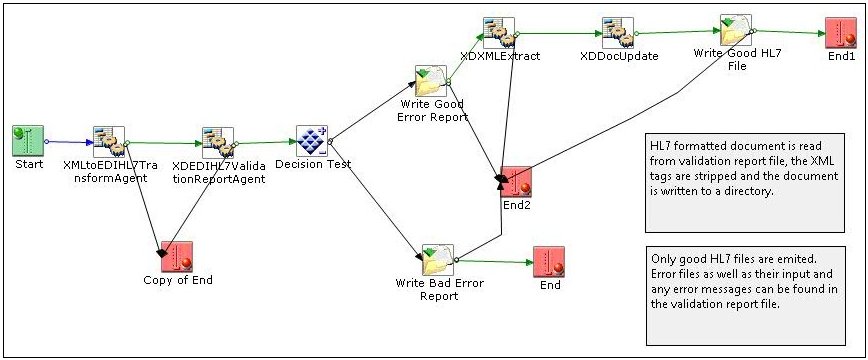
For more information, see Process Flow Used for Outbound Processing: XML to HL7.
Your screen should resemble the following image.
-
Click the Save icon near the File
menu to save your edited listener configuration. You can also press
the shortcut key (Ctrl+S) to save your work if you are using a Windows
environment.