In this section: How to: |
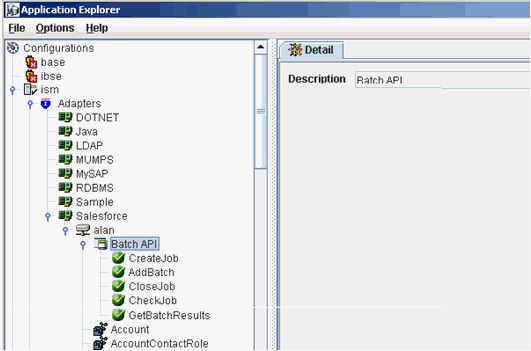
Batch API services are exposed under the Batch API node at the root of the Salesforce adapter metadata tree, as shown in the following image.

To use the Salesforce Batch API:
For example:
<Create-Job-Request location="BatchAPI/CreateJob">
  <jobInfo>
    <operation>insert</operation>
    <object>Contact</object>
    <contentType>CSV</contentType>
  </jobInfo>
</Create-Job-Request>
For example:
<Create-Job-Response>
      <jobId>750A00000004QzSIAU</jobId>
</Create-Job-Response>
All records in this file must have the same type (for example, Contact) and the first line in the file must specify the field names that are used in the file. For more information about the format of the CSV batch file, see the Salesforce Bulk API documentation.
The following is an example of a CSV batch file:
FirstName,LastName,Department,Birthdate,Description
Tom1,Jones1,Marketing,1940-06-07Z,Branding guru on the West Coast
Ian1,Dury1,R&D,,World-renowned expert in fuzzy logic
For example:
<Add-Batch-Request location="BatchAPI/AddBatch">
    <file>C:/temp/data.csv</file>
    <jobId>750A00000004QzSIAU</jobId>
</Add-Batch-Request>
The response contains a batch ID, which can be used for future reference:
<Add-Batch-Response>
     <batchId>751A00000004SExIAM</batchId>
</Add-Batch-Response>
For example:
<Close-Job-Request location="BatchAPI/CloseJob">
     <jobId>750A00000004QzSIAU</jobId>
</Close-Job-Request>
The status of a job can be queried at any time using <Check-Job-Request>.
For example:
<Check-Job-Request location="BatchAPI/CheckJob">
     <jobId>750A00000004QzSIAU</jobId>
</Check-Job-Request>
The response contains information about the job as a whole and all of its associated batches.
For example:
<Check-Job-Response>
    <jobInfo>
        <id>750A00000004QzSIAU</id>
        <operation>insert</operation>
        <object>Contact</object>
        <createdById>005A0000000U8BSIA0</createdById>
        <createdDate>2010-04-14T16:38:16.000Z</createdDate>
        <systemModstamp>2010-04-14T16:41:49.000Z</systemModstamp>
        <state>Closed</state>
        <concurrencyMode>Parallel</concurrencyMode>
        <contentType>CSV</contentType>
        <numberBatchesQueued>0</numberBatchesQueued>
        <numberBatchesInProgress>0</numberBatchesInProgress>
        <numberBatchesCompleted>1</numberBatchesCompleted>
        <numberBatchesFailed>0</numberBatchesFailed>
        <numberBatchesTotal>1</numberBatchesTotal>
        <numberRecordsProcessed>2</numberRecordsProcessed>
        <numberRetries>0</numberRetries>
        <apiVersion>18.0</apiVersion>
    </jobInfo>
<batchInfoList>
    <batchInfo>
        <id>751A00000004SExIAM</id>
        <jobId>750A00000004QzSIAU</jobId>
        <state>Completed</state>
        <createdDate>2010-04-14T16:40:33.000Z</createdDate>
        <systemModstamp>2010-04-14T16:40:35.000Z</systemModstamp>
        <numberRecordsProcessed>2</numberRecordsProcessed>
    </batchInfo>
  </batchInfoList>
</Check-Job-Response>
For example:
<Get-Batch-Request location="BatchAPI/GetBatchResults">
     <jobId>750A00000004QzSIAU</jobId>
     <batchId>751A00000004SExIAM</batchId>
     <file>c:/temp/out.csv</file>
</Get-Batch-Request>
The CSV file will contain one line for each record in the batch input file. Each line will specify the ID of the affected record and its status.
For example:
"Id","Success","Created","Error"
"003A0000008kYUVIA2","true","true",""
"003A0000008kYUWIA2","true","true",""
The Salesforce Batch API supports the Upsert operation, which is used to create new records and update existing records in a database table.
The following is an example of a job request that specifies the Upsert operation:
<Create-Job-Request location="BatchAPI/CreateJob">
  <jobInfo>
    <operation>upsert</operation>
    <object>CHG_ACCT__c</object>
    <externalIdFieldName>upID__c</externalIdFieldName>
    <contentType>XML</contentType>
  </jobInfo>
</Create-Job-Request>
The following is an example of a reference to the input XML file to be uploaded and the job ID in the batch request:
<Add-Batch-Request location="BatchAPI/AddBatch">
  <file>C:\CHG_BATCH_UPSERT\BATCHAPI_XML_INPUT.xml</file>
  <jobId>750400000008TItAAM</jobId>
</Add-Batch-Request>
| iWay Software |