Configuring Integration Broker in PeopleSoft Release 8.4 (PeopleTools Releases 8.40 - 8.47)
You can configure PeopleSoft 8.4 to send an
asynchronous outbound message to the File Output connector.
To configure application messaging in PeopleSoft 8.4:
- Ensure that
the message is active and is routed to the proper Message Channel.
- Configure the
IntegrationGateway.properties file to communicate with your PeopleSoft 8.4
application.
- Configure the
Integration Gateway and File Output connector.
- Create and configure
a new Gateway node.
These tasks are described in detail in the following procedures.
x
Procedure: How to Ensure the Message Is Active and Is Routed Correctly
To ensure
that the message is active and is routed to the proper Message Channel:
-
Open Application
Designer.
-
On the
File menu, point to Open, click Message,
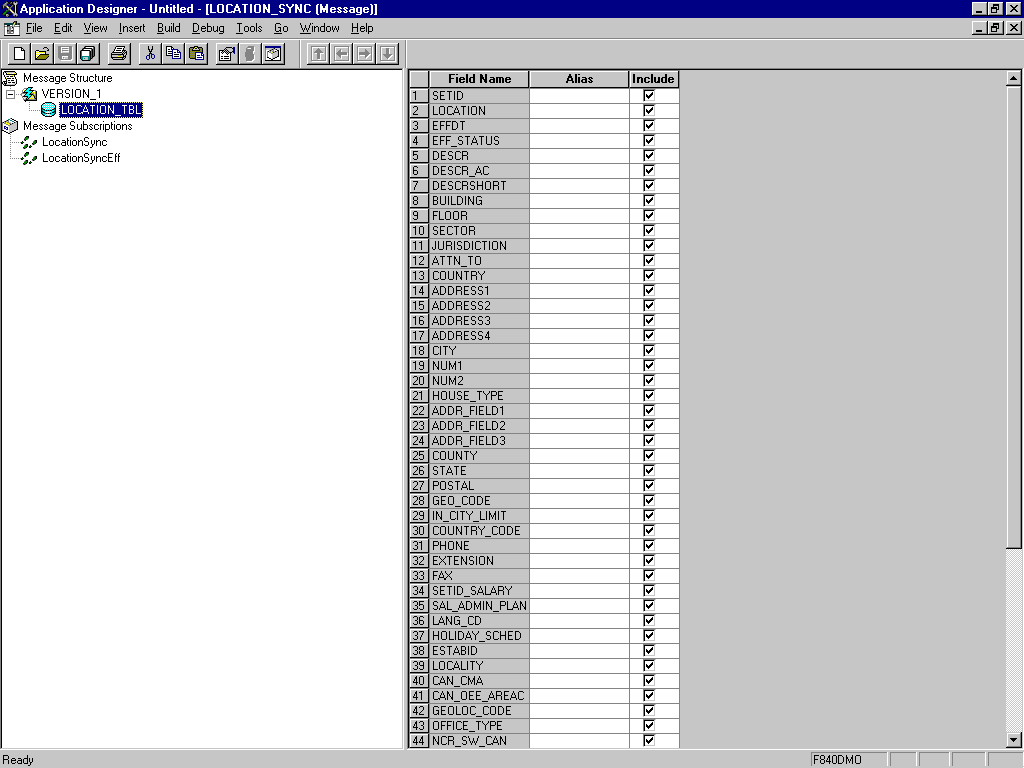
and open the LOCATION_SYNC message.
The Application Designer opens as shown in the following
image. The message field names appear in a column with corresponding
columns for the field alias and a check box indicating whether to
include the field.

-
To view
the fields that are included in the Message, select LOCATION_TBL.
-
To view
the Properties dialog box, right-click LOCATION_TBL and
select Properties.
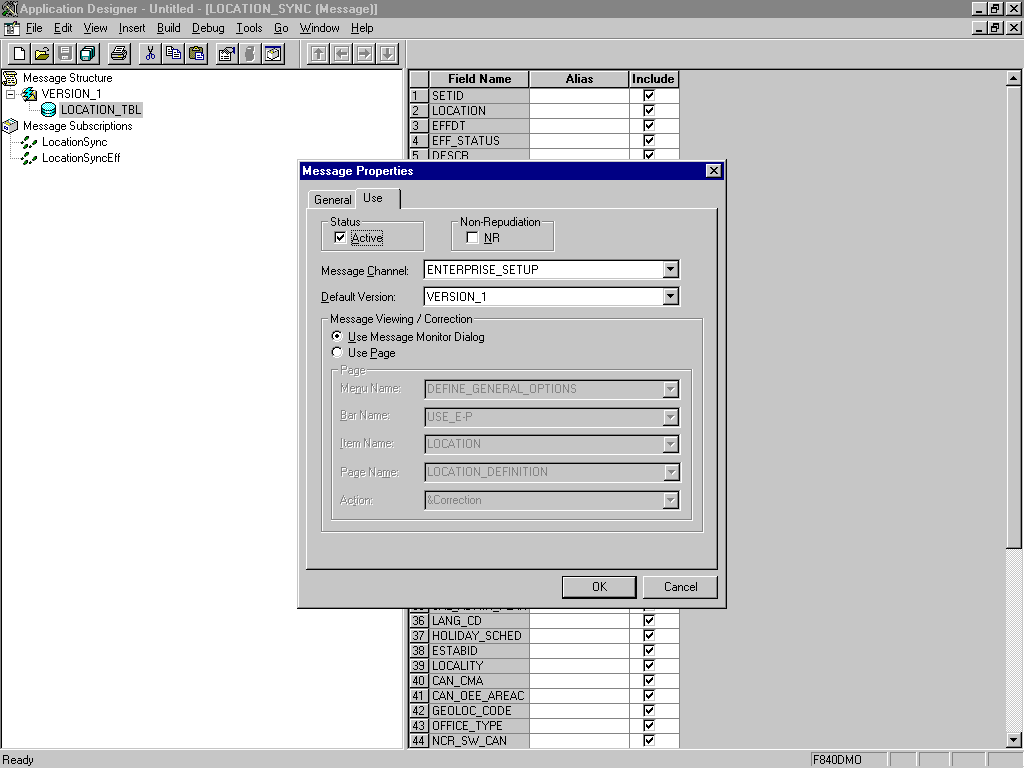
The Message Properties dialog box opens as shown in the
following image and includes Non-Repudiation and Status check boxes,
Message Channel and Default Version lists, and Use Message Monitor
Dialog and Use Page options.

-
Select the Use tab.
-
Ensure the Status check box is selected,
indicating that the message is active.
The message is routed to the Message Channel, ENTERPRISE_SETUP, and
the default message version is VERSION_1 (messages can have multiple versions).
-
Click OK.
-
Save the
message.
You have
ensured that the message is active and routed correctly.
x
Procedure: How to Configure the IntegrationGateway.properties File
If your
web server is WebSphere, the IntegrationGateway.properties file
resides in:
C:\websphere\AppServer\installedApps\peoplesoft\PSIGW\Web-inf\
To
configure the IntegrationGateway.properties file:
-
Using
the editor of your choice, open the IntegrationGateway.properties file.
-
Find the
section of the file that specifies the JOLT connect string setting for
the default application server. This is usually near line 75 and
looks similar to the following:
## JOLT connect string setting for optional Default Application
Server. Do NOT specify a NODENAME.
#
# Example:
#ig.isc.serverURL=//MYSERVER:9000
#ig.isc.userid=MYUSERID
#ig.isc.password=MYPASSWORD
#ig.isc.toolsRel=8.40
-
Uncomment
(or copy and uncomment) the four lines that specify the connection.
-
Enter
the appropriate information.
In the following example, the PeopleTools release is 8.40.09.
ig.isc.serverURL=//isdsrv14:9000
ig.isc.userid=VP1
ig.isc.password=VP1
ig.isc.toolsRel=8.40.09
The PeopleSoft tools release
must be precise to the last decimal.
Note: With Release
8.42, the password must be stored in an encrypted format. PeopleSoft
provides a script called PSCipher.bat (PSCipher.sh on Unix) to accomplish
encryption. Usually, this script is located in the path of the IntegrationGateway.properties
file. To run this script, follow the instructions provided by PeopleSoft.
You have
finished configuring the IntegrationGateway.properties file.
x
Procedure: How to Configure the Integration Gateway and the File Output Connector
To configure
the Integration Gateway and the File Output Connector:
-
In a web browser, open your PeopleSoft 8.4 application
in 4-tier mode.
-
In the
Menu pane, expand PeopleTools, Integration
Broker, and then, click Gateways.
-
Open the LOCAL
Gateway ID and type the following Gateway URL:
machine-name/PSIGW/PeopleSoftListeningConnector
where:
- machine-name
Is the URL of your PeopleSoft web server.
-
Click Refresh.
A message appears stating the outcome of the refresh process.
-
Click OK.
-
Scroll
down and click Save.
You must click Save before continuing.
-
Click
the Properties hyperlink for the FILEOUTPUT
Connector ID.
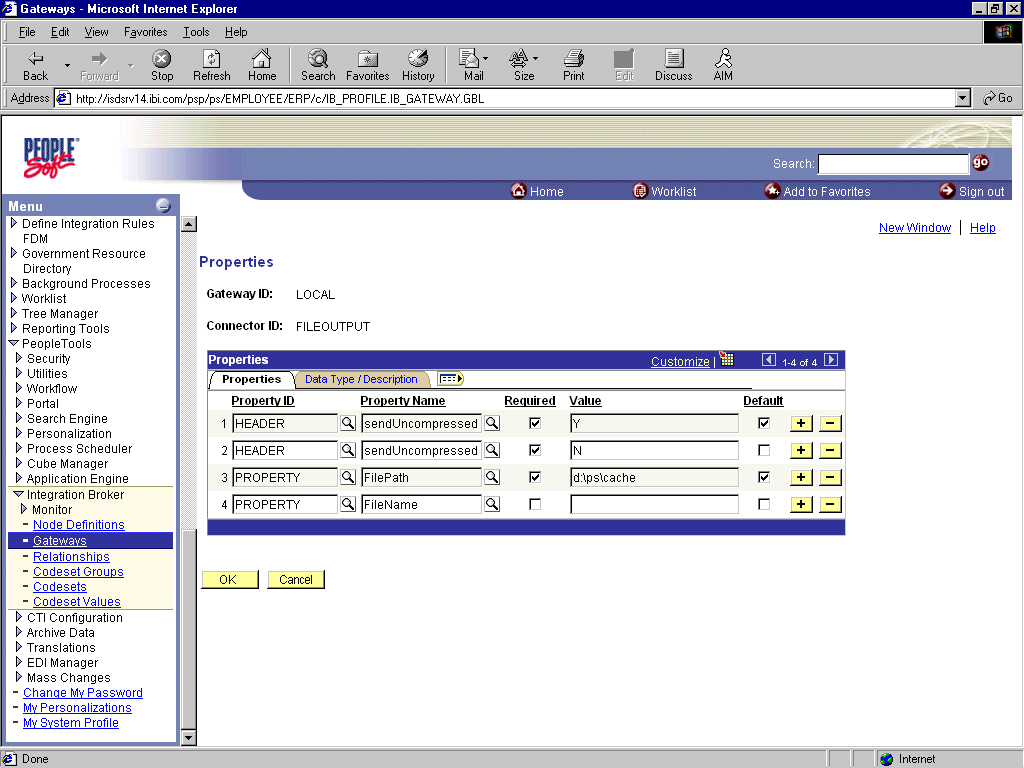
The Properties pane for the FILEOUTPUT Connector opens,
as shown in the following image. Information for the Gateway ID
and the Connector ID appears. The Properties tab is active and includes
fields for the Property ID, Name, and Value. Check boxes indicating
whether required and whether the value is the default also appear
on the tab.

-
Accept or overwrite the default values.
In the previous image, the FilePath PROPERTY from the c:\temp
default was changed to d:\ps\cache.
-
To return to the Gateway window, click OK.
-
Scroll
down and click Save.
You have
finished configuring the Integration Gateway and the File Output Connector.
x
Procedure: How to Create and Configure a New Gateway Node
To create
and configure a new Gateway Node:
-
In the
Menu pane, expand PeopleTools, Integration
Broker, and click Node Definitions.
-
Select the Add a New Value tab.
-
In the Node Name field, type a node name.
It is recommended that you name your first (trial) message
node EXTERNAL. After successfully configuring and sending messages
using this node, you can create additional message nodes with names
appropriate for your application.
-
Click Add.
The Node Info tab becomes available.
-
In the Description field, type an appropriate description.
-
From the Node Type drop-down list, select EXTERNAL.
-
From the Routing Type drop-down list, select Implicit.
-
Click
the Connectors tab to make it available.
-
For the Gateway ID, specify LOCAL.
-
For the Connector ID, specify FILEOUTPUT.
-
Accept or overwrite the default Gateway property values.
-
Click Save.
-
To specify
the transactions to route messages to your node, select the Transactions tab.
-
Click Add
Transaction.
-
From the Transaction Type drop-down list, select Outbound
Asynchronous.
-
In the Request Message field, specify LOCATION_SYNC.
-
In the Request Message Version field, specify VERSION_1.
-
Click Add.
The Transaction Detail pane opens.
-
In the Routing Type drop-down list, verify that the value is Implicit.
-
Click Save.
-
Click the Return to Transaction List hyperlink.
-
To ensure that your data entry is not lost, click Save again.
You have finished creating and configuring the new Gateway Node.
-
Continue
with the instructions in Viewing the PeopleCode for a Message.


