Configuring the TCP/IP or HTTP Target Connector for PeopleSoft 8.4
The TCP/IP message routing software, provided with the
iWay Application Adapter for PeopleSoft, passes XML documents from
PeopleSoft Integration Gateway to your application server.
The HTTP Outbound Connector, provided by PeopleSoft, may be used
in place of the iWAY TCP/IP84 Connector in release 8.4.
This configuration topic assumes you are familiar with PeopleSoft
Integration Broker (in release 8.4). If not, see Using PeopleSoft 8 Integration Broker for basic information about configuring
and testing. For a complete description before you work with the
iWay Application Adapter for PeopleSoft, see your PeopleSoft documentation.
The procedures in this topic assume that your Integration Broker
environment is configured and tested. For more information, see Using PeopleSoft 8 Integration Broker.
To configure the PeopleSoft 8.4 TCP/IP or HTTP Target Connector
to send messages to your application server:
- Configure
the gateway for the TCP/IP Target Connector or HTTP Target Connector.
For
more information, see How to Configure the Gateway for the TCP/IP Target Connector or How to Configure the Gateway for the HTTP Target Connector.
Note: This
step is optional when configuring the HTTP Connector. The HTTP Target
Connector is supplied with your PeopleSoft application, and no special configuration
steps are required. If you choose, you may configure default connection values
on the Gateway. You can override these values when you configure
the node.
- Configure the
node.
For more information see How to Configure the Node for the TCP/IP84 Connector or How to Configure the Node to Use the HTTP Connector.
Note: Starting
with release 8.4, the Integration Broker is delivered with an HTTP
Outbound Connector. This connector can be used in place of the iWAY TCP/IP84
Connector for sending messages to your application server.
x
Procedure: How to Configure the Gateway for the TCP/IP Target Connector
To configure
the gateway for the TCP/IP Target Connector:
-
In a web browser, open your PeopleSoft release 8.4 application.
-
In the
Menu pane, expand PeopleTools, Integration
Broker, and then click Gateways.
-
Open the LOCAL
Gateway ID.
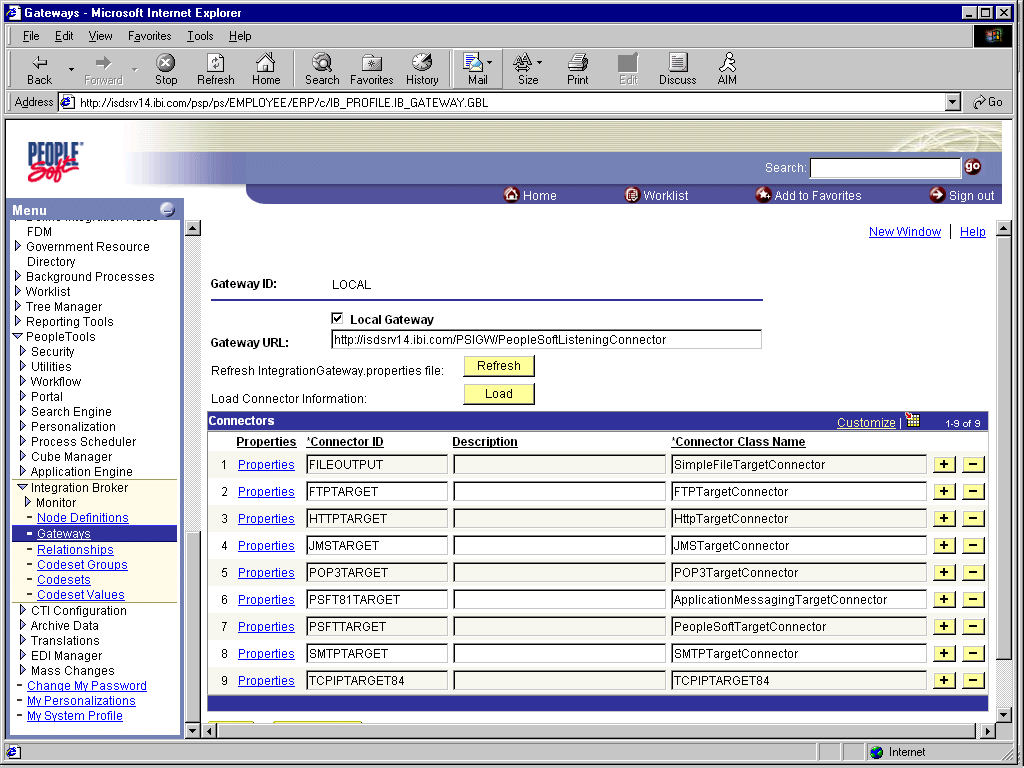
The following image shows the PeopleSoft Gateway ID pane
on the right. The right pane includes the following: the Local Gateway
check box, the Gateway URL field, fields with information for Connector
ID, Description, and Connector Class Name, Properties hyperlinks,
and the Refresh and Load buttons.
-
If you do not see the TCPIPTARGET84 Connector ID, click Load and
scroll to locate TCPIPTARGET84 in the list.
If TCPIPTARGET84 still does not appear, the connector class
file was not installed in the Integration Gateway. For information
about installing the TCPIPTAGER84 connector, see the iWay
Installation and Configuration manual.
-
Click the Properties hyperlink for TCPIPTARGET84.
The following image shows the Properties pane for TCPIPTARGET84. Gateways
is selected in the Menu pane. The right pane contains the following components:
the Gateway ID, Connector ID, and OK and Cancel buttons.
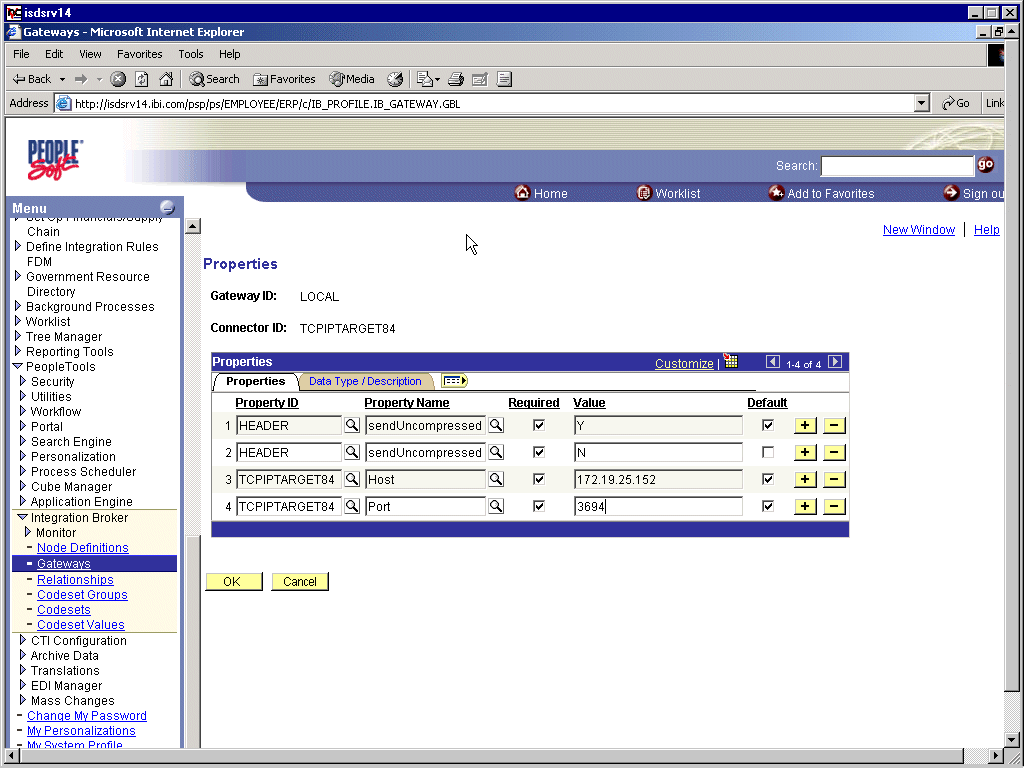
Default values appear
for the host and the port. For complex business situations, you
can override this setting on the individual node.
-
Type values for the host and the port for the machine on which your
PeopleSoft XML listener is listening for incoming messages.
-
Click OK.
The Gateway window opens.
-
Scroll
to the bottom of the window and click Save.
You have
finished configuring the gateway for the TCP/IP Target Connector.
x
Procedure: How to Configure the Node for the TCP/IP84 Connector
To configure
the node for the TCP/IP84 Connector:
-
In the Menu pane, select PeopleTools, Integration
Broker, and then click Node Definitions.
-
Select
the node that you want to configure.
Note: This procedure uses a node called EXTERNAL.
For more information about creating and using nodes, see Using PeopleSoft 8 Integration Broker or your PeopleSoft documentation.
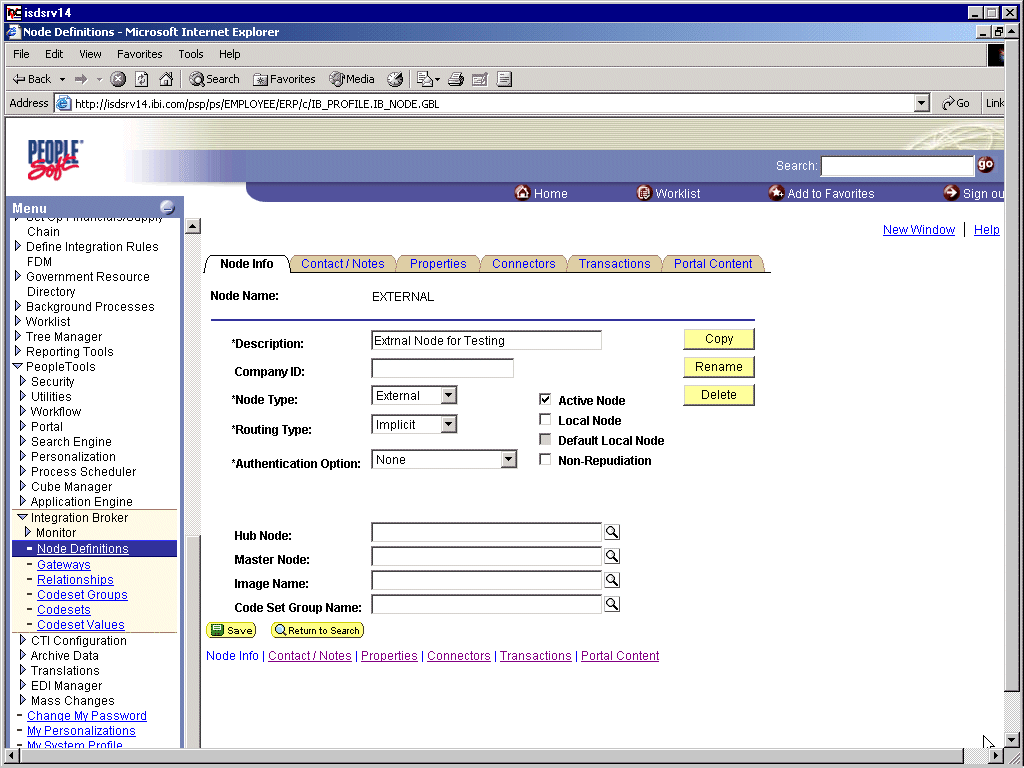
The
following image shows the Node Info tab for External node on the
right. It includes the following: Description, Company ID, Hub Node,
Master Node, Image Name, and Code Set Group Name fields; Node Type,
Routing Type, and Authentication Options lists; Active Node, Local
Node, Default Local Node, and Non-Repudiation check boxes; and Copy,
Rename, and Delete buttons.
-
From the Node Type drop-down list, select External.
-
From the Routing Type drop-down list, select Implicit.
-
Select
the Connectors tab.
-
Select TCPIPTARGET84 as the Connector
ID.
Default values appear for the host and the port.
-
Type values for the host and the port for the machine and port that
route XML to your application server.
You can accept or override the default values for individual nodes.
-
Click Save.
-
If you are warned that you are changing the Connector, click OK.
-
Select
the Transactions tab.
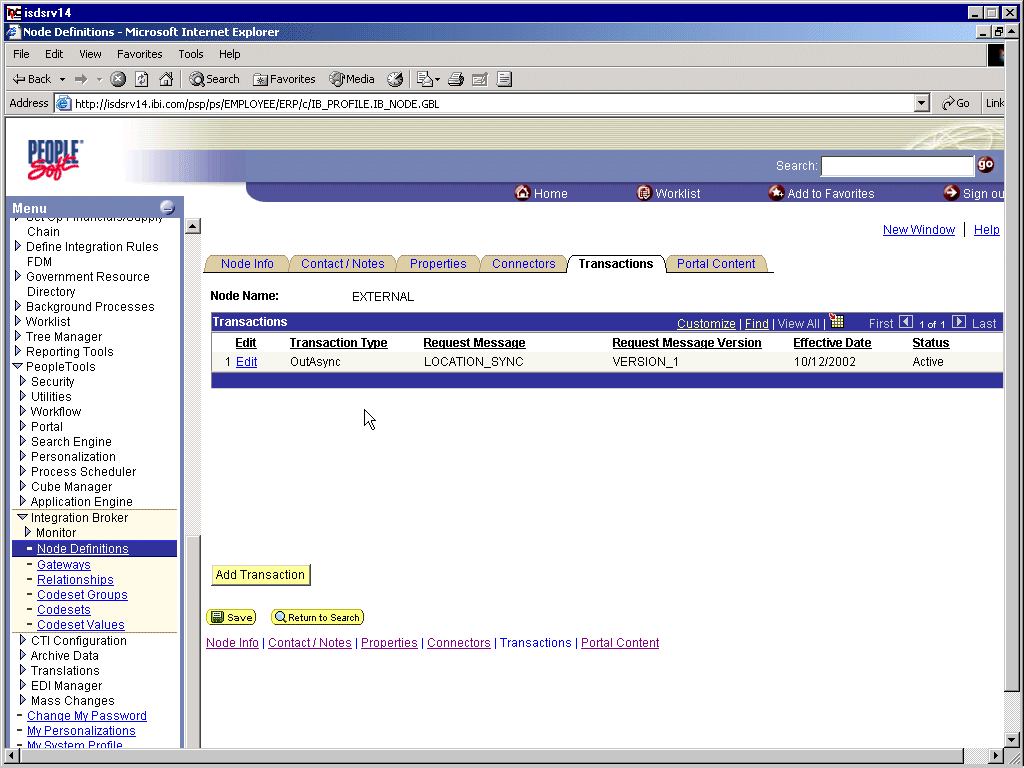
The following image shows the TCP/IP84 Connector Transaction
tab for the External node type. It contains transaction details
and the Add Transaction, Save, and Return to Search buttons.
-
If there are no transactions, click Add Transaction to
add the message with which you are working.
In this procedure, the node is already configured with
the LOCATION_SYNC message.
-
To make the Transaction Detail tab available and view transaction
details for the LOCATION_SYNC message, click Edit.
The following image shows the TCP/IP84 Connector Transaction
Detail tab, which contains information for the following: Node Name,
Effective Date, Transaction Type, Request Message, Request Message
Version, and Routing Type. The Comment field is currently empty.
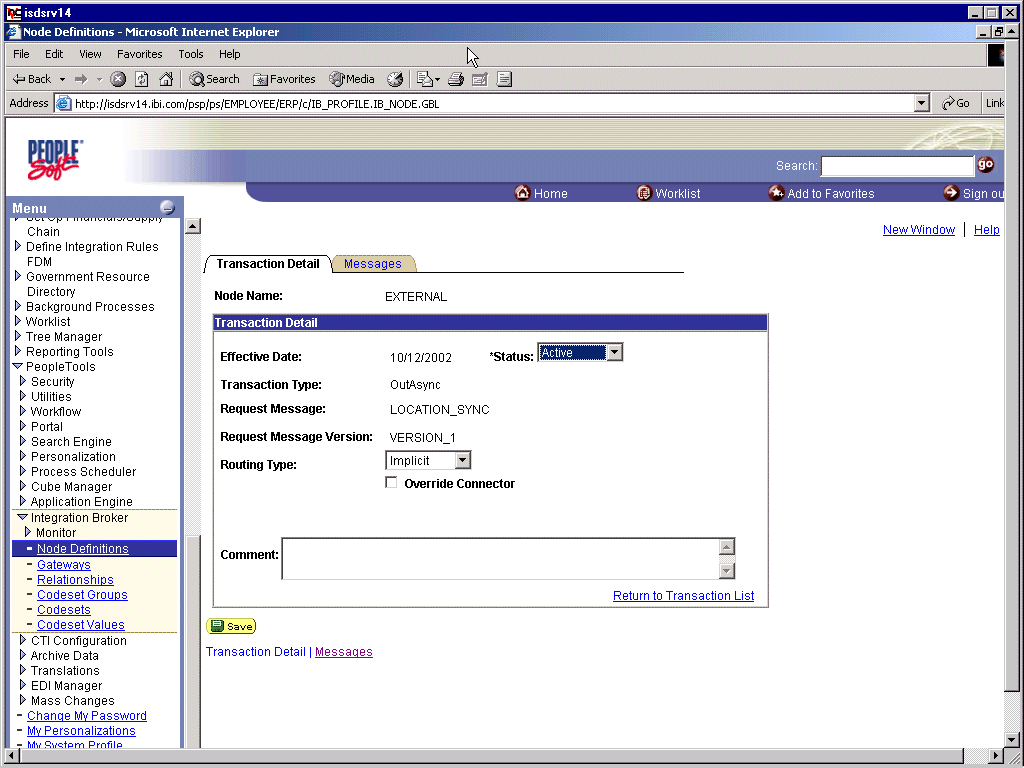
You can add the message
with which you are working.
-
Verify that the Routing Type is Implicit.
-
Click Save and
return to the Transactions tab.
-
To edit additional transactions, click the Edit hyperlink
to navigate to the Transaction Detail tab.
-
In the Transaction Detail tab, from the Status drop-down list, select Inactive.
Inactive status is for initial testing only. After you
test your configuration, you can change the status to Active and
have as many nodes and transactions as required to satisfy your
business requirements.
-
Click Save.
You are
ready to send XML messages to your PeopleSoft XML Listener.
x
Procedure: How to Configure the Gateway for the HTTP Target Connector
To configure
the gateway for the HTTP Target Connector:
-
In a web browser, open your PeopleSoft 8.4 application.
-
In the
Menu pane, expand PeopleTools, Integration
Broker, and then click Gateways.
-
Open the LOCAL
Gateway ID.
The following image shows the HTTP Target Connector Gateway
ID pane on the right and includes the following: the Local Gateway
check box, the Gateway URL field, fields with information for Connector
ID, Description, and Connector Class Name, Properties hyperlinks,
and the Refresh and Load buttons.

-
If you do not see the HTTPTARGET Connector ID, click Load.
-
If it still does not appear, consult with your PeopleSoft system administrator
as your Gateway was not installed properly.
-
Click
the Properties hyperlink for HTTPTARGET.
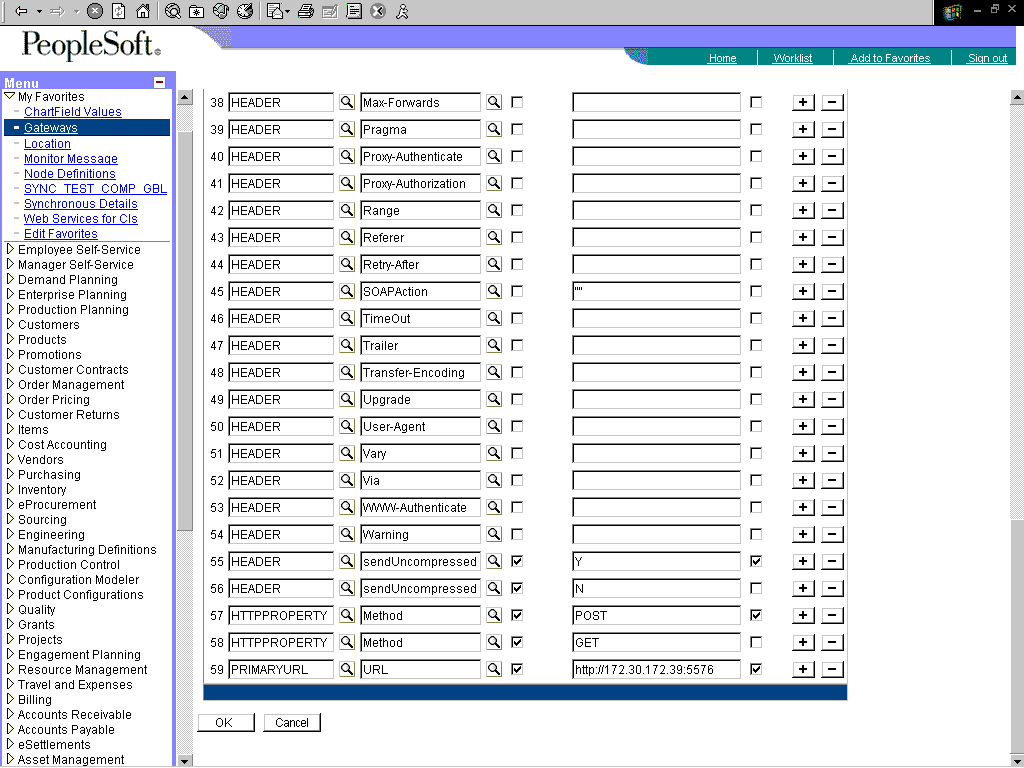
The Properties pane for HTTPTARGET opens, as shown in the
following image. Gateways is selected in the Menu pane on the left.
On the right, information about Headers appears.
-
Scroll
to the bottom and type a value for the PRIMARYURL.
This is the default HTTP address (machine and port) on
which your PeopleSoft XML Listener is listening for incoming messages.
Note: For
complex business situations, you can override this setting on the
individual node.
-
Click OK.
The Gateway window opens.
-
Scroll
to the bottom of the window and click Save.
You have
finished configuring the gateway for the HTTP Target Connector.
x
Procedure: How to Configure the Node to Use the HTTP Connector
To configure
the node to use the HTTP Connector:
-
In the Menu pane, expand PeopleTools, Integration
Broker, and then click Node Definitions.
-
Select
the node that you want to configure.
This procedure uses a node called EXTERNAL. For more information
about creating and using nodes, see Using PeopleSoft 8 Integration Broker or your PeopleSoft documentation.
The
following image shows the Node Info tab for External node on the
right. It includes the following: Description, Company ID, Hub Node,
Master Node, Image Name, and Code Set Group Name fields; Node Type,
Routing Type, and Authentication Options lists; Active Node, Local
Node, Default Local Node, and Non-Repudiation check boxes; and Copy,
Rename, and Delete buttons.

-
From the Node Type drop-down list, select External.
-
From the Routing Type drop-down list, select Implicit.
-
Select
the Connectors tab.
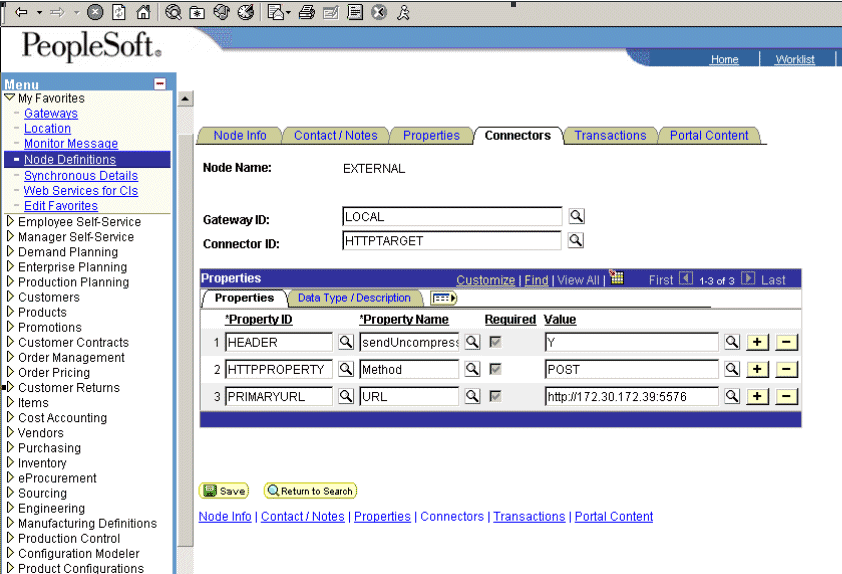
The following image shows the PeopleSoft Integration Broker
Connectors tab for the External node. It includes the following:
Gateway ID, Connector ID, Property ID, Property Name, and Value
fields and Save and Return to Search buttons.
-
Change the Connector ID to HTTPTARGET.
-
Type a value for each property based on the information in
the following table.
|
Property ID
|
Property Name
|
Value
|
|---|
|
HEADER
|
sendUncompressed
|
Y
|
|
HTTPPROPERTY
|
Method
|
POST
|
|
PRIMARYURL
|
URL
|
URL and the port of the HTTP listener
|
Note: For complex business situations
you can configure multiple nodes and multiple listeners.
-
Click Save.
-
If you are warned that you are changing the Connector, click OK.
-
Select
the Transactions tab.
The following image shows the Transactions tab selected.
It contains the node name, Transaction information, and the Add
Transaction, Save, and Return to Search buttons.

-
If there
are no transactions, click Add Transaction.
In this procedure, the node is already configured with
the LOCATION_SYNC message.
The following image shows the PeopleSoft
Integration Broker Transaction Detail tab for the External node.
It contains information for the following: Effective Date, Status,
Transaction Type, Request Message, Request Message Version, and
Routing Type. Currently, the Comment field is empty.

You can add the message
with which you are working.
-
Verify that the Routing Type is Implicit.
-
Click Save.
-
Click Return
to Transaction List.
-
If there are other transactions, edit them.
-
Set the status to Inactive.
Inactive status is for initial testing only. After you
test your configuration, you can change the status to Active and
have as many nodes and transactions as required to satisfy your
business requirements.
-
Click Save.
You are
ready to send XML messages to your PeopleSoft XML Listener.


