
In this section: |
If you choose to create a profile using a plan, then the canvas will contain the following plan:
This simple plan contains the following steps:
Double-click the Profiling step to open the Profiling Step Editor. You can modify the existing configuration and add additional analyses to run, as shown in the following image.
There are two categories of settings in the Profiling Step Editor:
This section describes the different tabs found in the General category.
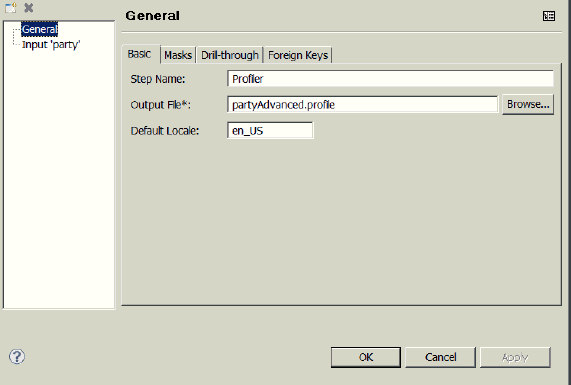
The Basic tab contains fields for specifying the step name, output file name, location, and default locale for the generated files.
The Masks tab contains the masks that have been defined and is where new masks can be created and edited. A mask is a way of showing the structure of the data rather than the content of the data. User defined codes are used instead of the actual characters in the data to describe these patterns. For example, the mask D could be used to represent a digit, while L could be used to represent a letter. The codes and rules for the masks can be defined here.
Each mask configuration contains the following settings:
Multiple characters can be used in the same mask (for example, [:digit:][:white:]). Characters that are not masked, will be shown as they are in the data when Copy others is selected. For example, if only numbers are masked, the Mask results could show # main street in an address field, for example, where # is a numerical mask for a sequence of digits.
The Repeated Symbol and Repeated Threshold fields may to left blank to mask all characters individually regardless of the sequence length, as shown in the following image.
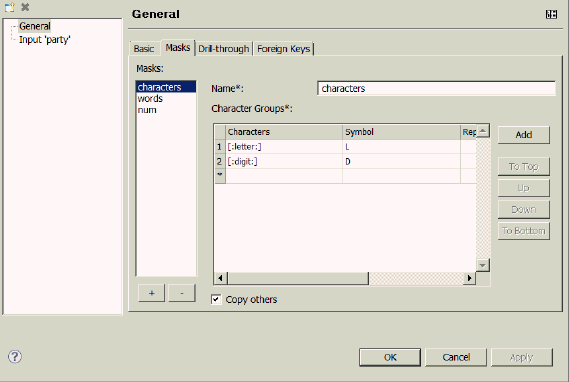
To create a new mask, click the Add (+) button at the bottom of the list of masks. To delete a mask, click the dash (-) button. A mask may contain multiple masking rules (called character groups), as shown in the image above. To add a new character group, click the Add button. The order of character groups might be important when creating a mask with several character groups, one of which is a subset of another, especially when the [:all:] character type is used in conjunction with other types. For example, if you want to mark all letters with L, all digits with D, and any other symbol with $, the rule containing [:all:] should be placed last in the list. Use the To Top, Up, Down and To Bottom buttons to change the placing of rules relative to each other.
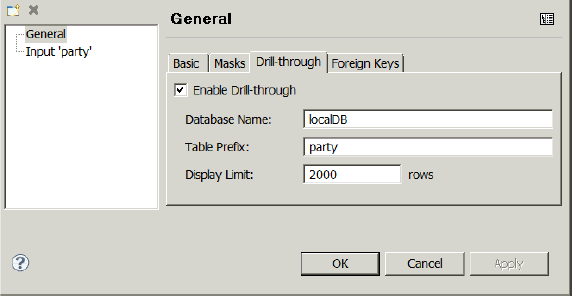
The Drill-through tab specifies whether drill-through functionality should be used or not. Enabling drill-through allows you to inspect the individual records that comprise the generated statistics and other measures shown in the Profile viewer. Because it will store additional fields, it requires a database connection for use.
To allow drill-through in the generated profile, click Enable Drill-through, as shown in the following image.
The following list describes theparameters of the Drill-through tab.
When drill-through is enabled, it can be used by right-clicking on many of the statistics shown in the profile viewer (for example, Median value) and selecting Drill-through.
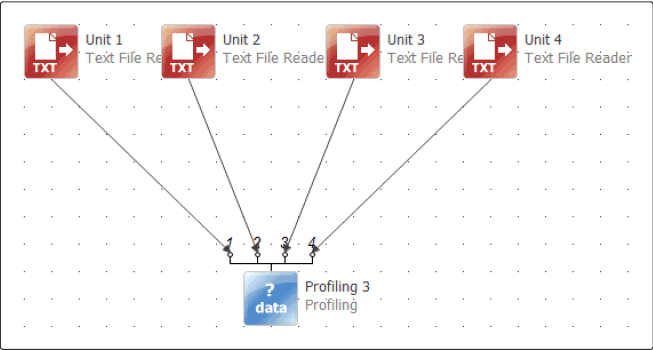
Foreign Key analysis can be performed when there are two or more different inputs connected to the same Profiling step. Create a new Foreign Key analysis by clicking the Add (+) button at the bottom of the list, similar to creating a new Mask analysis. Then enter the names of the inputs to analyze in the Left Input Name and Right Input Name fields. Content-assist (Ctrl + Space) can be used to list the inputs of the step. You can then use the Components fields to enter the column(s) from each input to analyze.
The Input category contains settings that are specific to each Profiling step input. To add a new input to the Profiling step, click the above category list. This adds a new connection point to the step icon in the Plan editor, so that a new input (for example, Text File Reader or JDBC Reader step) can be connected. After this, all additional inputs should be configured in terms of data to profile ( Data tab) and optionally, other tabs as described in the following sections.
The adjacent Remove button can be used to delete an input.
The following image shows the Input Category.

The following image shows the multiple profiling inputs.
The Data tab shows all the data that will be profiled. It also contains the individual settings for each column to be profiled. By default, the settings that are defined in the Create Profile wizard area apply to all columns, but this tab allows configuring each column separately.
When connected to an incoming step (such as Text File Reader), the Fill Columns button can be used to automatically add columns that are connected to the input, rather than manually typing the incoming column names. The Type column uses the types defined in the originating input step (for example, Text File Reader) and is for reference only. To change the data type of a column, use the Metadata Editor or input step.
The Dependencies tab can be used to define an analysis to test the dependency of the fields in one column on the fields in other columns, such as whether birth number is related in some way to birth date. For more details on dependency analysis, go to the product Help and search for the Profiling step.
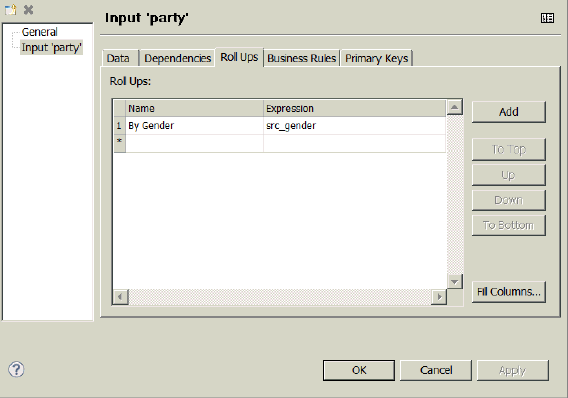
A Roll Up is a way to look at a specific subset of the profiled data. Entering a column name in the Roll Ups Expression field will create a list of separate profile analyses for each value of that column. For example, if the data contains a column of genders, creating a roll up of this column will allow viewing profile results for each gender value in that column, including empty rows, which might reveal new patterns in the data. When a roll up is defined, the Inputs and Roll Ups panel will be shown in the Profile Viewer, as shown in the following image.
A business rule is a Boolean expression that is evaluated and its results are presented in the Profile Viewer, as shown in the following image.
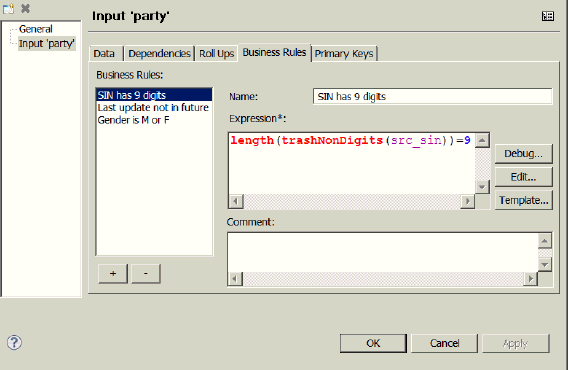
See the Expressions Help page for a description of available expressions and their usage by clicking on Help and then selecting Help Contents to search for Expressions.
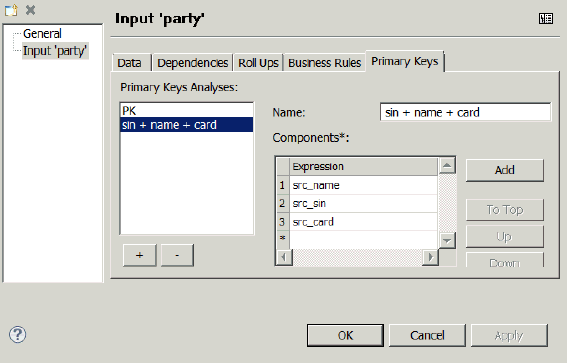
To analyze the uniqueness of a particular column and determine whether it is a primary key, add a new primary key analysis and enter the name of the column to analyze in the Expression field of the Components section. Several columns can be analyzed in conjunction, as shown in the following image.
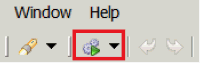
To create the profile, click the Run button in the toolbar, as shown in the following image.
The profile appears in the location specified in Output File field of the Basic tab. If you specify only the file name, the profile will be created in the same folder that the plan is in, as shown in the following image.

| iWay Software |