-
Click Create Data Profile in
the Manage Data Quality Profiles page.
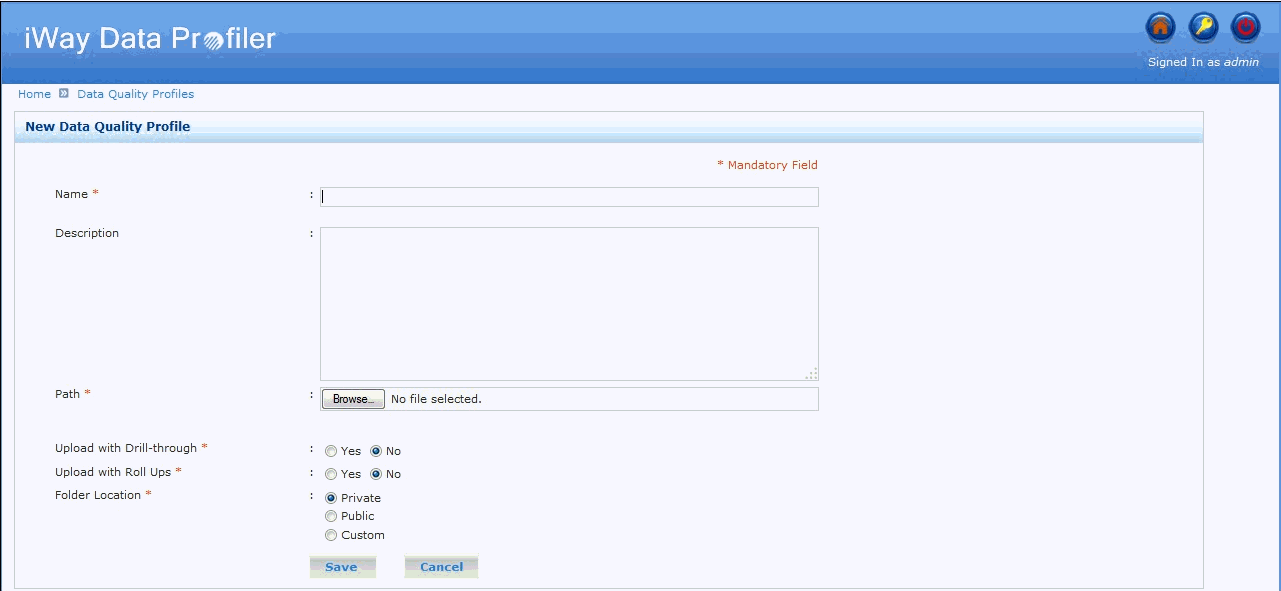
The New Data Quality Profile pane opens, as shown in the following image.
-
To create a new data quality profile, enter or select
values for the following fields:
-
Profile Name. The Profile Name value is required
and must not exceed 50 characters. Only alphanumeric characters,
spaces, and underscores (_) are allowed.
Note: Do not use the same profile name for two or more data quality profiles for the same user.
- Description. The description is optional and must not exceed 200 characters.
- Path. The path to the XML file generated by DQS is required. The XML file must be valid. The size of the XML file must not be less than 1KB and must not exceed 300MB.
-
Upload with Drill-through. Only users who have the required
drill-through privilege set by the administrator in the Roles section
of the Security Center page, will see the Upload with Drill-through
option in this section.
For more information regarding detailed functionality of creating profiles with drill-through, see Creating and Exporting Data Quality Profiles Using iWay Data Quality Server.
Note: When a user tries to upload a profile with or without drill-through information, depending on their privileges, the following scenarios may occur:
a. The user does not have the required privileges to upload a drill-through profile.
- If a user uploads a profile without drill-through information, then the profile is uploaded successfully.
- If a user uploads a drill-through profile, then the profile is uploaded successfully without drill-through information.
b. The user has the required privileges to upload a drill-through profile.
- If a user uploads a profile with drill-through information and selects Yes for the Upload with Drill-through option, then the profile is uploaded successfully.
- If a user uploads a profile without drill-through information and selects Yes for the Upload with Drill-through option, a warning message is displayed indicating that the Upload with Drill-through option is selected, but the profile is missing drill-through information. If you click OK, the profile will be uploaded without drill-through information. If you click Cancel, the current data quality profile creation process is canceled.
- If a user uploads a drill-through profile and selects No for the Upload with Drill-through information option, a warning message is displayed indicating that the Upload Profile having Drill-through information without Drill-through option is selected. If you click OK, the profile will be uploaded without drill-through information. If you click Cancel, the current data quality profile creation process is canceled.
- If a user uploads a profile without drill-through information and selects No for the Upload Drill-through information option, then the profile is uploaded successfully.
-
Upload with Roll Ups. Only users who have the required
Roll Up privilege set by the administrator in the Roles section
of the Security Center page, will see the Upload with Roll Ups option
in this section.
Note: When a user tries to upload a profile with or without roll up information, depending on their privileges, the following scenarios may occur:
a. The user does not have the required privileges to upload a roll up profile.
- If a user uploads a profile without roll up information, then the profile is uploaded successfully.
- If a user uploads a roll up profile, then the profile is uploaded successfully without roll up information.
b. The user has the required privileges to upload a roll up profile.
- If a user uploads a profile with roll up information and selects Yes for the Upload with Roll Ups option, then the profile is uploaded successfully.
- If a user uploads a profile without roll up information and selects Yes for the Upload with Roll Ups option, a message is displayed indicating that the Upload with Roll Ups option is selected, but the profile is missing the roll up information.
- If a user uploads a Roll Up profile and selects No for the Upload with Roll Ups option, a message is displayed indicating that Uploading a profile having Roll Up information without Roll Up option is selected. If you click Ok, the profile will be uploaded without Roll Up information. If you click Cancel, the current data quality profile creation process is canceled.
- If a user uploads a profile without roll up information and selects No for the Upload with Roll Ups option, then the profile is uploaded successfully.
-
Folder Location. Select one of the available folder location
options (Private, Public,
or Custom). If the custom option is selected,
you must select one of the custom folders from the drop-down list.
- If you select Private, only you can view the data quality profile.
- If you select Public, everyone can view the data quality profile.
- If you select Custom, the data quality profile is viewable only by the users who have access to the selected folder. For detailed functionality of these folders, see Managing the Security Center.
-
Profile Name. The Profile Name value is required
and must not exceed 50 characters. Only alphanumeric characters,
spaces, and underscores (_) are allowed.
-
Click Save to save the data quality profile.
A confirmation message is displayed.
You can click Cancel to cancel the data quality profile creation process.
You will return to the Manage Data Quality Profiles page.
Note: A message indicating that the data quality profile was created successfully is displayed in the Manage Data Quality Profiles page.