On UNIX or Linux platforms, installing as root is not recommended. Creating a dedicated User and Group with appropriate rights is preferred.
To install iWay Data Profiler on UNIX or Linux:
-
Copy the
following installation files to a directory on your system:
- installer-mm-dd-yyyy-OSXX
- Iway-iDP-9.0.1.ga-mm-dd-yyyy-OSXX.sh
where:
- mm-dd-yyyy
-
Specifies the date of the iDP build.
- OS
-
Specifies the operating system (for example, Linux).
- XX
-
Specifies the 64-bit version of Linux.
For example, iWay-iDP-9.0.1.ga-01-05-2014-Linux64.sh.
- Use FTP in binary mode to transfer the installation files to your UNIX or Linux system.
- Navigate to the directory containing the installation files.
-
Ensure that you have the correct privileges to execute
the installation file.
Note: If you do not have the correct privileges, enter the following command at the command prompt to use the execute privilege on the installation file:
chmod 755 iWay-iDP-9.0.1.ga-02-10-2015-Linux64.sh
-
Enter the
following command at the command prompt to start the iDP installation:
./iWay-iDP-9.0.1.ga-02-10-2015-Linux64.sh
The installation may take a few moments to initialize.
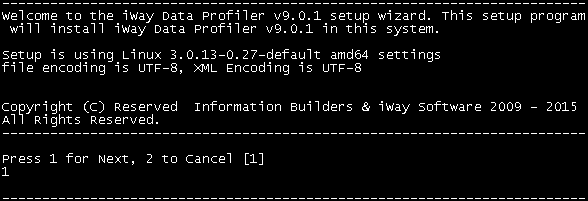
Once the installation is initialized, the following welcome prompt is displayed, as shown in the following image.
-
Type 1 and
then press Enter to continue.
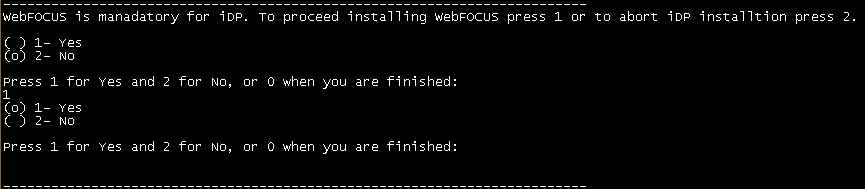
A confirmation message is displayed, which prompts you to specify whether an existing version of WebFOCUS Release 8.0 Version 08 is already installed, as shown in the following image.

-
If WebFOCUS is currently installed on your system, then
type 1 and press Enter. If WebFOCUS is currently
not installed on your system, then type 2 and
press Enter.
The following prompt is displayed, which determines whether you want to proceed with installing WebFOCUS during the iDP installation.
-
Type 1 to install WebFOCUS Release
8.0 Version 08 along with iDP. If 2 is selected,
WebFOCUS Release 8.0 Version 08 will not be installed along with
iDP.
Note: The installation only installs WebFOCUS Reporting Server Release 8.0 Version 08M and WebFOCUS Client Release 8.0 Version 08. iDP Version 9.0.1 is also compatible with WebFOCUS Reporting Server Release 8.0 Version 08M and WebFOCUS Client Release 8.0 Version 08.
-
Press Enter to continue.
The iWay Data Profiler Software License Agreement is displayed, as shown in the following image.
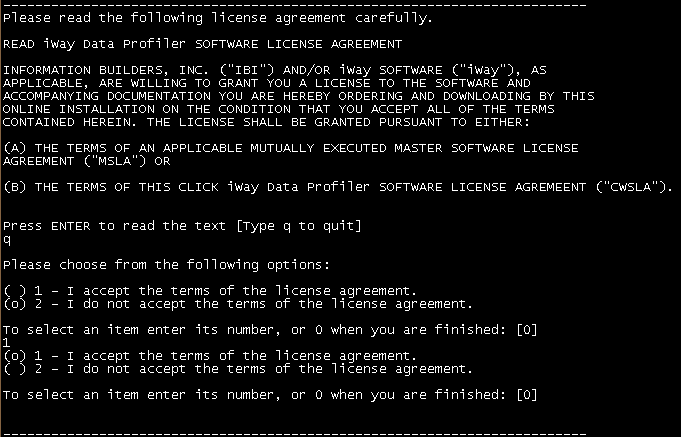
- Press Enter to scroll through the entire license agreement until the prompt asking whether you want to accept the license agreement is displayed.
- Type 1 and press Enter if you accept the terms of the license agreement.
-
Press Enter
to continue.
The iDP Installation Type prompt is displayed, as shown in the following image.
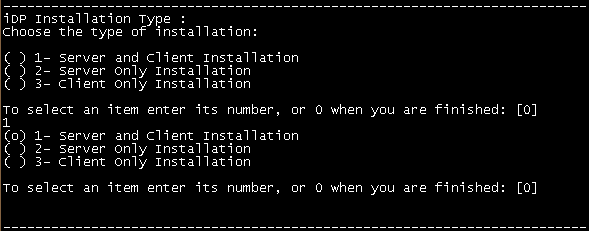
Select one of the following options for the iDP Installation Type prompt:
- 1 - Server and Client Installation. If the WebFOCUS Reporting Server and WebFOCUS Client are installed on the same system, then select this option to install iWay Data Profiler Server (idp) and Client (idpweb).
- 2 - Server Only Installation. If only the WebFOCUS Reporting Server is installed on this system, then select this option to install iWay Data Profiler Server (idp).
- 3 - Client Only Installation. If only the WebFOCUS Client is installed on this system, then select this option to install iWay Data Profiler Client (idpweb).
-
Type 1 and
then press Enter to continue.
The prompt is refreshed with your selection.
-
Press Enter
to continue.
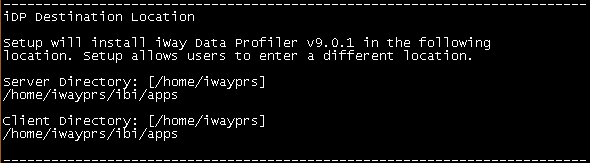
The iDP Destination Location prompt is displayed, as shown in the following image.

Note: The root directory of the user account that is currently logged in and executing the iDP installation is used by the installer. Ensure that the specified folder where iDP or WebFOCUS will be installed has privileges enabled to create files.
-
Specify the following path for the Server Directory:
<root>/ibi/apps
where:
- <root>
Is the root directory of the user account that is executing the iDP installation. For example:
/home/iwayprs
Note: By default, the iDP Server is installed in the following path:
<root>/ibi/apps/idp
-
Press Enter
to continue.
The Client Directory prompt is displayed, as shown in the following image.
Note: The Server Directory prompt is not displayed if you selected the Client Only Installation option for step 12. The Client Directory prompt is not displayed if you selected the Server Only Installation option for step 12. If you selected the Server Only Installation option, then skip steps 24 to 40.
-
Specify the following path for the Client Directory:
<root>/ibi/apps
where:
- <root>
Is the root directory of the user account that is executing the iDP installation. For example:
/home/iwayprs
Note: By default, the iDP Client is installed in the following path:
<root>/ibi/apps/idpweb
-
Press Enter to continue.
The iDP Server and iDP Client directory locations will be validated and the iDP installation will proceed.
Notes:
- If the same version of iDP already exists in the path that is
provided, a message is displayed prompting you to reinstall iDP,
as shown in the following image.

If option 1 is selected, the iDP installer will replace the existing files in the path that is provided. If option 2 is selected, you are returned to the previous step.
- If an earlier version of iDP already exists in the path that
is provided, a prompt is displayed, asking you to upgrade to the
latest iDP version or install a separate iDP version to coexist
with the existing version, as shown in the following image.
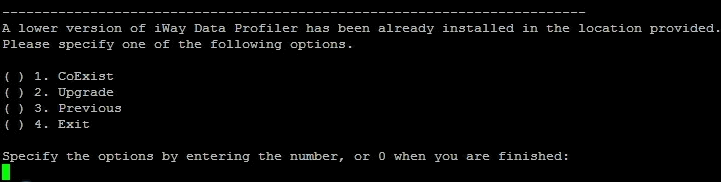
If option 1 (CoExist) is selected, you are prompted to enter a different location to coexist with the earlier version of iDP. If you select option 2 (Upgrade), you can upgrade your previous version of iDP.
- Upgrade refers to the replacement of the existing version of iDP with a newer version of iDP.
- CoExist refers to retaining an earlier version of iDP with a newer version of iDP on the same system.
- If a later version of iDP already exists in the path that is
provided, a prompt is displayed asking you to install a separate
iDP version to coexist with the existing version or downgrade to
an earlier iDP version, as shown in the following image.
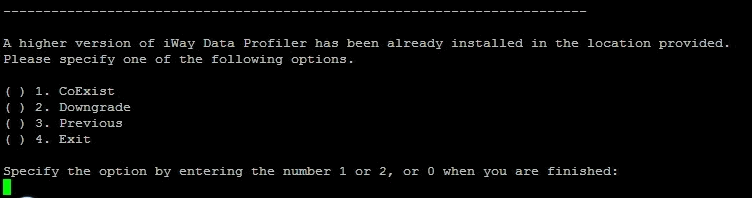
If option 1 (CoExist) is selected, you are prompted to enter a different location to coexist with the earlier version of iDP. If option 2 (Downgrade) is selected, the later version of iDP will be downgraded to a lower version in the same path.
- If the same version of iDP already exists in the path that is
provided, a message is displayed prompting you to reinstall iDP,
as shown in the following image.
-
Press Enter to continue.
The Select the Web/Application Server prompt is displayed, as shown in the following image.
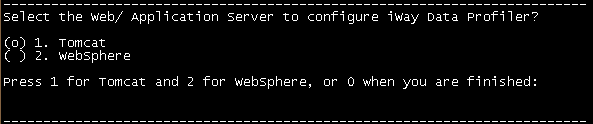
-
Select 1 to configure Apache Tomcat
as the designated Web/Application Server for iDP.
Note: Do not select WebSphere as the Web/Application server. iDP Version 9.0.1 does not support IBM WebSphere.
The WebFOCUS Configurations prompt is displayed, as shown in the following image.
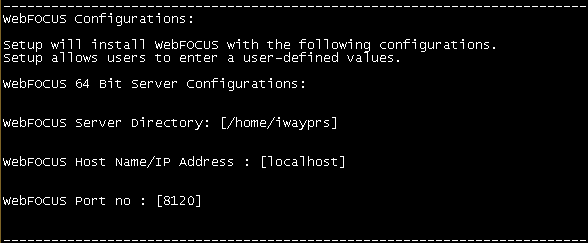
Note: If the option to install WebFOCUS is selected during the iDP installation (step 8), then the WebFOCUS Configuration prompt is displayed and requests the WebFOCUS Reporting Server credentials.
-
Specify the following WebFOCUS Reporting Server credentials:
-
WebFOCUS Server Directory. The directory for
the WebFOCUS Reporting Server.
Press Enter to accept the default value and continue. The default directory for the WebFOCUS Reporting Server is:
<root>/ibi/srv80/home
where:
- <root>
Is the root directory of the user account that is executing the iDP installation. For example:
/home/iwayprs
- WebFOCUS Host Name/IP Address. The host name of the WebFOCUS Reporting Server (for example, localhost).
- WebFOCUS Port no. The base TCP port for the WebFOCUS Reporting Server (for example, 8120).
-
WebFOCUS Server Directory. The directory for
the WebFOCUS Reporting Server.
-
Press Enter to continue.
The WebFOCUS 64 Bit Client Configuration prompt is displayed, as shown in the following image.
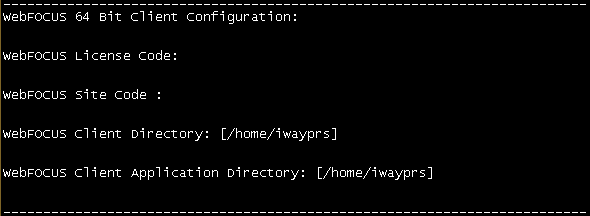
Note: If the option to install WebFOCUS is selected during the iDP installation (step 8), then the WebFOCUS Configuration prompt is displayed and requests the WebFOCUS Client credentials.
-
Enter the following WebFOCUS Client credentials:
- WebFOCUS License Code. Provide the valid License code for a successful WebFOCUS client installation.
- WebFOCUS Site Code. Provide the valid Site code for a successful WebFOCUS client installation.
-
WebFOCUS Client Directory. The
directory for the WebFOCUS Client.
Press Enter to accept the default value and continue. The default directory for the WebFOCUS Client is:
<root>/ibi/WebFOCUS80
where:
- <root>
Is the root directory of the user account that is executing the iDP installation. For example:
/home/iwayprs
-
WebFOCUS Client Application Directory. The applications
directory for the WebFOCUS Client.
Press Enter to accept the default value and continue. The default directory for the applications directory is:
<root>/ibi/apps
where:
- <root>
Is the home directory of the user account that is executing the iDP installation. For example:
/home/iwayprs
-
Press Enter to continue.
A Tomcat installation prompt is displayed, which determines whether or not you want to install Apache Tomcat, as shown in the following image.
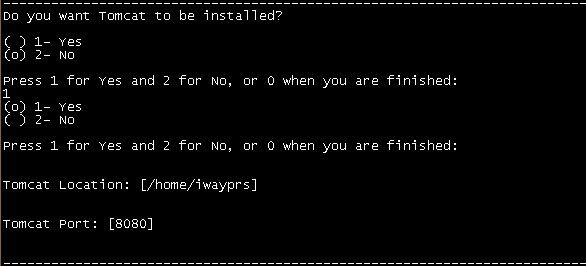
Select 1 if you want to install Apache Tomcat.
Note: If option 2 is selected, then the iDP installer will prompt you for the existing Apache Tomcat Host Name/IP Address and Tomcat Port number.
-
If the option to install Apache Tomcat is selected, then
provide the Apache Tomcat location where you want to install the
server and the port number.
By default, Apache Tomcat is installed in the following path:
<root>/ibi/Tomcatwhere:
- <root>
Is the root directory of the user account that is executing the iDP installation. For example:
/home/iwayprs
The default port number for Apache Tomcat is 8080.
Note: Apache Tomcat will be started automatically by the iDP installer.
-
Press Enter
to continue.
The Select Your Database prompt is displayed, as shown in the following image.

-
Type the
number that corresponds to the database you are configuring for
iDP (for example, 4 - ORACLE).
Notes:
- You can only specify one database at a time.
- For demonstration purposes, this procedure will select and configure Oracle as the database to be used for iDP.
-
Continue
to press Enter and provide the DB User Name, DB Password, and Confirm
DB Password values, as shown in the following image.

Note: In use cases involving an Oracle database (schema), all tables and related objects are owned by a user account. A user ID and a schema share the same name (for example, idp_data).
Ensure that the DB Password and Confirm DB Password values are the same (for example, idp_data).
-
Press Enter to continue.
Default values for the selected Oracle database are listed, as shown in the following image.

-
Press Enter
to continue.
You are prompted for the DB Host Name/IP Address, DB Port Number, Oracle SID, iDP DB Schema, WebFOCUS DB Schema, and JDBC Path assignments, as shown in the following image.
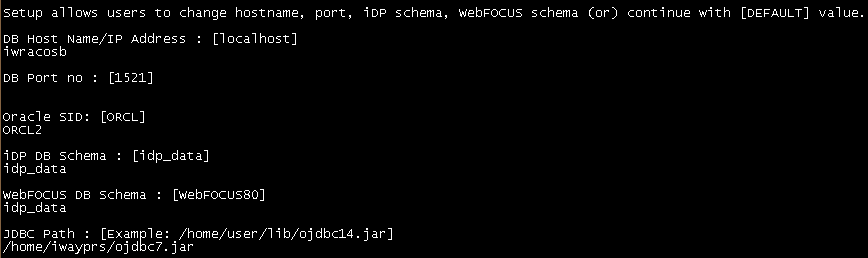
Notes:
- Ensure that a schema called idp_data is created and exists in the database that will be used with iDP for a successful WebFOCUS Client installation
- In the case of an Oracle database (schema), all tables and related objects are owned by a user account. A user ID and a schema share the same name. As a result, during an iDP installation, you cannot have different schemas for iDP tables and WebFOCUS repository tables.
-
After specifying values for the corresponding database
parameters, press Enter to continue.
The Drill-through DB selection prompt is displayed, as shown in the following image.
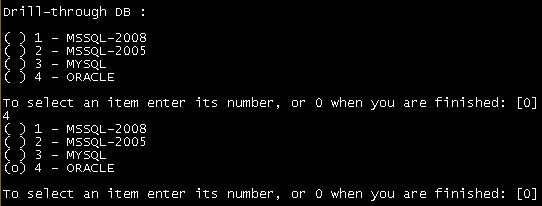
-
Select a
drill-through database from the list (for example, 4 - ORACLE).
Note: This drill-through database is used by iWay Data Profiler to access the drill-through tables created by iWay Data Quality Server (DQS).
-
Press Enter to continue.
The Choose for Plan selection prompt is displayed, as shown in the following image.

-
Continue to press Enter to provide the DB User Name,
DB Password, and Confirm DB Password values (for example, idp_data)
with respect to the drill-through database selected in DQS, as shown
in the following image.

-
Press Enter to continue.
You are prompted for the DB Host Name/IP Address, DB Port number, and DB Schema assignments, as shown in the following image.
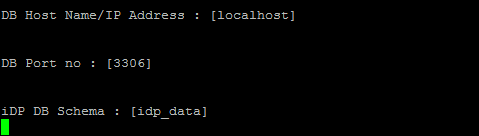
-
Press Enter
to continue.
A Language selection prompt is displayed, as shown in the following image.

-
Select the
language that you want to install with iDP and press Enter to specify
whether you require the multilingual (UTF-8) format.
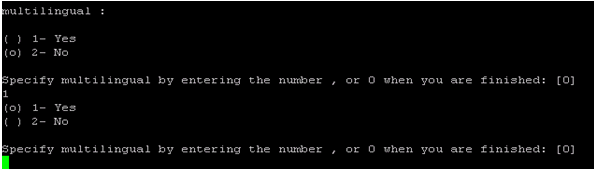
Note: Ensure that the multilingual (UTF-8) format is selected for all languages other than English. For English, selection of the multilingual (UTF-8) format is optional.
-
Press Enter
to continue.
The Enable Mail selection prompt is displayed, as shown in the following image.
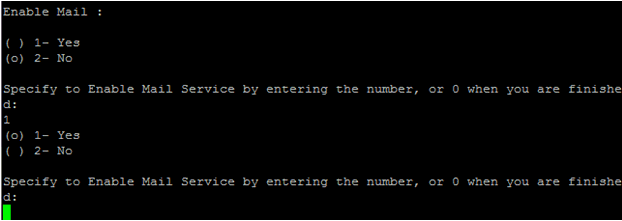
-
Type 1 or 2.
Typing 1 enables the option to send a profile report as an email attachment in the Export profile page of the iDP console.
-
Continue
pressing Enter to provide the following email credentials to receive
the email reports:
- Mail hostname. Provides the host name of the mail server.
- SMTP Port. Provides the SMTP port number pertaining to the host name.
- Use secure connection (SSL). If Yes is selected, you can send an email using a Secure Sockets Layer (SSL) connection to the mail server.
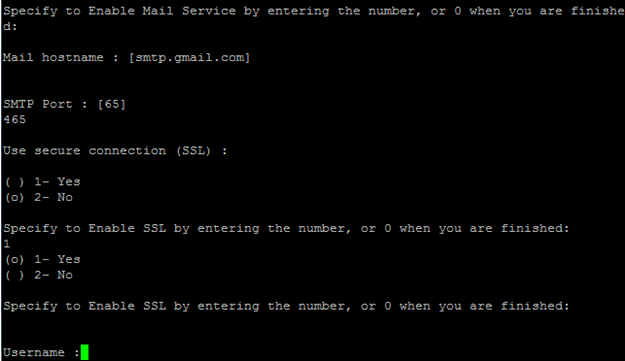
- Username. Type a valid user name for the mail server.
- Mail Password. Type a valid password to access the mail server.
-
Confirm Mail Password. Retype
the Mail Password for confirmation.
Note: Ensure that the Mail Password and Confirm Mail Password entries are the same.
- Host Email. Provide a valid email address of the sender, from which all emails will be sent.

-
Press Enter to continue.
The Server Manager Login Credentials prompt is displayed, as shown in the following image.
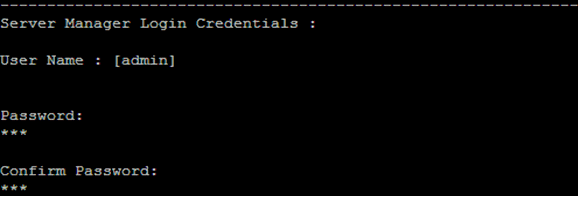
Note: The login credentials being requested here are for the iWay Data Profiler - Server Manager console only, which is used to modify the property settings that are used by iDP (for example, Data Profiler settings and Logger settings).
Ensure that the Password and Confirm Password entries are the same.
-
Press Enter
to continue.
The installer starts copying the files and displays the configuration details, as shown in the following image.
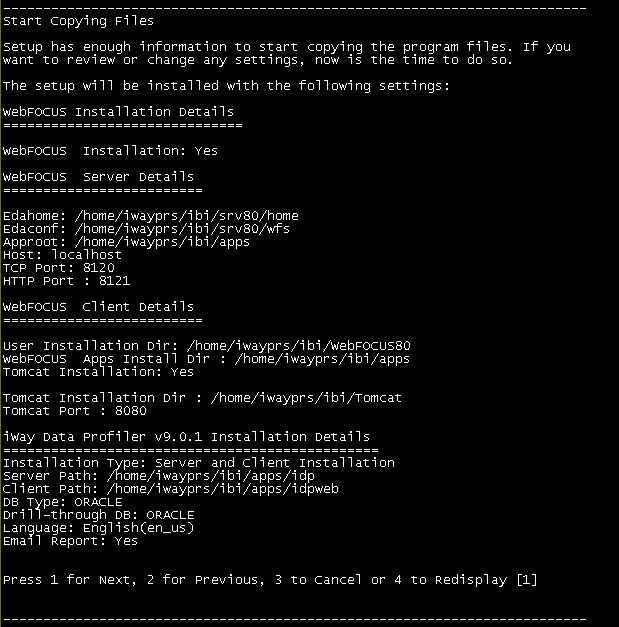
Note: The settings are displayed based on the Installation type.
-
Press Enter to
confirm the settings.
The installer copies the files with the required settings.

Note: If WebFOCUS Reporting Server and WebFOCUS Client are also being installed, then the overall installation time will be extended.
When the iDP installation process has finished, the Setup Completes pane opens, as shown in the following image.
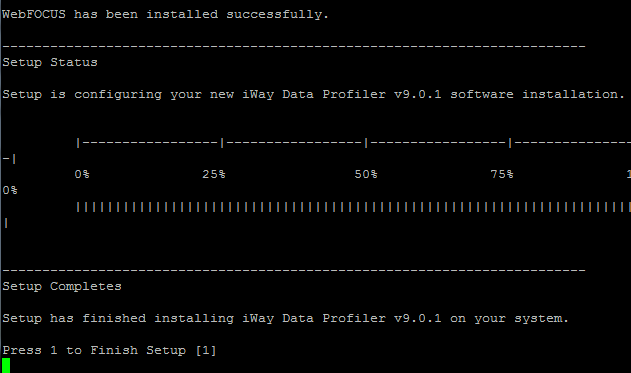
When the installation process has finished, the Setup Completes prompt opens, as shown in the following image.
