You can generate both XML request and response document
schemas using iWay Explorer. This topic describes how to generate
these schemas for the three GeoLoad target types.
x
Generating Schemas for Geocoding
The following procedure explain how to generate schemas
for request and response documents for a geocoding target.
x
Procedure: How to Generate Schemas for Geocoding
-
Connect
to the Geocoding target for which you want to generate the schema.
-
Expand
the target and the AddressRoot node.
-
Select
the GeoCoding node.
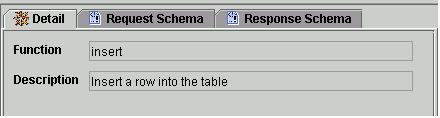
Three tabs (Details, Request Schema, Response Schema) appear
on the right, as shown in the following image.

-
Select
either the Request Schema tab or the Response
Schema tab, as needed.
The schema appears on the right under the selected tab.
-
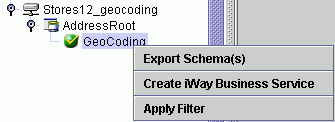
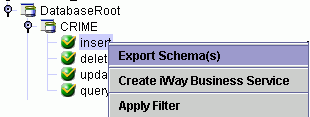
To save
the schema to a file, right-click the GeoCoding node
and select Export Schema(s), as shown in
the following image.
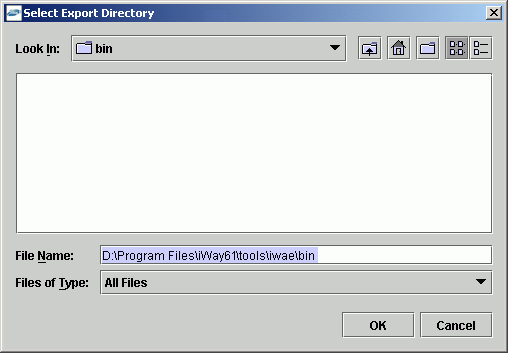
The
Select Export Directory window opens, as shown in the following
image. This window allows you to navigate to a directory, name the
file, and select the file type to save.
-
Select the directory in which you want the schema files to
reside, type a name for the file (if you want a name other than
the default), and select the file type.
-
Click OK.
Both the request and response schemas are saved to the
named directory as text files.
-
Import
the schema files into an XML editor, such as XML Spy.
-
In the
XML editor, create the request and response documents for the specific
geocoding task.
The following
reference items show the request document schema and response document
schema generated by the iWay Technology Adapter for ESRI.
x
Reference: Geocoding Request Schema
The
following is the schema for a Geocoding request document.
<?xml version="1.0" encoding="UTF-8" ?>
  <!-- Generated by the iBSE 2004-12-28T20:22:04Z -->
- <xs:schema xmlns:xs="http://www.w3.org/2001/XMLSchema">
  - <xs:element name="address_geocoding_request">
    - <xs:complexType>
      - <xs:sequence>
        - <xs:element name="record" minOccurs="0" maxOccurs="unbounded">
          - <xs:complexType>
            - <xs:sequence>
              <xs:element name="street" type="xs:string" />
              <xs:element name="city" type="xs:string" />
              <xs:element name="state" type="xs:string" />
              <xs:element name="country" minOccurs="0" type="xs:string"/>
              <xs:element name="zipcode" type="xs:string" />
             </xs:sequence>
           </xs:complexType>
         </xs:element>
       </xs:sequence>
     </xs:complexType>
   </xs:element>
 </xs:schema>
x
Reference: Geocoding Response Schema
The
following is the schema for a Geocoding response document.
  <?xml version="1.0" encoding="UTF-8" ?>
  <!-- Generated by the iBSE 2004-12-28T20:22:04Z -->
- <xs:schema xmlns:xs="http://www.w3.org/2001/XMLSchema">
  - <xs:element name="address_geocoding_response">
    - <xs:complexType>
      - <xs:sequence>
        - <xs:element name="record" minOccurs="0" maxOccurs="unbounded">
          - <xs:complexType>
            - <xs:sequence>
              <xs:element name="street" type="xs:string" />
              <xs:element name="city" type="xs:string" />
              <xs:element name="state" type="xs:string" />
              <xs:element name="country" minOccurs="0" type="xs:string"/>
              <xs:element name="zipcode" type="xs:string" />
             </xs:sequence>
           </xs:complexType>
         </xs:element>
       </xs:sequence>
     </xs:complexType>
   </xs:element>
   <xs:element name="Locator" minOccurs="0" maxOccurs="unbounded">
   - <xs:complexType>
     - <xs:sequence>
        <xs:element name="locationX" type="xs:string" />
        <xs:element name="locationY" type="xs:string" />
        <xs:element name="XYScale" type="xs:string" />
        <xs:element name="Standard_Street_Name" minOccurs="0"
         type="xs:string" />
        <xs:element name="Standard_City_Name" type="xs:string" />
        <xs:element name="Standard_State_Name" type="xs:string" />
        <xs:element name="Standard_Country_Name" type="xs:string" />
        <xs:element name="Standard_Zipcode" type="xs:string" />
        <xs:element name="Rationale" minOccurs="0" type="xs:string" />
        <xs:element name="Block" type="xs:string" />
        <xs:element name="Block_Group" type="xs:string" />
        <xs:element name="Cbsa" type="xs:string" />
        <xs:element name="County" type="xs:string" />
        <xs:element name="Matched_Side" minOccurs="0" type="xs:string" />
        <xs:element name="Matched_Status" type="xs:string" />
        <xs:element name="Mcd" type="xs:string" />
        <xs:element name="Msa" type="xs:string" />
        <xs:element name="Place" type="xs:string" />
        <xs:element name="Previous_Msa" minOccurs="0" type="xs:string" />
<xs:element name="State_Fips" type="xs:string" />
<xs:element name="Tract" type="xs:string" /> </xs:sequence>
</xs:complexType>
</xs:element>
</xs:sequence>
</xs:complexType>
</xs:element>
</xs:schema>
x
Generating Schemas for ESRI Loading
The following procedure explains how to generate schemas
for request and response documents for an ESRI Loading target.
x
Procedure: How to Generate Schemas for ESRI Loading
To generate
schemas for ESRI Loading:
-
Connect
to the ESRI Loading target for which you want to generate schema.
-
Expand
the target and the ESRIRoot node.
-
Select
the database table for which you want to generate schema.
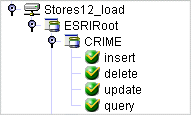
On the left, the table node expands to display four table
functions; insert, delete, update, and query. The following image
shows an example of an expanded database table named CRIME.
The
table functions are:
-
Insert -
inserts a row into the selected table.
-
Delete -
deletes a row from the selected table.
-
Update -
updates one or more rows in the selected table.
-
Query -
queries a row in the selected table.
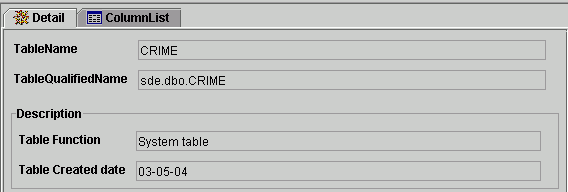
Descriptive information
about the table appears on the right under the Detail tab.
A second tab, ColumnList, also appears. The Detail display provides
the table name and qualified name, as well as a description of its function
and the date it was created. An example of a detail display for
a table named CRIME is shown in the following image.
-
To see
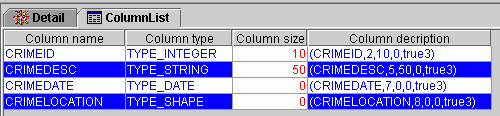
the fields in the table (that is, the metadata), click the ColumnList tab.
An example of ColumnList information appears in the following image.
This images shows the name, type, size and description of each column
in the example table.
-
Select
the table function (insert, delete, update, or query) for which
you want to generate schema.
The Request Schema and Response Schema tabs appear next
to the Detail tab, as shown in the following image.
-
Select
either the Request Schema tab or the Response
Schema tab to view a schema.
The schema appears on the right under the selected tab.
-
To save
the schema to a file, right-click the table function on the left
and select Export Schema(s), as shown in
the following image.
The Select Export
Directory window opens, as shown in the following image. This window
allows you to navigate to a directory, name the file, and select
the file type to save.
-
Select the directory in which you want the schema files to
reside, type a name for the file (if you want a name other than
the default), and select the file type.
-
Click OK.
Both the request and response schemas are saved to the
named directory as text files.
-
Import
the schema files into an XML editor, such as XML Spy.
-
In the
XML editor, create the request and response documents for the specific
geocoding task.
The following
reference items show the request and response document schema generated
by the iWay Technology Adapter for ESRI for insert and delete. Use
the procedure to generate schema to view the schema for the update
and query functions.
x
Reference: Insert Request Schema
The
following is the schema for ESRI loading insert request document.
<?xml version="1.0" encoding="UTF-8" ?>
 <xs:schema xmlns:xs="http://www.w3.org/2001/XMLSchema">
   <xs:element name="arcsde_CRIME_insert_request">
      <xs:complexType>
         <xs:sequence>
           <xs:element name="record" minOccurs="0" maxOccurs="unbounded">
             <xs:complexType>
               <xs:sequence>
                 <xs:element name="CRIMEID" type="xs:integer" />
                 <xs:element name="CRIMEDESC" type="xs:string" />
                 <xs:element name="CRIMEDATE" type="xs:date" />
                 <xs:element name="CRIMELOCATION">
                   <xs:complexType>
                     <xs:sequence>
                       <xs:element name="lon" type="xs:double" />
                       <xs:element name="lat" type="xs:double" />
                     </xs:sequence>
                   </xs:complexType>
                 </xs:element>
               </xs:sequence>
             </xs:complexType>
           </xs:element>
         </xs:sequence>
       </xs:complexType>
    </xs:element>
 </xs:schema>
x
Reference: Insert Response Schema
The
following is the schema for ESRI loading insert response document.
<?xml version="1.0" encoding="UTF-8" ?>
  <xs:schema xmlns:xs="http://www.w3.org/2001/XMLSchema">
    <xs:element name="arcsde_CRIME_insert_response">
      <xs:complexType>
        <xs:sequence>
           <xs:element name="Return_Code" type="xs:string" minOccurs="0"
               maxOccurs="unbounded" />
           <xs:element name="Return_Msg" type="xs:string" minOccurs="0"
               maxOccurs="unbounded" />
           <xs:element name="insertRecordNumber" minOccurs="0"
               maxOccurs="unbounded" />
         </xs:sequence>
       </xs:complexType>
     </xs:element>
   </xs:schema>
x
Reference: Delete Request Schema
The
following is the schema for ESRI loading delete request document.
<?xml version="1.0" encoding="UTF-8" ?>
 <xs:schema xmlns:xs="http://www.w3.org/2001/XMLSchema">
   <xs:element name="arcsde_CRIME_delete_request">
     <xs:complexType>
       <xs:sequence>
         <xs:element name="where" minOccurs="1" maxOccurs="1" />
       </xs:sequence>
     </xs:complexType>
   </xs:element>
 </xs:schema>
x
Reference: Delete Response Schema
The
following is the schema for ESRI loading delete response document.
<?xml version="1.0" encoding="UTF-8" ?>
 <xs:schema xmlns:xs="http://www.w3.org/2001/XMLSchema">
   <xs:element name="arcsde_CRIME_insert_response">
     <xs:complexType>
       <xs:sequence>
         <xs:element name="Return_Code" type="xs:string" minOccurs="0"
             maxOccurs="unbounded" />
         <xs:element name="Return_Msg" type="xs:string" minOccurs="0"
             maxOccurs="unbounded" />
       </xs:sequence>
    </xs:complexType>
  </xs:element>
 </xs:schema>
x
Generating Schemas for Geocoding and ESRI Loading
The following procedure explain how to generate schemas
for request and response documents for a Geocoding and ESRI Loading
target.
Note: For the Geocoding and ESRI Loading function, schema
is generated for the ESRI Loading function only. Geocoding is transparent
and does not generate a response document. There is an option available
when you create a Geocoding and ESRI Loading target that allows
the adapter to produce a geocoding response document if needed.
x
Procedure: How to Generate Schemas for Geocoding and ESRI Loading
To generate
schemas for Geocoding and ESRI Loading:
-
Connect
to the Geocoding and ESRI Loading target for which you want to generate
schema.
-
Expand
the target and the ESRIRoot node.
-
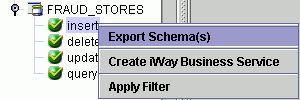
Select
the database table for which you want to generate schema.
The table node expands to display four table functions,
insert, delete, update, and query. The following image shows an
example of an expanded table named FRAUD_STORES.
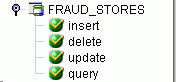
The table functions
are:
-
Insert -
inserts a row into the selected table.
-
Delete -
deletes a row from the selected table.
-
Update -
updates one or more rows in the selected table.
-
Query -
queries a row in the selected table.
Descriptive information
about the table appears on the right under the Detail tab.
This display provides the table name and qualified name, as well
as a description of its function and the date it was created. A
second tab, ColumnList, also appears. An example of a detail display
of a table named FRAUD_STORES is shown in the following image.

-
To see
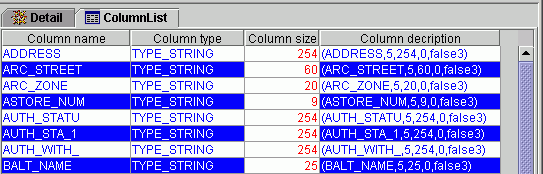
the fields in the table (metadata), click the ColumnList tab.
An example of ColumnList information appears in the following image.
This images shows the name, type, size and description of each column
in an example table.
-
Select
the table function (insert, delete, update, or query) for which
you want to generate schema.
The Request Schema and Response Schema tabs appear next
to the Detail tab, as shown in the following image.
-
Select
either the Request Schema tab or the Response
Schema tab, as required.
The schema appears on the right under the selected tab.
-
To save
the schema to a file, right-click the table function on the left
and select Export Schema(s), as shown in
the following image.
The
Select Export Directory window opens, as shown in the following
image. This window allows you to navigate to a directory, name the
file, and select the file type to save.
-
Select the directory in which you want the schema files to
reside, type a name for the file (if you want a name other than
the default), and select the file type.
-
Click OK.
Both the request and response schemas are saved to the
named directory as text files.
-
Import
the schema files into an XML editor, such as XML Spy.
-
In the
XML editor, create the request and response documents for the specific
geocoding task.
The XML
request and response documents are similar to those for ESRI loading.