SFTP

In this section:

When you connect to a server using Secure File Transfer Protocol (SFTP), SSH encryption is used to protect the connection between your client machine and the server. This protects your password and your data, preventing an eavesdropper from capturing or stealing them as they travel over the network.

Despite the similarity in name and operation, SFTP is a completely different protocol from FTP and does not support all the same features and commands as FTP. Also, while they are both secure file transfer protocols and have similar names, FTPS (FTP with TLS/SSL) should not be confused with SFTP.

To use SFTP for secure connections, the server you are connecting to must also support SFTP. If you try to connect with SFTP to a server that does not support it, you will receive an error. Your network administrator or service provider can tell you if your server supports SFTP, and what other information you might need to use SFTP if it does.


Top of page

x
Password Authentication Versus Key Pair Based Authentication

All the SFTP components support both password-based and key pair-based authentication without password.

In conventional password authentication, you prove you are who you claim to be by proving that you know the correct password. The only way to prove you know the password is to tell the server what you think the password is. This means that if the server has been hacked, or spoofed, an attacker can learn your password.

Key Pair authentication solves this problem. You generate a key pair, consisting of a public key (which everybody is allowed to know) and a private key (which you keep secret and do not give to anybody). The private key is able to generate signatures. A signature created using your private key cannot be forged by anybody who does not have that key, but anybody who has your public key can verify that a particular signature is genuine.

So you generate a key pair on your own computer, and you copy the public key to the server under a certain name. Then, when the server asks you to prove who you are, WinSCP can generate a signature using your private key. The server can verify that signature (since it has your public key) and allow you to log in. Now if the server is hacked or spoofed, the attacker does not gain your private key or password. They only gain one signature. And signatures cannot be re-used, so they have gained nothing.

Note: While using key pair authentication, the private key file path has to be populated in the SFTP component that is invoked. If password based authentication is used, the password field has to be populated while the private key file is left blank. This applies for all SFTP components listed below.


Top of page

x
Components Supported by iwsftp

This section lists components that are supported by iwsftp.


Top of page

x
Configuring the SFTP Listener

This section describes how to configure the SFTP listener.

The following table lists and describes the procedure for the SFTP Listener.

Property Name

Property Description

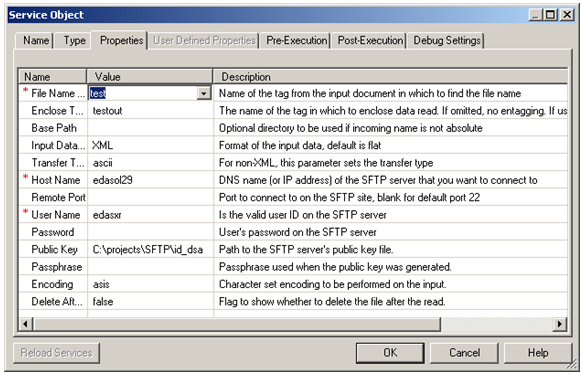
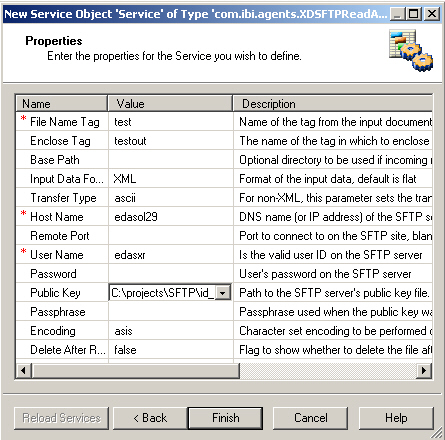
Host Name (required)

The name of host machine where listener contacts the service to obtain requests from.

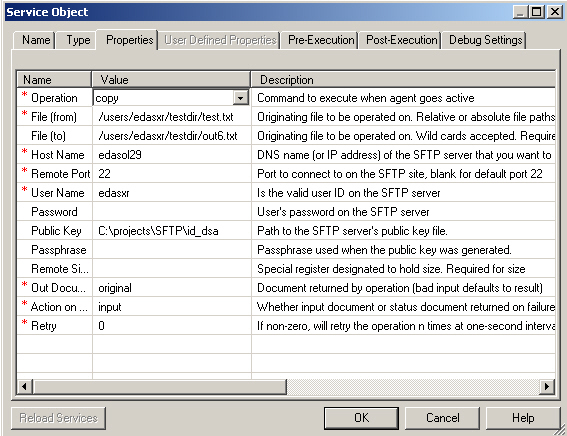
Remote Port (required)

The port to connect to on the SFTP site, blank for default port 22

Input Path

The directory with optional pattern on SFTP host from which to retrieve files. A specific file name or DOS-style pattern) can be used. Do not use suffix in.

Include Symbolic Links (required)

If set to true, then the SFTP listener processes the symbolic links.

Include Hidden Files (required)

If set to true, then the SFTP listener processes the hidden files.

Destination Directory

The directory on SFTP host to return responses to.

Data, Signal or Streaming (required)

Determines how the input will be processed by the SFTP listener. Select one of the following options from the drop-down list:

  • Data. The data file will be retrieved from the SSH server and maintained in memory while processed by the listener.
  • Signal. The data file will be retrieved from the SSH server and stored locally. A signal document will be generated by the listener.

    Note: If Signal is set, then a value for the Local Store Directory parameter must be provided.

  • Streaming. A connection will be opened with the SSH server and data from the file will be retrieved and processed by the listener as required.

Local Store Directory

The directory on the iWay server where files are saved. You must specify a directory path only if the Payload Type parameter is set to Signal.

Remove locally stored files

If set to true, the FTP listener deletes the file stored locally after it is processed. This parameter requires a directory path to be specified for the Local Store Directory parameter.

Pending Queue

The directory to hold documents which are to be retried later.

Suffix In Filter

This limits input files to those with these extensions. For example, enter "XML,in" to accept files with extensions "xml" and "in". Note that this is not case-sensitive. Do not use a period (.), use a dash (-) to mean no extension, or an asterisk (*) to mean any.

Duration

The maximum time that a document can remain in the retry pending queue.

Retry

The interval between retrying pending requests

Do not unzip ZIP files

This passes ZIP files as a single file for processing (requires ACCEPT FLAT turned on).

Bad File List

This maintains a list of files with errors, preventing them from being re-accessed. If set to true, the files will not be retried.

Delete After Read

This determines whether to delete the file after it is read. If set to true, the file is deleted by the listener. If set to false, the file will not be deleted by the listener.

File Protect

This emits a temporary name and then renames it to the desired name.

Security

User Name

The user ID on the SFTP server.

Password

The user password on the SFTP server.

Private Key

The path to the private key file for public-key authentication.

Passphrase

The passphrase used to protect the Private Key

Other

Whitespace Normalization

Specifies how the parser treats whitespace in element objects. Select preserve (default) to turn off all normalization as prescribed by the XML Specification. Select condense to remove extra whitespaces in pretty printed documents and for compatibility with earlier versions.

Accepts non-XML (flat) only

If set to true, the listener expects flat (non-XML). Automatic parsing is not performed.

Optimize Favoring

Use this when the selection of memory is useful for large input document

Multithreading

The number of documents that can be processed in parallel

Execution Time Limit

The time limit for document execution (in seconds) before it is cancellation is attempted. (Also see system property kill interval. This applies to agent stacks and sets a lower limit for process flows.)

Polling Interval

The interval at which to check for new input

Default Java File Encoding

The default encoding if incoming message is not self-declaring (that is, XML)

Agent Precedence

This changes the order by which the engine selects agents. Normally the document overrides the listener. This is used to manage iWay documents

Always reply to listener default

If set to true, the default reply definition is used in addition to the defined replies

Error Documents treated normally

If set to true, the error documents will get processed by any configured pre-emitters

Listener is Transaction Manager

If set to true, the agents run within a local transaction managed by the listener

Record in Activity Log(s)

If set to true, the activity on this channel will be recorded in the activity logs. If set to false, the activity will not be recorded.

Note: The SFTP listener supports streaming. Streaming is used for large documents or documents for which the application needs to split the input into sections under the same transaction. For more information on streaming and configuring streaming preparsers, see the iWay Service Manager Component and Functional Language Reference Guide.


x
Reference: SFTP Listener Special Registers

The following table lists and describes the special registers (SREGs) available on the SFTP listener.

Name

Level

Type

Description

iwayconfig

System

String

The current active configuration name.

msgsize

Document

Integer

The physical length of the message payload.

name

System

String

The assigned name of the master (listener).

protocol

System

String

The protocol on which the message was received.

source

Document

String

The full name of the input file.

tid

Document

String

Unique transaction ID.


x
Procedure: How to Test the SFTP Listener Channel Using a Private Key File Without a Password
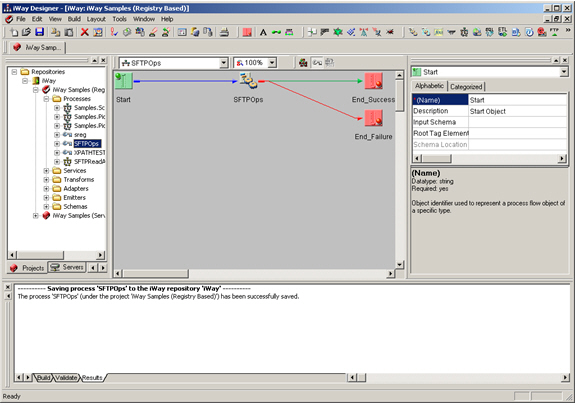
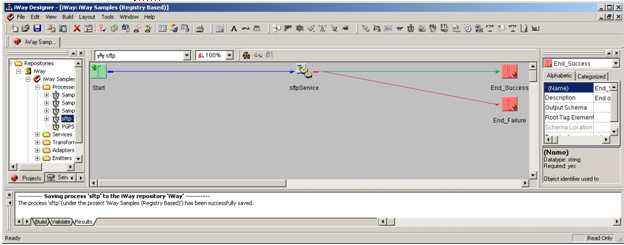
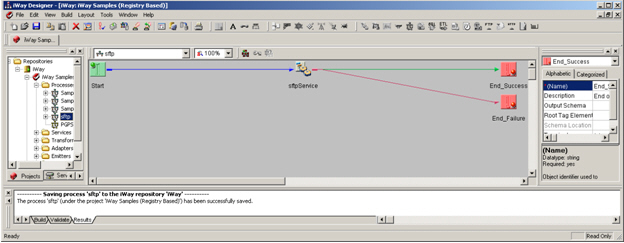
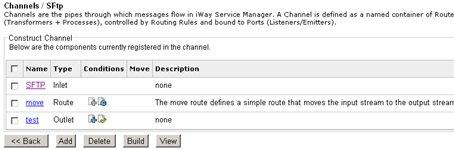
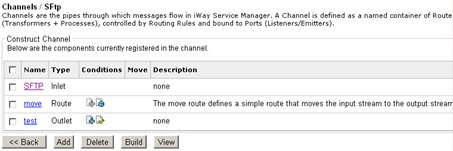
  1. Construct an inlet consisting of an SFTP listener as shown below:

  2. Construct a channel (for example, mySFTP) consisting of the inlet, move Route and a File emitter which writes the output file to a test directory (for example, c:\test).

  3. Build and deploy the channel.
  4. Start the channel.
  5. Place an XML file in the /home/org directory on the SFTP host using SFTP commands, or if the server is a Windows machine, by copying it to the folder.
  6. The SFTP channel processes this message and drops the file into the c:\test directory on the iway client machine.

Top of page

x
Configuring the SFTP Emitter

This section describes how to configure the SFTP emitter.

The following table lists and describes the procedure for the SFTP Emitter.

Property Name

Property Description

Destination

The absolute path of the file which is being emitted at the name of the SFTP server. For instance, if the file needs to be emitted to a machine sftpsrv on the directory /home/org and the file is to be saved as out[1..9].xml then the value of this field would be /home/org/out*.xml@sftpsrv as shown above.

User Name

The user name on the SFTP server that has read and write access to the directory entered in the Input Path field.

Password

The password for user account to use when connecting to protocol host.

Private Key

The SSH private Key file used for server authentication (required is password is omitted).

Pass Phrase

The SSH Passphrase used when Private Key was generated (optional).

Move To

The directory to which the file is to be moved after it is emitted.

File Protect

Emits a temporary name and then renames it to the desired name.


x
Procedure: How to Test an SFTP Emitter Test Channel
  1. Construct an outlet consisting of an SFTP emitter, such as, mySftpEmit as explained in Configuring the SFTP Listener.
  2. Construct a channel (for example, File1) consisting of a file inlet, move Route and a File emitter which writes the output file to a test directory, for example, c:\test.
  3. Build and deploy the channel.
  4. Start the channel.
  5. Copy an XML file to the directory where the File1 listener is listening.

    The File1 channel processes this message and copies the out1.xml file onto the directory on the SFTP server machine, which is /home/org according to the configuration settings in How to Test an SFTP Emitter Test Channel.


Top of page

x
Configuring the SFTP Agents

This section describes how to configure the SFTP agents.

The following table lists and describes parameters for the XDSFTPReadAgent.

Property Name

Property Description

File Name

The special register namespace into which protocol headers from the incoming request will be saved.

File Name not a Document Tag

The special register namespace from which protocol headers for the outbound response will be taken.

Enclose Tag

The name of the tag in which to enclose data read. If omitted, no entagging. If used, output is XML.

Base Path

The optional directory to be used if incoming name is not absolute.

Input Data Format

The format of the input data, default is flat.

Transfer Type

For non-XML, this parameter sets the transfer type.

Host Name

The name of the SFTP server to connect.

Remote Port

The port to connect to on the SFTP site, blank for default port 22.

User Name

The username on the SFTP server through which files are emitted.

Password

The password for user account to use when connecting to protocol host.

Private Key

The SSH Private Key file used for server authentication (required is password is omitted).

Pass Phrase

The SSH Passphrase used when Private Key was generated (optional).

Encoding

The character set encoding to be performed on the input.

Delete After Read

The flag to show whether to delete the file after the read.

The following table lists and describes parameters for the XDSFTPEmitAgent.

Property Name

Property Description

Host Name

The DNS name (or IP address) of the SFTP server that you want to connect to.

Remote Port

The port number used to connect to the SFTP site, blank for default port 22.

User Name

The user ID on the SFTP server.

Password

The user password on the SFTP server.

Private Key

The path to the private key file for public-key authentication.

Pass Phrase

The pass phrase used to protect the private key.

Remote Site Folder

The folder or directory on the SFTP site that you want to use as a starting location when you connect. A blank value defaults to the login directory.

File Protect

This emits a temporary name and then renames it to the desired name.

File Pattern

This specifies the output file pattern to be used.

Retry Interval

The retry interval in seconds (allows for xxhxxmxxs format). Omit or use 0 for no retry.

Return

Select one of the following values:

  • Status. The status document will be the output document.
  • Input. The input document will be the output document.


x
Procedure: How to Test an Emit Agent Using a Private Key File

The test case is similar to the SFTP emitter in section 6. However, in this case an agent is used to emit the file to the SFTP server using private key file. An SFTPEmitAgent would be used instead of an SFTPEmitter when a process flow which performs a sequence of tasks (for a business process) needs to be used and statuses need to be evaluated.

  1. Construct a process flow called sftp, which consists of a service (for example, sftpservice) that refers to the class XDSFTPEmitAgent. Configure the properties of the agent as shown below:

    The properties are explained in the section Configuring the SFTP Emitter.

    As shown in the above example, the value of the Host Name can be

    edasol29

    and the username can be

    edasxr

    where:

    edasxr

    Has write access to the Remote Site Folder directory.

    Also, the Private Key file can point to the id_dsa private key file on the iway server. Enter the values of the fields as shown above.

  2. Construct the process flow as shown below:

  3. Add the sftp process to a route (for example, myRoute).
  4. Construct a channel (for example, File1) consisting of a file inlet, myRoute, and a default outlet.
  5. Build and deploy the channel.
  6. Start the channel.
  7. Copy an XML file to the directory where the File1 listener is listening.

The File1 channel processes this message and copies the out1.xml file to the directory on the SFTP server referred to by the attribute Remote Site Folder on the sftpservice object in the process flow.


x
Procedure: How to Test a Read Agent Using a Private Key File

The SFTP Read agent is used to read files from an SFTP server (drive on UNIX or Windows). It can also be used in tandem with a file listener to embed file contents (the file picked up by the listener) into the xml file read from the SFTP drive by specifying the tag.

  1. Construct a process flow called sftp, which consists of a service (for example, sftpservice) that refers to the class XDSFTPReadAgent. Configure the properties of the agent as shown below:

    The properties are explained under Configuring the SFTP Agents.

  2. Construct the process flow as shown below:

  3. Add the sftp process to a route (for example, myRoute). Construct a channel (for example, File1) consisting of a file inlet, myRoute, and a default outlet.
  4. Build and deploy the channel.
  5. Start the channel.
  6. Copy an XML file (for example, test.xml) to the directory where the File1 listener is listening. This XML file can have the following content:
    <test>c:\test\a.txt</test>
  7. Let the a.txt file consist of the following text:
    This is a sftp readagent test
  8. The File1 channel processes the XML file (test.xml), reading the file a.txt and generates the file testout.xml, which is copied to the destination directory specified for the file listener. The file testout.xml has the following content:
    <testout> This is a sftp readagent test </testout>

Top of page

x
SFTPOps Agent Operations

The SFTP Ops agent stands for SFTP operations. Emits through SSH protocol to a given host<:port> using various common SFTP commands. It can be used to perform operations, such as Copy, Prepend, Append, Size, Move and so on.


x
Procedure: How to Test the SFTP Ops Agent for a Copy Operation
  1. Create a process flow and add a service object for the SFTP File Ops Service (com.ibi.agents.XDSFTPOpsAgent).

  2. Set the Service object class name to com.ibi.agents.XDSFTPOpsAgent.
  3. Set the properties as shown below:

    The From file test.txt is:

    This an SFTPServer test

    The to file out6.txt is:

    <parent><test1>Soumya</test1></parent>
  4. Test run the process flow SFTPOps.

    The to file out6.txt content is modified as:

    This an SFTPServer test


x
Procedure: How to Test the SFTP Ops Agent for a Move Operation
  1. Create a process flow and add a service object for the SFTP File Ops Service (com.ibi.agents.XDSFTPOpsAgent).

  2. Set the Service object class name to com.ibi.agents.XDSFTPOpsAgent.

    Set the properties as shown below:

  3. The From file /users/edasxr/testdir/test.txt is
    This an SFTPServer test
  4. Test run the process flow SFTPOps.

    The From File test.txt is renamed to testmove.txt.


x
Procedure: How to Test the SFTP Ops Agent for a Prepend Operation
  1. Create a process flow and add a service object for the SFTP File Ops Service (com.ibi.agents.XDSFTPOpsAgent).

  2. Set the Service object class name to com.ibi.agents.XDSFTPOpsAgent.

    Set the properties as shown below.

    The From file /users/edasxr/testdir/out6.txt is:

    this is a test

    The to file /users/edasxr/testdir/testmove.txt is:

    for sftpops agent
  3. Test run the process flow SFTPOps.

    The to file testmove.txt content is modified as:

    this is a test for sftpops agent


x
Procedure: How to Test the SFTP Ops Agent for an Append Operation
  1. Create a process flow and add a service object for the SFTP File Ops Service (com.ibi.agents.XDSFTPOpsAgent).

  2. Set the Service object class name to com.ibi.agents.XDSFTPOpsAgent.

    Set the properties as shown below.

    The From file /users/edasxr/testdir/out6.txt is:

    this is a test

    The to file /users/edasxr/testdir/testmove.txt is:

    for sftpops agent
  3. Test run the process flow SFTPOps.

    The to file testmove.txt content is modified as:

    this is a test for sftpops agent


x
Procedure: How to Test the SFTP Ops Agent for a Delete Operation
  1. Create a process flow and add a service object for the SFTP File Ops Service (com.ibi.agents.XDSFTPOpsAgent).

  2. Set the Service object class name to com.ibi.agents.XDSFTPOpsAgent.

    Set the properties as shown below:

  3. Test run the process flow SFTPOps.

    The From file /users/edasxr/testdir/out6.txt is deleted.


x
Procedure: How to Test the SFTP Ops Agent for a Rename Operation
  1. Create a process flow and add a service object for the SFTP File Ops Service (com.ibi.agents.XDSFTPOpsAgent).

  2. Set the Service object class name to com.ibi.agents.XDSFTPOpsAgent.

    Set the properties as shown below:

  3. The From file /users/edasxr/testdir/test.txt is
    This an SFTPServer test
  4. Test run the process flow SFTPOps.

    The From File test.txt is renamed to testmove.txt.


x
Procedure: How to Test the SFTP Ops Agent for a Size Operation
  1. Create a process flow and add a service object for the SFTP File Ops Service (com.ibi.agents.XDSFTPOpsAgent).

  2. Set the Service object class name to com.ibi.agents.XDSFTPOpsAgent.

    Set the properties as shown below:


x
Procedure: How to Test the SFTP Ops Agent for an Exist Operation
  1. Create a process flow and add a service object for the SFTP File Ops Service (com.ibi.agents.XDSFTPOpsAgent).

  2. Set the Service object class name to com.ibi.agents.XDSFTPOpsAgent.

    Set the properties as shown below


Top of page

x
Installing an OpenSSH Server in Windows

Below are steps on how to install an OpenSSH server in Windows:

  1. Install the typical server version found at http://sourceforge.net/projects/sshwindows/.
  2. Run the installer by clicking on defaults.

    Note: No configuration is required during installation.

  3. The install location is C:\Program files.

Top of page

x
Configuring an OpenSSH Server in Windows

Below are steps on how to configure an OpenSSH server in Windows:

  1. Open a command prompt and change to the installation directory (Program Files\OpenSSH is the default).
  2. CD into the bin directory.
  3. Use mkgroup to create a group permissions file. For local groups, use the -l switch. For domain groups, use the -d switch.

    For both domain and local, it is best to run the command twice (remember to use >>, not >). If you use both, make sure to edit the file to remove any duplicate entries.

    mkgroup -l >> ..\etc\group      (local groups)
    mkgroup -d >> ..\etc\group      (domain groups)
  4. Use mkpasswd to add authorized users into the passwd file. For local users, use the -l switch. For domain users, use the -d switch.

    For both domain and local, it is best to run the command twice (remember to use >>, not >). If you use both, make sure to edit the file to remove any duplicate entries.

    mkpasswd -l [-u <username>] >> ..\etc\passwd      (local users)
    mkpasswd -d [-u <username>] >> ..\etc\passwd      (domain users)

    Note:

    • To add users from a domain that is not the primary domain of the machine, add the domain name after the user name.
    • Omitting the username switch adds ALL users from the machine or domain, including service accounts and the Guest account.
  5. Start the OpenSSH server.
    net start opensshd
  6. Test the server. Using a separate machine as the client is best. If you connect but the connection immediately gets dropped, reboot the machine with the server and try connecting again.

    Note: The major rule in using this utility is to only allow trusted users to have login permissions. The cygwin port of OpenSSH uses the full OpenSSH source code and the security of the program is not diluted.


x
Procedure: How to Setup an SSH Login Without a Password Using a Private Key
  1. Connect to your SSH server (for example, edasol29), using your configured credentials.
  2. Create an .ssh folder, under the default login directory. For example:

    /users/[myusername]

    Check permissions on your ~/.ssh folder and make sure to enter the following command if they are wrong:

    chmod 700 .ssh
  3. Generate the keys on the SSH server using the following command:
    ssh-keygen -t dsa

    or

    ssh-keygen -t rsa
  4. Accept the file names provided and enter a passphrase, if necessary.
  5. Create an empty file authorized_keys under the .ssh folder and add public keys. For example:
    mv id_dsa.pub authorized_keys

    The id_dsa private key generated can be used to login without the password to the OpenSSH server.

  6. Copy the private key (id_dsa) to your local Windows machine. You can use Winscp or SFTP.
  7. Launch puttygen.exe. Under actions, select load and load the id_dsa file.
  8. Enter the passphrase you set when you generated the key on the server. Puttygen will now convert the key to a format (.ppk), which is used for SFTP connections by most tools, such as putty, Winscp, and so on.
  9. Save the file as
    privatekey.ppk
  10. Change your putty settings under connection, SSH, auth to use privatekey.ppk.
  11. Try and connect. Enter the passphrase if you have one.


x
The /home Directory

In the passwd file, you will notice that the home directory of the user is set as /home/username, with username being the name of the account. In the default install, the /home directory is set to the default profile directory for all users. This is usually C:\Documents and Settings on Windows 2000 and XP, and C:\WINNT\Profiles on Windows NT 4.0. The location of /home can be edited to fit your special requirements by editing a registry key.

To change the Windows directory /home corresponds to, you will need to edit a registry entry under HKEY_LOCAL_MACHINE\SOFTWARE\Cygnus Solutions\Cygwin\mounts v2\/home. The value of the key named native is the directory that /home is. If you want all your users to enter in a directory on your machine called F:\Users, change native to read F:\Users. By default, each user will then be placed in the directory F:\Users\username, where username is the name of the user account. To place the user directly under F:\Users, change the home directory password to /home.


x
Firewalls

The OpenSSH server listens for traffic on TCP port 22 by default. If your firewall setup does not allow connections on this port, it can be changed by editing the etc/sshd_config file.

Note: For additional troubleshooting and OpenSSH advanced configuration, refer to the readme.txt file, under C:\Program files\OpenSSH\docs


Top of page

x
Converting a Private Key to the OpenSSH Key Format

During implementations of the SFTP listener, you may be prompted to accept a public key from a SFTP server. In this scenario, you must ensure that the private key file being specified for the SFTP listener is generated using OpenSSH key format. Otherwise, the SFTP listener will be unable to open the file. Usually, private key files that are generated for PuTTY interfaces have a .ppk file extension. You must convert the private key file to OpenSSH key format by using the PuTTY Key Generator tool, which can be downloaded from the following website:

http://www.chiark.greenend.org.uk/~sgtatham/putty/download.html

Once you download the PuTTY Key Generator tool, perform the following steps


x
Procedure: How to Convert a Private Key to the OpenSSH Key Format

To convert a private key to the OpenSSH key format using the PuTTY Key Generator tool:

  1. After it is downloaded, open the PuTTY Key Generator tool.

  2. Enter a passphrase when prompted.
  3. Click Conversions from the menu bar and select Export OpenSSH key.

    The Save private key as dialog box opens, as shown in the following image.

  4. Navigate to a directory on your file system that is accessible by iWay Service Manager.
  5. Enter a file name for the private key followed by the .pem extension to distinguish it from .ppk PuTTY key files.
  6. Click Save.

iWay Software