Migrating iWay Design-Time Data
As of iWay Service Manager version 5.5, a design-time
repository called the Registry is provided. The Registry contains
iWay Service Manager components that are used (and potentially reused)
to create iWay channels and services.
Important: In Service Manager, you only need to package
the design-time data for migration. Once it has been imported into
the target server, you will deploy the channels to create their
run-time form. For more information, see Using the Archive Manager in
the iWay Service Manager User's Guide.
This section explains how to migrate the following design-time
metadata:
- Designer Flows
- Transforms
and Ebixes
- Adapter Schemas
- Custom Transform
Functions
- Channels and
Services
x
Migrating iWay Designer Data
Migrating Designer projects and process flows into the
Designer design-time Repository is a two step process:
- Creating
projects to mirror the source Repository structure.
- Moving the
actual flows.
x
Make note of all projects defined in the source iWay
Server Repository, and which process flows each project contains.
Use this list to guide the creation and population of Designer projects
within the target iWay Designer Repository.
If both the source and target iWay server are running and accessible
to one Designer instance, you may do this interactively. You can
connect the new Designer to the old server by defining a new Repository
configuration (see How to Configure a Designer Repository). To use this method, both servers
must be up and connected to the client machine through LAN/WAN.
After creating the projects, there are three different methods
available to move process flows into the Designer Repository for
ongoing development. The mechanism you choose depends on whether
the process flows are:
- Part of a
listener installed from a package.
- Part of a
channel imported from an archive.
- Neither of
the above (unpublished; present only in the Designer Repository
of the source server).
x
Importing From Configuration
This method requires that you have previously migrated
your listeners by installing the appropriate package zip files to
the target server. This is done through the iWay web console, as
explained in Migrating iWay Run-Time Data. Process flows may be moved into the design-time
Repository from a listener by right-clicking on the target project
and selecting Import from Configuration or Registry. In
this case, the source of the process flow is the run-time configuration
where the listener resides. For complete instructions, see the iWay
Designer User's Guide.
x
This method requires that you have previously migrated
your channels by importing the appropriate archives to the target
server. This is done through the iWay web console, as explained
in Using the Archive Manager. Process flows may be moved into the
design-time Repository from a channel by right-clicking on the target
project and selecting Import from Configuration or Registry. In
this case, the source of the process flow is the Registry. For complete
instructions, see the iWay Designer User's Guide.
x
Export as XML and Import From File
If any process flows that require migration are not
part of listeners and/or channels, they are not available through
the Designer Import from Configuration or Registry function.
In this case, you must export these flows as XML files (see Exporting
Process Flows in the iWay Designer User's Guide)
and then import them (see Importing a Process Flow into a
Project in the iWay Designer User's Guide) into
the Designer Repository of the target. This can be accomplished
without both servers running simultaneously or being physically accessible
from one Designer GUI client. The exported XML files should be moved
from the source to the target by a mechanism such as, SMB/UNC file
copy, email, FTP, and so on.
x
Migrating Transform Projects and Ebix Entry Projects
This section describes how to migrate Transform Projects
and Ebix Entry projects from your Source system to a Target system.
x
On the Source system, Transform
project files (.gxp) used by iWay Transformer are located in the
following working directory by default:
[IWAYHOME_1]\tools\transformer\myprojects\transform_projects
where:
- IWAYHOME_1
Is the source directory where iWay Service Manager was installed.
This working directory can be thought of as the workspace of
the Transform project. When creating Transform projects, it is recommended
to keep all supporting files, for example, an input data file or
dictionary, in this location. This setup, along with setting relative
path and embedding your files, helps to migrate your project easily
when required.
Before you migrate a Transform project to your target system,
you must first examine the project to determine which supporting
files are used.
The supporting files of a Transform project can include:
- Dictionary file. An
XML, DTD, or XSD file that is used to represent the dictionary of
the XML input data. If you are using EDI HIPAA, EDI X12, EDIFACT,
or SWIFT formats in your transform, the dictionary consists of a
header and structure file with a .dic extension. (Required)
- Data file. An
input data for your format that contains sample data to model the
transform. (Required)
- Validation file. A
user-defined DTD or XSD file to validate the transform. (Optional)
- Transformation template file. A
template file (.xch) that is used to define a transformation layout
in iWay Transformer. (Optional)
- Custom function. A
custom function is written using Java and can be defined in iWay
Transformer to be used for advanced mapping purposes. For more information
on migrating custom functions, see the iWay Transformer User’s Guide.
(Optional)
As an example, consider the sample Transform project that takes
an EDI HIPAA document as input and transforms the output to XML.
This Transform project consists of:
- EDI_HIPAA_to_XML.gxp. The
Transform project file.
- input.x12. A
sample of HIPAA Health Care Claim Status Request data. This document
is used as the input data file for the project.
- HIPAAHeader.dic. A
standard HIPAA dictionary file, which is used as the header.
- sampleDictionary.dic. A
standard HIPAA dictionary file, which is used as the structure.
During migration, you must copy the Transform project .gxp file
and all of its supporting files to the following directory:
[IWAYHOME_2]\tools\transformer\myprojects\transform_projects
where:
- IWAYHOME_2
Is the target directory where iWay Service Manager is now installed.
x
On the Source system, Ebix Entry project files (.ebx)
used by iWay Transformer are located in the following working directory
by default
[IWAYHOME_1]\tools\transformer\myprojects\package_entry_projects
where:
- IWAYHOME_1
Is the source directory where iWay Service Manager was installed.
This working directory can be thought of as the workspace of
the Ebix Entry project.
An Ebix Entry project file (.ebx) is actually an archive that
consists of the following parts:
- Manifest file (Manifest.mf). Similar
to an iWay package file, it also contains the history of changes
for the custom Ebixes.
- Index file (Index.xml). Lists
every metadata component stored in the current Ebix archive.
- Package file (Package.xml). Contains
the routing table.
- Dictionaries (Ebix entries).
- Metadata components.
- Dependent files (schemas, templates, rules, and so on).
During migration, you must copy the .ebx file of the Ebix Entry
project to the following directory
[IWAYHOME_2]\tools\transformer\myprojects\package_entry_projects
where:
- IWAYHOME_2
Is the target directory where iWay Service Manager
is now installed.
x
Migrating Design-Time Custom Transformer Functions
iWay Transformer supports the use of custom (that is,
user-written) functions to augment the behavior of iWay transforms.
These functions are written in Java and the compiled classes are
stored in jar files in the iWay directory structure.
The Design-Time Custom Transformer functions are located in the
following directory, on the machine which has the Transformer GUI
tool installed:
[IWAYHOME]\tools\transformer\custom_functions
Copy these custom function jar files from this location to the
analogous directory on the new client machine, using OS file copy,
FTP, email, and so on, either directly or through an interim temporary
storage location.
Note: An import statement has changed between iWay versions,
so depending on your source and target version of iWay, you may
need to edit and recompile your custom functions. For more information,
see the iWay Transformer User's Guide.
x
Migrating XML Schemas Generated by iWay Explorer
By default, iWay Explorer stores the XML schemas it
creates in subdirectories under the iWay home directory of the machine
where it is installed. The exact location of the schemas differs
depending on whether you deploy iWay Explorer with an iBSP or a
JCA configuration.
You can backup your existing schemas before migrating from your
source system to a target system.
When the adapter is used with an iBSP configuration, iWay Explorer
stores the schemas in a subdirectory of the iWay installation directory,
for example:
[IWAYHOME_1]\config\base\wsdl\schemas\service\Adapter\TargetName
where:
- IWAYHOME_1
Is the source directory where iWay Service Manager is installed.
- Adapter
Is the name of the adapter you are using.
- TargetName
Is the name of the adapter connection as defined in iWay
Explorer. Under this directory, iWay Explorer creates subdirectories
containing XML schemas.
During migration, you can copy the XML schema files to the following
directory:
[IWAYHOME_2]\config\base\wsdl\schemas\service\Adapter\TargetName
where:
- IWAYHOME_2
Is the target directory where iWay Service Manager is now installed.
- Adapter
Is the name of the adapter you are using.
- TargetName
Is the name of the adapter connection as defined in iWay Explorer.
When the adapter is used with a JCA configuration, iWay Explorer
stores the schemas under a \schemas subdirectory of the iWay home
directory, for example:
[IWAYHOME_1]\config\base\schemas\Adapter\TargetName
where:
- IWAYHOME_1
Is the source directory where iWay Service Manager is installed.
- Adapter
Is the name of the adapter you are using.
- TargetName
Is the name of the adapter connection as defined in iWay
Explorer. Under this directory, iWay Explorer creates subdirectories
containing XML schemas.
During migration, you can copy the XML schema files to the following
directory:
[IWAYHOME_2]\config\base\schemas\Adapter\TargetName
where:
- IWAYHOME_2
Is the target directory where iWay Service Manager is now installed.
- Adapter
Is the name of the adapter you are using.
- TargetName
Is the name of the adapter connection as defined in iWay Explorer.
x
Using the Archive Manager
This section explains how to use the iWay Service Manager
Archive Manager to archive your design-time data for migration.
Using the Archive Manager, you will import components into the Registry.
To migrate design-time data you will:
- Use Archive
Manager to build an archive containing the components you want to
migrate.
- Download
the archive file from the iWay server to your workstation.
- Move (add)
the archive file from your workstation to the target iWay server.
- Import the
archive file to the target iWay Service Manager. This installs all
of the iWay components in the archive.
This section provides the procedures to migrate your iWay design-time data.
x
Procedure: How to Archive Design-Time Data
-
From iWay Service Manager Console on the original server, click Tools,
then in the left pane, select Archive Manager.
Archive Manager opens in the right pane of the Console,
as shown in the following image.
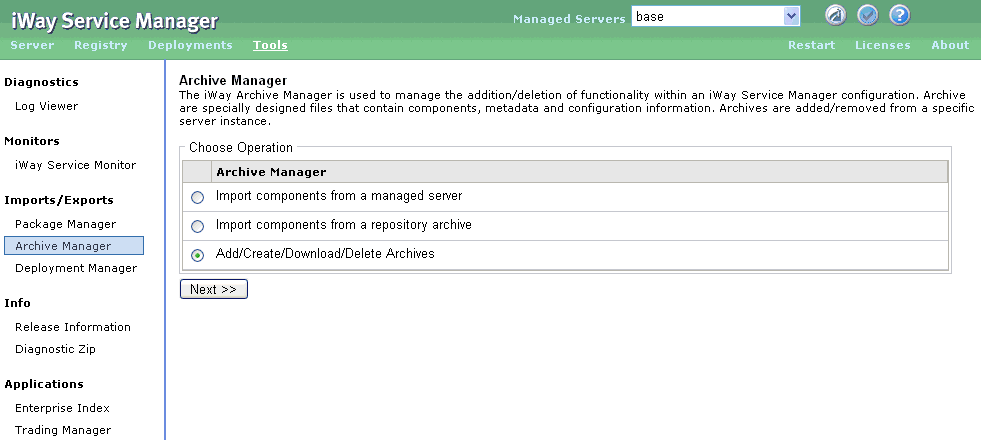
-
Select Add/Create/Download/Delete Archives and
click Next.
The Repository Archives pane opens with a list of available archives.
-
Click Create.
The right pane displays a list of available components
you can export to an archive. The list provides the component type
and a description, and includes adapters, channels, inlets, outlets,
routes, emitters, process flows, and so on.
You can filter
the list using a criteria that will help you locate the items of
interest, for example, route, as shown in the following image.
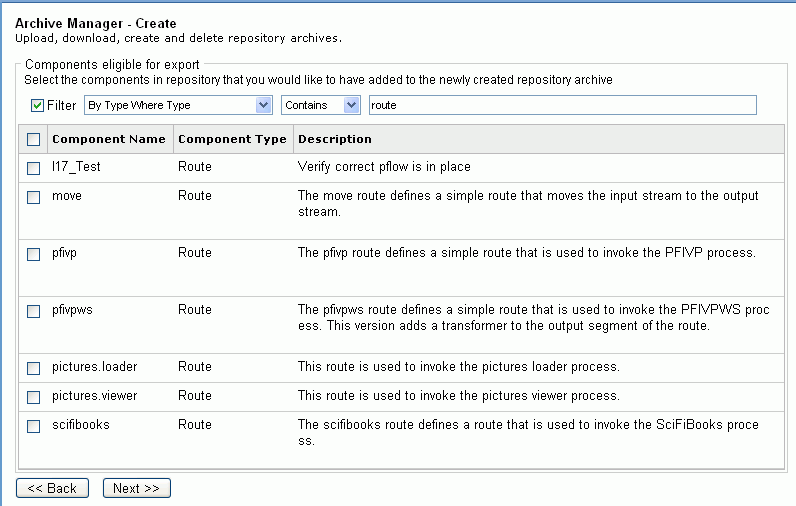
-
Select the components that you want to archive.
Important: If you are very familiar with your application,
you can choose only those components that you need. Otherwise, as
a best practice, select all components to ensure that you migrate
everything needed to maintain the integrity of your application.
-
At the bottom of the component list, click Next.
If you selected an item that contains another dependent
item that was not select, the following pane opens.
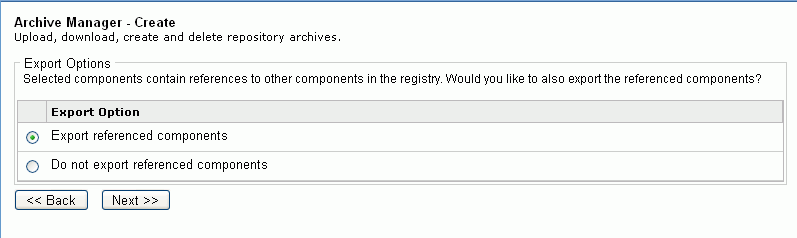
-
Select Export referenced components and
click Next.
The right pane displays the fields for the archive name
and description.
-
Type a name and brief description for the archive file.
Note: Archive names can only consist of only letters,
numbers, and underscores, and must begin with a letter.
The
following image is an example of the name and description pane.
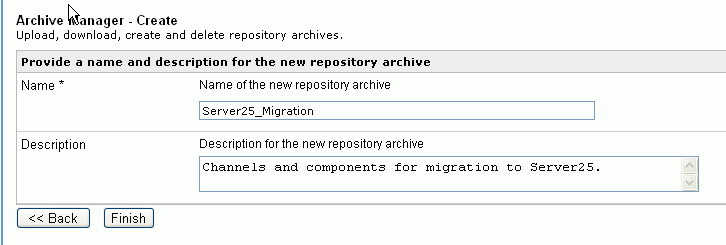
-
Click Finish.
The
Repository Archives pane opens showing the new archive file in the
list.
x
Procedure: How to Download the Archive File to Your Workstation
Use
the following steps to download the archive file to your workstation.
This makes it accessible by your browser.
-
In Archive Manager, select Add/Create/Download/Delete
Archives and click Next.
-
In Repository Archives list, click the Download icon
next to the package you want to download.
The File Download dialog box opens, providing the option
to open or save the archive zip file.
-
Click Save.
-
In the Save As dialog box, specify the directory where you
want the archive file to reside.
-
Click Save.
Note: The dialog box and behavior for saving the
file will depend on your browser.
x
Procedure: How to Add the Archive File to the Target Server
Use
the following steps to add the archive file to the target server.
This makes the archive file available to import into iWay Service
Manager.
-
From the target Archive Manager, select the Add/Create/Download/Delete
Archives, then click Next.
The list of uploaded archive files will be displayed, as
shown in the following image.
-
Click Add.
The Archive Manager Upload pane opens, as shown in the
following image.

-
Type a fully qualified file name or click Browse to
navigate to the archive file.
-
Click Next.
The
archive file is uploaded and appears in the Repository Archives list.
x
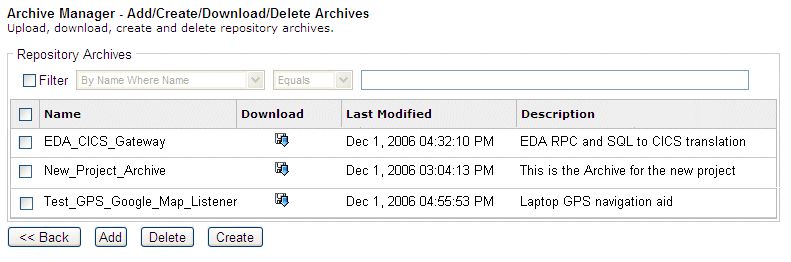
Procedure: How to Import an Archive File From the Repository Archive
Use
the following steps to import the uploaded archive file to iWay
Service Manager on the target server.
-
From Archive Manager, select Import components from
a repository archive, and click Next.
The list of available archive files to import is displayed,
as shown in the following image.
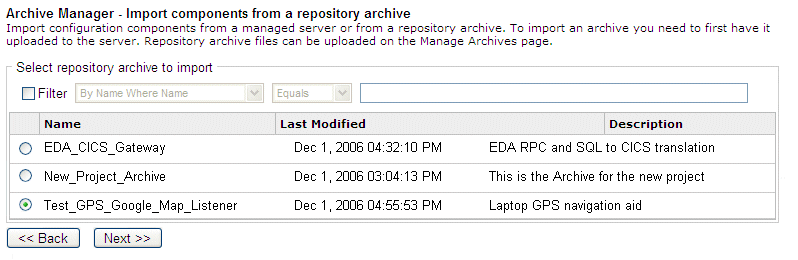
-
Select the archive file you want to import and click Next.
If the components stored in the archive are already present
in your Registry, you will be presented with a page to selectively
replace any preexisting components. As shown in the following image,
two components are selected to be overwritten, the default and move
components.
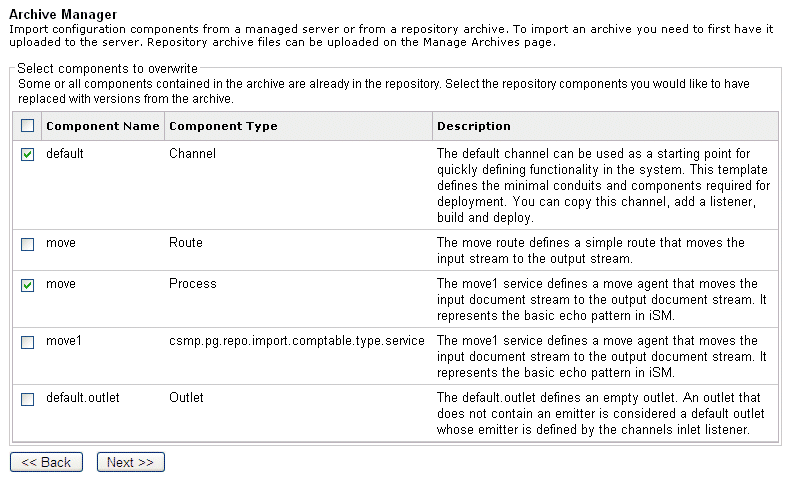
-
Select the component you wish to overwrite, and click Next.
The results page displays the success of importing the
repository archive with the default and move components overwritten,
as shown in the following image.
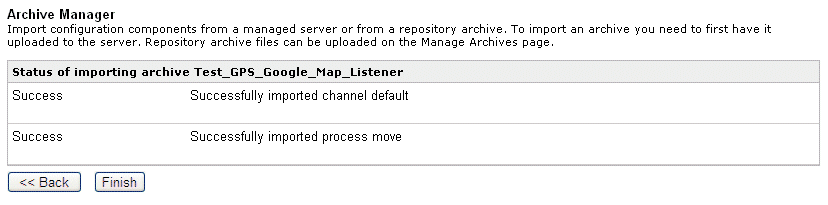
-
Click Finish to return to the main Archive Manager
pane.
x
Deploying Channels in the Target Server
Once the components reside in the target iWay Service
Manager registry, you must rebuild your channels, and then deploy
them. For instructions on building and deploying a channel, see Configuring
Channels in the iWay Service Manager User's Guide.