Once you have added the PGP extension to your iWay Service Manager instance, you are ready to install and configure the PGP extension.
You must first obtain the following .JAR files:
- bcpg_jdkxx_<version>.jar
- bcprov_jdkxx_<version>.jar
Make sure to download the latest versions of the .JAR files from the following website:
http://www.bouncycastle.org
These files must be copied to the following directory:
iwayhome\libwhere:
- iwayhome
Is the location where iWay Service Manager is installed.
The iwpgp.jar file is also required and is provided with the iWay PGP extension installation. This file must be copied to the following directory:
iwayhome\etc\manager\extensionswhere:
- iwayhome
Is the location where iWay Service Manager is installed.
Download the GNU Privacy Guard (gnupg-w32cli-1.4.9.exe) from the following website:
http://www.gnupg.org/download/
To install and configure the iWay PGP extension:
- Execute the gnupg-w32cli-1.4.9.exe file to install the GNU Privacy Guard.
-
Create a system variable called GNUPGHOME, which is
the directory where your keys are created. For example:
C:\Program Files\GNU\GnuPG\keys
-
Add your GNU Privacy Guard installation directory to the System
Path. For example:
C:\Program Files\GNU\GnuPG
- Open a command prompt and navigate to your GNU Privacy Guard installation directory.
-
Execute the following command:
gpg --gen-key
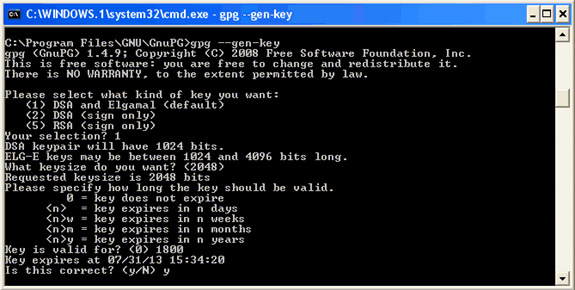
-
Select 5 for RSA key and follow the prompts.
You will be prompted to specify the Real Name. Ensure that the Real Name is not too large, since you will have to type it frequently.
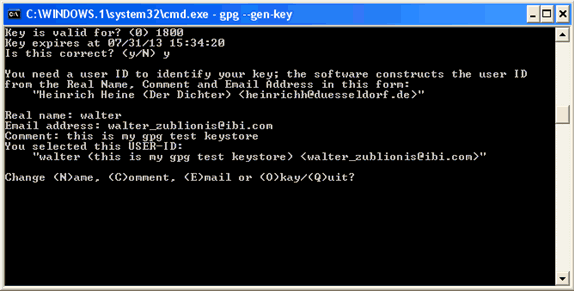
- As an example, enter walter for the Real Name.
- Enter walter_zublionis@ibi.com for the Email Address.
-
Enter this is my gpg test keystore for
the Comment.
Thus, the alias or user ID is walter (this is my gpg test keystore) <walter_zublionis@ibi.com>. This user ID or the alias is used to identify or lookup the key for editing. This should be noted for future reference.
-
Enter hello when prompted for a pass phrase.
Once confirmed, you will have a secret and public key generated in the GNU Privacy Guard home directory. At this point, your key is not enabled for encryption. You must create a subkey.
-
Execute the following command:
gpg --edit-key "walter (this is my gpg test keystore) <walter_zublionis@ibi.com>”
You are now in the GNU Privacy Guard Edit mode.
-
Enter addkey at the command prompt.
You are prompted for a pass phrase.
-
Enter hello at the command prompt.
The following menu is displayed:
Please select what kind of key you want:
(2) DSA (sign only)
(4) Elgamal (encrypt only)
(5) RSA (sign only)
(6) RSA (encrypt only)
- Select 6 to add an RSA encryption key.
-
Enter list at the command prompt.
The pub(public) and sub(private) keys are now available, as shown in the following example:
pub  1024R/FA9F8DE1  created: 2008-09-10  expires: never  usage: SC
trust: ultimate      validity: ultimate
sub  1024R/A3DACF28  created: 2008-09-10  expires: never  usage: E
[ultimate] (1). walter (hello) <walter_zublionis@ibi.com>
Your key is now enabled for encryption.