Using the Deployment Manager
iWay Service Manager provides support for servlet deployment
within various application servers, such as Apache Tomcat, IBM WebSphere,
Sun Application Server, and JBoss. The Deployment Manager allows
you to create a standalone configuration under iWay Service Manager
and then create a corresponding web application (.WAR) that encapsulates
the configuration. The web application includes all the required components
for the configuration and the iWay Software components necessary
to run iWay Service Manager as a standalone web application.
Note: Any required third-party components must be registered
separately with the application server. The deployed iWay Service
Manager servlet is designed to be used as a run-time environment.
However, you can still use the standalone iWay Software design time
tools such as iWay Designer, iWay Transformer, and iWay Explorer
to connect and modify the deployed iWay Service Manager servlet.
Only one .WAR can be used per Application Server configuration.
x
Deploying iWay Service Manager as a Servlet
You must first install the iWay Service Manager release
on your local system and then create a configuration that can include
channels, web services, and any other required components for the
solution. Once the configuration has been fully tested and is ready
to be deployed to the Application Server, follow the steps below.
After the configuration has been deployed, the design time tools
such as Designer, Transformer and Application Explorer can be used
to modify the already running deployed servlet iSM configuration.
x
Procedure: How to Create Web Applications Based on iWay Service Manager Configurations
To
create web applications based on iSM configurations:
-
Open a web browser and point to the following URL:
http://host:port
where:
- host
Is the name of the server where iSM is installed.
- port
Is the port on which the server console is listening. The
default is 9999.
-
In the top pane, click Tools.
-
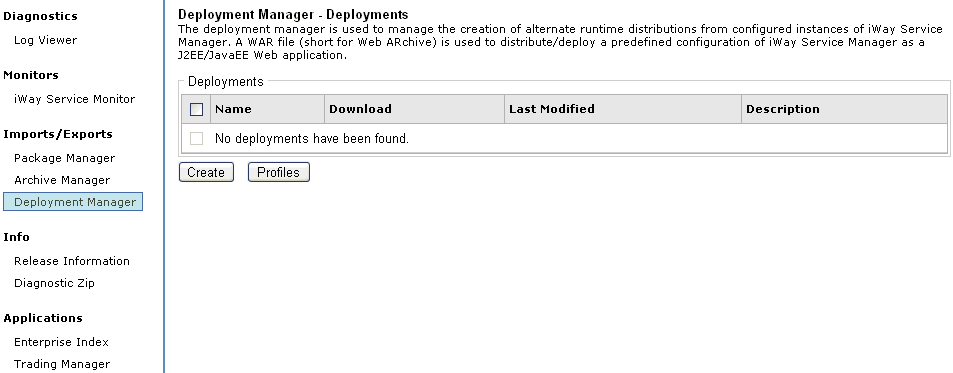
From the Imports/Exports list on the left pane, click Deployment
Manager.
The Deployment Manager pane opens.

-
Click Create to add a new web application module.
-
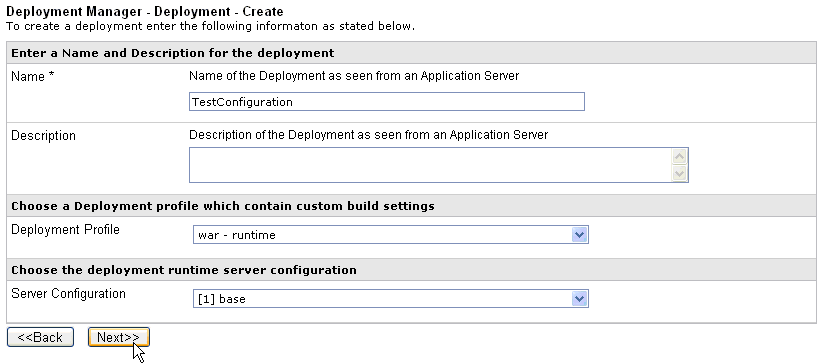
Provide the required configuration parameters, and click Next.

The
following table lists and describes each parameter for the Deployment Manager.
|
Parameter Name
|
Description
|
|---|
|
Name
|
Name of the web application module.
|
|
Descriptions
|
Optional description for the created module.
|
|
Deployment Profile
|
Lists the available deployment profiles:
-
war
- runtime: Includes the required components for the runtime.
-
war
- runtime - adapter: Includes the required components
for the runtime and the adapter configurations.
Additional
custom profiles may be created.
|
|
Server Configuration
|
List of available server configurations.
Select
the configuration for which you created a deployment.
You
do not need to select base since it is included by default.
|
The Special Registers pane opens, which
list the special registers defined within the selected configuration.
Select the special registers you wish to modify for this deployment.
Note: Do
not select the ibse port. The default application server port will be
used for running web services.

-
Click Finish.
After the process is complete, the Deployment file is displayed
in a list and can be selected for download.
To download the
module click on the download icon as shown in the following image.

The downloaded Deployment
file can now be deployed to an Application Server and will reflect
the contents of the deployed iSM configuration that was selected.
x
Deploying Web Application Module to WebSphere
This section describes the deployment of the iSM-based
web application module to the WebSphere environment. This process
would be different depending on the Application Server. Refer to
the User Guide of your Application Server for details on the Application
Deployment. To deploy within the WebSphere 6.1 environment you can
follow the steps provided.
x
Procedure: How to Deploy the Web Application Module to WebSphere
To
deploy the web application module to WebSphere:
-
Connect and log on to the WebSphere Administrative Console.
-
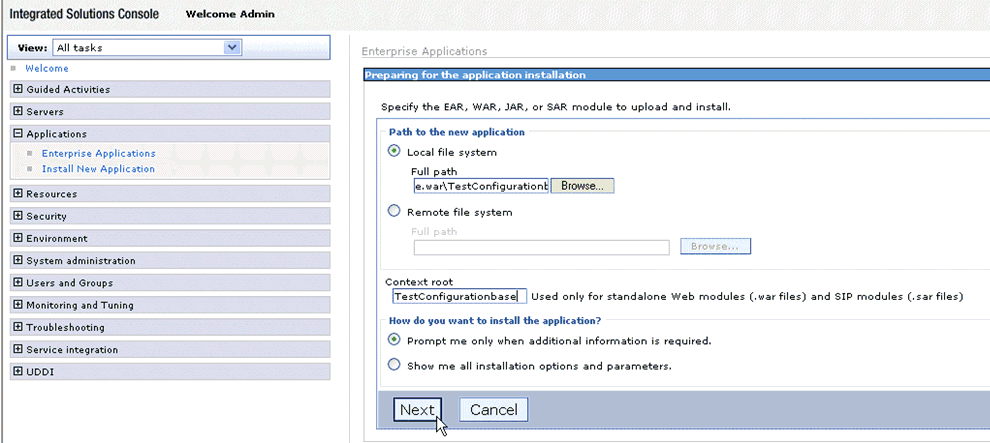
In the left panel, expand the Applications tab and
select Install New Application.

-
Provide the location of the created iSM-based war archive along
with the Context root and continue with the installation
by clicking Next.
Note: The Context root must be consistent
with the web.xml file.
On the following screens of the WebSphere
deployment process, you can either accept all the default configuration
parameters or modify them to fit your WebSphere environment.
-
Deploy the web application module and save the configuration
to the WebSphere server.
Once it is saved successfully, the application can be managed
by navigating to Applications and selecting Enterprise Applications.
It is recommended to restart the server after the installation has
been completed.
-
To test the deployed iSM based Servlet, connect to the web
application URL:
http://host:port/Contextroot/console
where:
- host
Is the server where the web application is running.
- port
Is the port where the web application is running.
- Contextroot
Is the context root provided for the application.
You
will be prompted for the user/password to log on to the iSM console.
After providing the information, you can use the full iSM Console
to manage your configuration and ensure that it is running properly.
x
Connecting Design Tools to the iSM Servlet
This section describes how to use the iWay Design Tools
to connect to the iSM instance that has been deployed into the web
application server. The process for the Design Tool used would be
the same as for the iSM stand alone, with the exception of the connection
URLs used. The connection URLs to establish connectivity to the
Servlet iSM are described below.
x
You can use iWay Designer to connect to the iSM Servlet
repository running within an Application Server. The connection
URL is
http://host:port/Contextroot/console
where:
- host
Is the server where the web application is running.
- port
Is the port where the web application is running.
- Contextroot
Is the context root provided for the application.
x
In iWay Transformer, you can use the Server Manager
feature under Tools to configure a connection to an iSM Servlet.
The connection URL is
http://host:port/Contextroot/console
where:
- host
Is the server where the web application is running.
- port
Is the port where the web application is running.
- Contextroot
Is the context root provided for the application.
x
iWay Application Explorer
You can use iWay Application Explorer to connect to
the Servlet iSM running within an Application Server. The connection
URL is
http://host:port/Contextroot/websvc
where:
- host
Is the server where the web application is running.
- port
Is the port where the web application is running.
- Contextroot
Is the context root provided for the application.
x
This section describes the web services under Servlet
iSM. Complete the following steps to ensure that the web services
are running properly under the Servlet iSM configuration that has
been deployed to the Application server.
- Connect to
the iSM Servlet under the Application Server to access web services.
The URL is
http://host:port/Contextroot/websvc
where:
- host
Is the server where the web application is running.
- port
Is the port where the web application is running.
- Contextroot
Is the context root provided for the application.
A
list of available licenses for the web services appears. The following
table describes the licenses for each web service.
License Name | Description |
|---|
IVP | The IVP License is installed by default.
It is used to install predefined iWay Business Service Provider
Services. |
production | The production License is installed by default.
It is used for production purpose. |
test | The test License is installed by default.
It is used to test iWay Business Service Provider Services. |
Note: You may also connect to the
web services by first connecting to the iSM based console as described
in the previous section. In the iSM console, under the Deployment
section, select Web Services.
- Click on the
IVP license and execute the provided iWay IVP web service. This
will return the iSM version and the current time.
x
Understanding the WEB.XML Configuration File
The web.xml file is a text-based XML file that provides
configuration and deployment information for the web components
that comprise a web application. The web.xml file resides in the
WEB-INF directory under the context of the hierarchy of directories that
exist for a web application. Examples of web components are servlet
parameters, servlet and JavaServer Pages (JSP) definitions, and
Uniform Resource Locators (URL) mappings. The Java Servlet 2.4 specification
defines the web.xml deployment descriptor file in terms of an XML
schema document. For backwards compatibility of applications written to
the Java Servlet 2.3 specification, web containers are also required
to support the Java Servlet 2.3 specification.
You can deploy iWay Service Manager as a web application. Additionally,
you can use the Deployment Manager to create a customizable and
reusable web application.
The following sample illustrates a typical web.xml that
is created by the Deployment Manager:
<?xml version="1.0" encoding="UTF-8"?>
<web-app xsi:schemaLocation="http://java.sun.com/xml/ns/j2ee
http://java.sun.com/xml/ns/j2ee/web-app_2_4.xsd"
       xmlns="http://java.sun.com/xml/ns/j2ee"
xmlns:xsi="http://www.w3.org/2001/XMLSchema-instance"
       id="homebase" version="2.4">
   <display-name>iWay 61 smsp2.13562 - homebase</display-name>
   <servlet>
      <servlet-name>homebase</servlet-name>
      <servlet-class>com.ibi.edaqm.ServiceManager</servlet-class>
      <init-param>
         <param-name>console</param-name>
         <param-value>web</param-value>
      </init-param>
      <init-param>
         <param-name>config</param-name>
         <param-value>base</param-value>
      </init-param>
      <init-parm>
         <param-name>MySpecialRegister</param-name>
         <param-value>ABC123</param-value>
      </init-parm>
   </servlet>
   <servlet-mapping>
       <servlet-name>homebase</servlet-name>
       <url-pattern>/*</url-pattern>
   </servlet-mapping>
</web-app>
x
This section describes the group of special predefined
parameters that are reserved to help control the behavior of iWay
Service Manager.
-
console
This
optional parameter controls the support of a console. It may be
omitted or its value may be left empty. If it is missing or invalid,
no console support is assumed. Currently the only valid value is web.
<init-param>
       <param-name>console</param-name>
       <param-value>web</param-value>
</init-param>
-
ibsp
This
optional parameter names the location of the IBSP that the iWay
adapter will reference. Note that the URL defined in the connection
parameters of iWay adapter targets (typically set to http://localhost:9000)
changes as iSM is deployed as a servlet. To accommodate this change
we instruct IBSP to replace the target endpoints as follows. The
value is taken as a base URL.
<init-param>
       <param-name>ibsp</param-name>
       <param-value>http://localhost:8080</param-value>
</init-param>
x
In addition to the reserved parameters, there may be
additional parameters in your web.xml file. The web application
driver of iWay Service Manager treats these parameters as System
Special Registers. This allows an Administrator the reconfigure the
values of these variables by updating the web.xml file according
to your specific application server implementation. For example:
<init-param>
       <param-name>MySpecialRegister</param-name>
       <param-value>ABC123</param-value>
</init-param>


